Here is a quick look at the contents of this amazing kit:
- Luxe Letterpress Stamp Set
- Luxe Letterpress Impression Plate
- Luxe Letterpress Impression Accessory Plates (3)
- Luxe Letterpress Frame Die
- Luxe Letterpress Envelope Seal Die
- 1 Printable Envelope Seal Labels Download
- 12 (8.5"x11") sheets of Lettra 110# letterpress stock
- 8 (4.25"x5.5") pieces of Lettra 220# letterpress stock
- 3 (8.5"x11") sheets Gold Foil Label sheets
- 1 Gold Doily
- 3 White Feathers
- 1 roll Super Fine Gold Metallic Tape
- 1 roll Gold Metallic Tape
- 1 mini bag Gold Sequin Mix
- Gold Baker's Twine
- Colorbox Cat Eye Metallic Ink Pad
The total retail cost of this kit is $85. There will be a limited number of these exclusive kits available and once they sell out, they will never be available again. The Luxe Letterpress Kit will be available for sale beginning on March 1st at 10pm EST, only at Papertrey Ink. Read all the details on Nichole's blog or contact Customer Service with any questions.
Here are a few things I've made with the kit!

When I opened my box, I had to try the impression plates right away. I used the center ones to create the center for the gold doily card and impressed the design onto the letterpress paper, then trimmed it to fit inside my folded doily. (Folded the edges of the doily, inserted the center letterpress paper that I embossed, and tied around the whole thing with the twine from the kit. I added it to a card base.) I also used the larger impression plate on an envelope! Really love how it looks and can't wait to do this to all my envelopes. Not sure why I never thought of this before.
Here is what the center of the doily card looks like. I used the gold ink pad in the kit to stamp the sentiment.
This is the impression plate and insert I used from the kit on the card above! There are actually 3 different impression plate inserts and also a plain one that cuts, so you can die cut the center out of a card, even if you aren't using the large impression plate with it. So awesome and soooo many possibilities! By the way, the letterpress paper in the kit is AMAZING. So thick, it impresses so beautifully. Really makes a professional looking card.
Here's another look at the envelope. (Envelopes are not in the kit, but I couldn't resist trying this plate on envelopes too!)

______
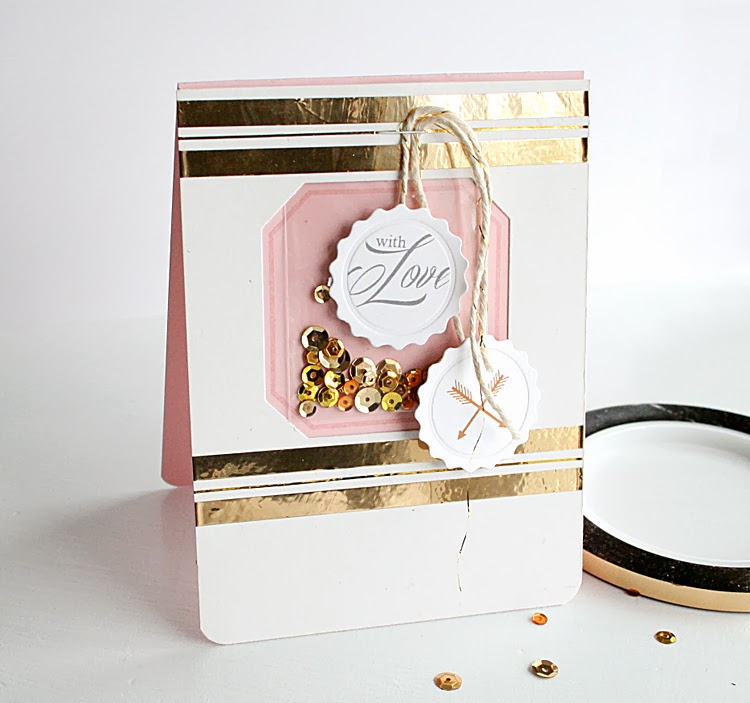
On the next card, I used the gold foil tapes, large and small to create these stripes on my card. I used the center die to die cut a hole in the front of the card and backed it with Sweet Blush cardstock. I stamped the center frame with the kit stamps, then I added a little bag of sequins in the middle from the kit. The bag is the one that the skinny gold foil tape came in!
Speaking of seals, look at all of these seals you get to make, and it's a free download, so you can keep on making them whenever you need one with this amazing seal die! On the gold star one, I cut the seal shape from the gold paper in the kit, then popped the star out with a circle punch and placed it in the center for a layered seal. Or you could emboss on the gold seal! The foil paper would work well for that.
______
My last card is embossed and stamped with a feather added to the front. Simple, but so elegant for a wedding.
Had a hard time photographing today, but the impression is really, really nice and deep on my card. Here is the plate I used in the center, and stamped it with the kit stamps. Placed it over the top of the card.
Here is a little better view of the nice impression in this really great quality letterpress paper!
Visit the Make It Market team to see more with this kit: Betsy Veldman, Dawn McVey, Heather Nichols, Melissa Phillips, Nichole Heady.


12 comments:
Beautiful work, love everything you made, especially all the seal ideas!
Those cards are very very pretty I especially love the first and last one!! Gorgeous!! :)
Beautiful. Love the kit
So beautiful! Love the idea of impressing the envelope.
I knew what letterpress was but didn't think I'd ever need a kit till I saw this one.
BEAUTIFUL!!
LOVE the envelope idea! I have done paper/glassine bags but NEVER thought of an envelope.. THANKS for the inspiration... gonna give it a try!!
Have a GREAT weekend!
I love the envelope idea. Very beautiful cards.
I don't think I've ever seen anything as lovely!
Your beautiful cards are one thing, that envelope, oh I'm in card heaven! I always think it can't get any better, and then you top it!
Danielle, your cards and the envelope are simply divine. Super job showcasing Betsy's kit. And I was thinking I could do without this…but now I have my doubts.
Such elegance and beauty :)
Elegant - can't believe the thickness of that paper.
Between you and Betsy, I was sold! Gorgeous projects as usual.
Post a Comment