Supplies you will need:
*White cardstock or matte finished photo paper: one 8 ½” x 11” piece and one 6 x 12” piece,
*Digital kit and digital saying (I used Carrie Stephen’s Santiago Sunrise kit and Warm Fuzzies kit from Prima Hybrid.),
*3 white Prima flowers (I used Prima #140441.),
*Glitter and glue (I used Glue Dots to adhere the flowers and small butterfly.),
*Twine from craft store.
1. Open a new file that is 8.5 x 11”. Click on the “blob” looking shape in the tool bar. At the top you will see “shape”. Select the butterfly shape. Draw with your mouse the butterfly shape 6” x 5” (or smaller if you wish to have a smaller card).
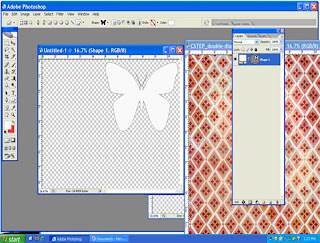 2. Open the patterned paper that you will use on your butterfly. I used Carrie Stephen’s Santiago Sunrise Double Diamond background at Prima Hybrid. Resize it to 6” x 6” by clicking on “Image”, “Image Size”, then put in 6 inches x 6 inches for the measurements.
Click the move tool (arrow and little cross), then drag your paper over the top of your butterfly. Click Control-Alt-G and the paper will take the shape of the butterfly.
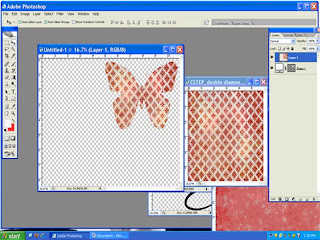 3. Repeat this process to create another smaller butterfly. I used Carrie’s Santiago kit again with the Sunrise Cherry paper. I also opened the long rub on from the kit and dragged it over to my butterfly for the body. If you click Control-T, you can resize it to fit the body.
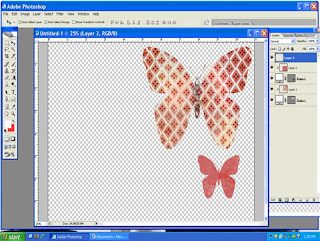 4. Open a sentiment to put on the front of your card. I used Carrie Stephen’s Warm Fuzzies kit from Prima Hybrid that says “Perfectly Sweet”. Using the move tool again, drag it over to your butterfly, and click Control-T to resize to fit.
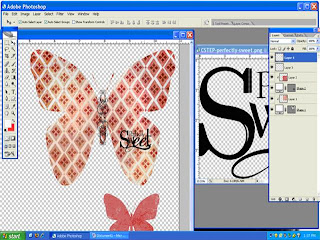 5. Select the Type tool in the tool in the tool bar (T). Add the word “How” right above sentiment and click the check mark at the top of the screen to accept it.
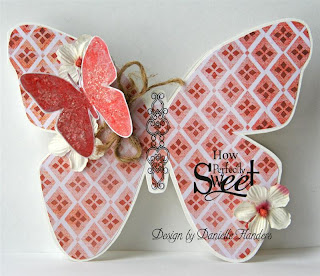
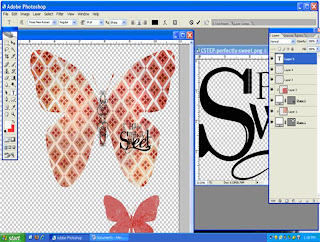 6. Print page out onto white cardstock. Cut out butterflies. Fold a white piece of 6” x 12” cardstock in half for the card base. Attach the large butterfly to front of card with the left top wing ON the fold. Cut around butterfly but do NOT CUT on fold.
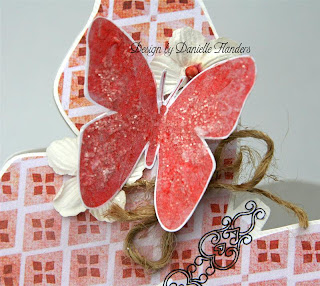
7. Attach glitter to small butterfly. Wrap twine around left top wing and tie in bow. Attach small butterfly over top and 2 Prima flowers. Adhere another flower to bottom right hand wing near saying. You are done! This card would be cute for a baby card or a nice thank you. Finished size is 6” x 5”.


24 comments:
How neat! I cant wait to try this at home!
Love the tutorial - can't wait to try this! I love digital scrapbooking - but I've never tried Hybrid! Thanks for the pointers!
awesome tutorial! may have to give it a whirl. I am assuming it will work close to the same for CS3? And I love how your card came out! you are amazing my dear ;) renee lamb
This is gorgeous! I will see what I can work with. I only have Photoshop 7.0 (I know the dinosaur program). Thanks for sharing though!!
how stinkin cute is that...and your instructions are perfect...thanks dani...
Danielle you are amazing......this card is amazing!!!!!! Thank you so much for sharing your talent and inspiring us all.
Luv Sandie
Merci pour le tutorial, c'est vraiment magnifique, de plus je craque toujours quand il y a des papillons et celui ci est particulièrement beau.
What a gorgeous card Dani!! Your tutorial is just fabulous!! Thanks for sharing it!
WOW Danielle....this is just BEAUTIFUL....I'm gonna give it a try real soon....thanks so much for sharing a bit of your talent with us!!!!! AMAZING!!!
great project!!! someday I'll try hybrid....
Awesome tutorial, Dani. I can't wait to try this!
Great tutorial - I'll have to give it a go! Thanks for showing.
Oh Danielle, you're my life saver! TY for such a fantastic tutorial which I totally needed. As silly as this may sound, but I couldn't figure out HOW I was going to make a folded card with shapes, and HELLO you just showed it. TY TY TY...I love all your projects/designs. A true inspiration and hey, if you know of any sites that offer great monthly card kits, please do let me know. I appreciate it..thanks again doll!
Thanks so much Dani - will give this a try for sure :)
oh, Dani. I'm going to try this one. super neat. and congrats on your cards going out for publication.
Thank you so much for sharing these instructions. I am going to try this today! Love your blog. So glad I found it!
YOUR card is GORGEOUS!!!!!! I love your tutorial, thanks Dani!!!
OHHH and you are so sweet!! Thank you for your comment on my blog :) I adore you! Have a super day!
You know how I need these! Awesome tutorial, sweets.
Very cool, Dani! I just love that card. Thanks for the how-to!
Just happened upon your site (link from Anam Stubbingtons site) and I really enjoyed reading your blog. The hybrid challenge seems very cool and I hope to be able to try it in the very near future. Thanks!
I cant wait to try this the digital thing is all new to me, thanks for the instructions
gorgeous - great idea - I've already made two !
oh Dani, thanks so much for the tutorial! I am going to give this a try! :)
Hey Dani! Thanks for the tutorial and thanks for your cute little gifts for your card challenge! It was a happy mail day for me today. You rock!
Post a Comment