Tuesday, November 15, 2016

Release day...

Tonight is the night when all of the new releases (stamps, dies and such) are available for purchase at www.papertreyink.com! I have a few new sets to share with you.
Here I've used the new Dress Up Dolls: Winter Fun (snowflakes, snowman, mittens, scarf and snowballs) and the new Fill in the Blank stamp set (thank you background).
The background stitching die is cut with Noted: Scalloped A2 Vertical dies. "Warm Winter Wishes" was stamped with an older set, Two Feet Deep. I thought the saying would be cute with the snowman.
Warm Winter Wishes card:
STAMPS: Dress Up Dolls: Winter Fun, Fill In the Blank, Two Feet Deep
INK: Enchanted Evening, Hawaiian Shores, 
PAPER: Hawaiian Shores, white
DIES: Noted A2 Vertical 
OTHER: twine, dimensional adhesive.
------

Next is the new What the Doodle: Piece of Cake and Keep It Simple: Birthday III stamps!
I've tucked the little cake inside the Window Cut Tag die.
Happy Birthday card:
STAMPS: What the Doodle: Piece of Cake, Keep It Simple: Birthday III
INK: Pure Poppy, Versamark
PAPER: Lavender Moon, New Leaf pattern pack
DIES: What the Doodle: Piece of Cake, Basic Cut Tag, Window Cut Tag
OTHER: white embossing powder, Copic markers.
------
Also, I have some news to share with you all...

With great sadness, and after 6 years with Papertrey Ink, 10 full years of blogging and 1295 posts, I've decided to step down from crafting and all of my design teams. 

As some of you might know, I went through a horrible, unexpected divorce last year. It was the roughest year of my life. Since then, I've hung on to crafting, as it was one of the things I enjoyed the most, and although it was very difficult to craft many days when I had to come up with my monthly projects...it did get me through some very hard times.

Since then, I've been picking up the pieces one day at a time. I bought my home and refinanced it in my name. I paid off my car. I met a wonderful guy who showed me that I'm worthy of being loved as I am. An unexpected opportunity came to me a couple of months ago, working with breast cancer patients. This past weekend, they asked me to become full time, working with these patients, scheduling their surgeries and following them for months as they go through their mastectomies and reconstructions. I love my patients! I feel as though my situation, having changed, is driving me with this desire to help others get through their difficult times! I hope to still have time here and there to make things when the inspiration strikes me, and will continue to post my projects when I'm able. I don't want to give up crafting all together. I hope you will continue to stop by now and then to say hello. I will miss my Papertrey Ink family tremendously! Papertrey Ink has been my life the past 6 years!

Paper crafters are the most kind and amazing people, and I'm so thankful for the friendships I've made over the past 10 years through this hobby.

Visit the amazing design team to see more projects with the November release! Love this group of girls!!

Monday, November 14, 2016

Invitation Inspiration...

Today the Papertrey Ink team has more party stuff to show you! We are working with some new dies called Big Basics and the Invitation Basics stamp set. I've made a pre-teen girly party ensemble with an invitation and coordinating envelope and a tag.
The tag was cut with the new Basic Cut Tag and the Window Cut Tag. I stamped on the background tag (Basic Cut Tag) with the Invitation Basics with the balloons. I stamped the Wish Big sentiment with the For You stamps.
The invite is stamped with Invitation Basics and a die cut "You're Invited" is made with Big Basics: You're Invited dies. 
The bow is made with the new Wrap It Up dies.
And last is a stamped envelope to match! I love these products and had so much fun with them!
Party Time Invitation, Envelope and Tag ensemble:
STAMPS: For You, Invitation Basics
INK: Lovely Lady, Bright Buttercup, Vintage Jadeite, Aqua Mist, True Black, Pure Poppy, Raspberry Fizz, Summer Sunrise, Orange Zest, Hawaiian Shores, New Leaf
PAPER: white, Sheer Basics Vellum, True Black Gingham
DIES: Big Basics: You're Invited, Basic Cut Tag, Window Cut Tag, Wrap It Up
OTHER: A2 envelope, sequins.
------

Don't forget to shop November 15th at 10pm EST at Papertrey Ink to get all of the adorable new products we have been previewing this week! Stop by each of these blogs to see more: 

Sunday, November 13, 2016

Birthday Wrap Inspiration...

Today we are previewing a new stamp set called For You and some tag dies and Wrap It Up dies! Let's get started! First I have coordinating tag and card set. I die cut the "happy" tag and colored the word with Copic markers in an ombre fashion with red, orange and yellow, then backed it with the pink/red Ombre Stripes paper. It's stamped with For You as well.

Then I have a coordinating card to go with it, with the same design, just a different sentiment from For You, and backed with a Noted: Scalloped Square die cut card base.

Coordinating Happy Birthday Card and Tag:
STAMPS: For You
INK: True Black
PAPER: white
DIES: For You
OTHER: Copic markers, stars from Studio Calico, twine.
------
Next up are the new Wrap It Up dies, which include this square and adorable 3 layer bow that I cut from the star patterned Sheer Basics Vellum! I used For You again to stamp the sentiment.
I thought this would be fun for a gift card holder. I was going to add the tiny "to/from tag" in the set, but forgot before I took my photos! Darn it! You'll see more of the balloon stamp I used in tomorrow's post!
Don't you think this would make a cute pocket too for a party favor filled with colorful, fun goodies like these straws? A pocket could be made by just stitching or adhering the sides and bottom.
Something For You Gift Card Holder:
STAMPS: For You, Invitation Basics, Polka Dot Basics III
INK: Lovely Lady, Bright Buttercup, Aqua Mist, True Black, Vintage Jadeite
PAPER: white
DIES: Wrap It Up
OTHER: gold tape, twine.
------
Don't forget to shop on November 15th at 10pm EST at Papertrey Ink to get all of the new products we have been previewing this week! Stop by each of these blogs to see more: 

Saturday, November 12, 2016

Beautiful Inspiration...

Today we are previewing a new stamp and coordinating die set called Better Together, a lovely floral set that works well colored, or just stamped on cardstock and patterned paper like I did on this first one!
The background here is made with the new Leaf & Sprig Frames, which you can use individually, but I kept them all together and just embossed the cardstock with all of them. The yellow frame was cut with the new Fill in the Blank dies, and the sentiment was stamped and embossed with red embossing powder. I need to remember to use colored embossing powder more often!
I Can't Thank You Enough card:
STAMPS: Better Together
INK: Versamark
PAPER: Sheer Basics Vellum, white, Lavender Moon pattner pack, 
Harvest Gold pattern pack, Pure Poppy, Aqua Mist
DIES: Better Together 
OTHER: 
------
This card was stamped with Better Together also, with no coloring. 
I stamped the sentiment in the center and embossed it with white embossing powder, then stamped the florals in the corners. Simple and quick and can be made in any color!
People In Your Life card:
STAMPS: Better Together
INK: Hawaiian Shores
PAPER: Hawaiian Shores, Tropical Teal pattern pack
DIES: none
OTHER: white embossing powder.
------
Last up is a card with the Better Together large flower cut from watercolor paper, then stamped and embossed. To color it, I painted it with watercolor paints. The sentiment is from the new Inspired: Mercy stamps and dies.
I tapped a few little drops of watercolor in the background as well. This one is really pretty in real life.
Mercy card:
STAMPS: Better Together
INK: Versarmark, True Black
PAPER: white
DIES: Better Together, Inspired: Mercy
OTHER: watercolor paints, sequins.
------

Better Together will be available at 10pm EST at Papertrey Ink, along with the other new products shown today! Stop by each of these blogs to see more of this stamp set: 

Friday, November 11, 2016

Splits: Happy Birthday...

Today I get to show you a new stamp set by Papertrey Ink that is way funky and cool, a little out of my norm, but I had fun with it! It's called: Splits: Happy Birthday and will be available on Nov. 15th at 10pm EST for purchase at Papertrey Ink!

First up, I used the stamp set on vellum. It's hard to see in this photo, but I used the big striped vellum from this package of Sheer Basics Vellum underneath and stamped the Splits over the top. I added the new Big Basics: Wish Big die over the top with some red enamel dots and shiny blue stars from Studio Calico that I had in my stash. I also used a new die set to create the "stitches" called Noted: Scalloped A2 Vertical dies, coming soon! I really love how it frames out the design!
What do you think about the colors on this one? I kind of love them!
Wish Big card:
STAMPS: Splits: Happy Birthday
INK: Versamark
PAPER: Stormy Sea, Sheer Basics Vellum, Orange Zest
DIES: Noted: Scalloped A2 Vertical dies, Big Basics: Wish Big die
OTHER: enamel dots, white embossing powder.
------
On the next card, I die cut and stamped the Splits: Happy Birthday frame with red ink and cut it in half. I added half of it on the top portion of the card and the other half on the bottom. I used the Noted dies again to cut the red portion and trimmed out the middle to form a focal point for the "Wish Big" sentiment.
This card would be easy to make in any color, for a boy or a girl.
Wish Big card:
STAMPS: Splits: Happy Birthday
INK: Pure Poppy
PAPER: Pure Poppy, Harvest Gold pattern pack, Enchanted Evening pattern pack
DIES: Big Basics: Wish Big, Splits: Happy Birthday, Noted A2 Vertical
OTHER: chipboard star by Pink Paislee, enamel dot.
------
Last, but not least a more masculine card. I tried, folks! I tried!! This is as simple as I could get. Ha! I stamped and colored in the Splits frame die and added an Enchanted Evening patterned paper behind it with a white embossed saying with the Splits stamp for the sentiment.

Happy Birthday card:
STAMPS: Splits: Happy Birthday
INK: Enchanted Evening, Versamark
PAPER: Stormy Sea, 
DIES: Splits: Happy Birthday
OTHER: 
------
Don't forget to shop tonight at 10pm EST on November 15th at Papertrey Ink to get all of the new products we will be previewing this week! Stop by Nichole Heady's blog to see more, and I'll be back each day through the 15th with more cards and things!

Tuesday, November 1, 2016

Table Service revisited...

Here is an "oldie, but goodie" masking technique using the Table Service stamps by Papertrey Ink. I hope this will inspire you to break out your stamps and get creative! Masking off the sentiment is easy to do and creates a professional look to your cards. I'll show you how...


Step 1: Stamp sentiment in the center of the card first. I'm using the Table Service stamps by Papertrey Ink.

 Step 2: Use a strip of thin paper to cover the sentiment.

Step 3: Stamp circles overlapping the sentiment. You can stamp a few, or fill in the whole card front with them.

Step 4: Remove the paper strip and stamp the flowers in all of the centers. (You can keep the scrap paper on if you need to, if there is not enough room for the flowers on the two ends.)

Step 5: Fill in all of the circles with the floral stamp and lace borders. (Mask off the sentiment again, if you need to, for any of the remaining lace borders inside the circles.)

On my second card, I just used 3 circles for a quick card, but used the same idea with a new color palette.

Simple, yet effective!
Visit the other Papertrey Ink senior design team members to see more with Table Service: 

Also, see below for the October release post which has more projects made with the new stamps and dies that already came out on October 15th at Papertrey Ink!

More October release inspiration...

Today the Papertrey Ink team is hosting one more blog hop to share more projects made with the October release products! You can get them now on the main Papertrey Ink web page HERE!
First up, I've used the new and gorgeous Botanical Blocks IV and Keep It Simple: Just a Note.


The Botanical Blocks stamp was stamped onto Classic Kraft cardstock and embossed with white embossing powder, then colored in with Copic markers. The sentiment was stamped onto vellum and embossed also, then stapled onto the card front.
Just a Note card:
STAMPS: Keep It Simple: Just a Note, Botanical Blocks IV
INK: Versamark
PAPER: Classic Kraft, patterned paper by Gossamer Blue, vellum
DIES: none
OTHER: white embossing powder, Copics, twine, staples.
______

Next is Script Swirls: Christmas stamped onto the card.

After stamping the swirl font, I added the greenery from the same stamp set. I die cut a "merry" word from the Jingle All the Way set and painted it with Liquid Gold paint. The borders are cut with Layered Gift Bow dies.

Merry card:
STAMPS: Script Swirls: Christmas, Jingle All the Way
INK: True Black, New Leaf, Pure Poppy
PAPER: White cardstock
DIES: Layered Gift Bow dies, Jingle All the Way, Tag Sale #4
OTHER: Liquid Gold paint.
______

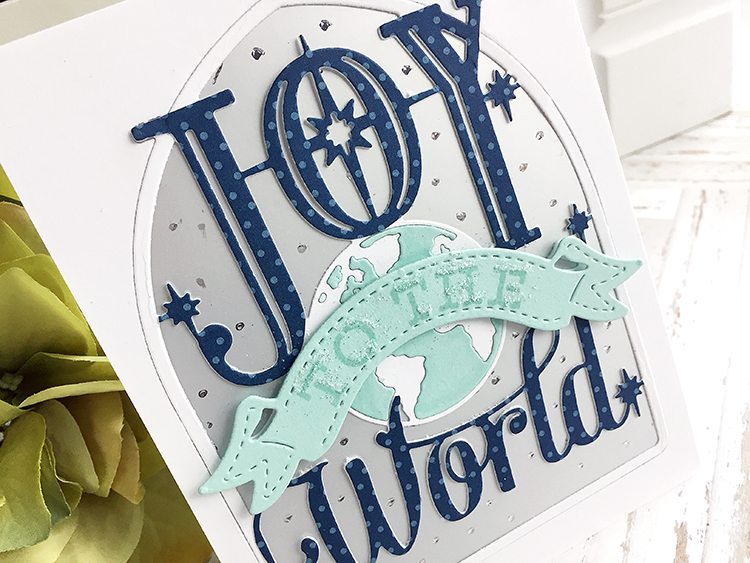
Next is Paper Clippings: Joy to the World stamps and dies. I cut the whole piece out of white, then cut another one with Enchanted Evening paper to trim the words out and glued them over the top. It's backed with Silver Shimmer cardstock.
Last, I used the Paper Clippings: Joy to the World Detail dies to trim out the aqua world and banner. The little dots are made with glue.
Joy to the World card:
STAMPS: Paper Clippings: Joy to the World
INK: Aqua Mist
PAPER: White, Silver Shimmer, Aqua Mist, Enchanted Evening patterned paper
DIES: Paper Clippings: Joy to the World, Paper Clippings: Joy to the World Details
OTHER: glitter.
______

This card is made with Inspired: Hope stamps and dies, Sprig Wreath stamps and dies, and the new Tiny Town Holiday Yard dies (trees).
The sentiment is embossed onto vellum, and the Hope word, wreath and trees were die cut and added over the top.
Hope card:
STAMPS: Sprig Wreath, Inspired: Hope
INK: Green Parakeet
PAPER: Spring Moss, Scarlet Jewel, Pure Poppy, patterned paper - Gossamer Blue
DIES: Sprig Wreath, Inspired: Hope, Tiny Town: Holiday Yard (trees)
OTHER: vellum, embossing powder, twine.
______

Last, one more tag set with the Script Swirls: Christmas. I wanted to try them onto the Tag Sale #4 die.
The Jingle All the Way dies were used to create the gold words over the top, painted with Liquid Gold paint.

Tag set:
STAMPS: Script Swirls: Christmas, Jingle All the Way
INK: True Black, New Leaf, Pure Poppy
PAPER: white
DIES: Jingle All the Way, Tag Sale #4
OTHER: Liquid Gold paint, seam binding.
______