Showing posts with label thank you. Show all posts

Tuesday, November 15, 2016

Release day...

Tonight is the night when all of the new releases (stamps, dies and such) are available for purchase at www.papertreyink.com! I have a few new sets to share with you.
Here I've used the new Dress Up Dolls: Winter Fun (snowflakes, snowman, mittens, scarf and snowballs) and the new Fill in the Blank stamp set (thank you background).
The background stitching die is cut with Noted: Scalloped A2 Vertical dies. "Warm Winter Wishes" was stamped with an older set, Two Feet Deep. I thought the saying would be cute with the snowman.
Warm Winter Wishes card:
STAMPS: Dress Up Dolls: Winter Fun, Fill In the Blank, Two Feet Deep
INK: Enchanted Evening, Hawaiian Shores, 
PAPER: Hawaiian Shores, white
DIES: Noted A2 Vertical 
OTHER: twine, dimensional adhesive.
------

Next is the new What the Doodle: Piece of Cake and Keep It Simple: Birthday III stamps!
I've tucked the little cake inside the Window Cut Tag die.
Happy Birthday card:
STAMPS: What the Doodle: Piece of Cake, Keep It Simple: Birthday III
INK: Pure Poppy, Versamark
PAPER: Lavender Moon, New Leaf pattern pack
DIES: What the Doodle: Piece of Cake, Basic Cut Tag, Window Cut Tag
OTHER: white embossing powder, Copic markers.
------
Also, I have some news to share with you all...

With great sadness, and after 6 years with Papertrey Ink, 10 full years of blogging and 1295 posts, I've decided to step down from crafting and all of my design teams. 

As some of you might know, I went through a horrible, unexpected divorce last year. It was the roughest year of my life. Since then, I've hung on to crafting, as it was one of the things I enjoyed the most, and although it was very difficult to craft many days when I had to come up with my monthly projects...it did get me through some very hard times.

Since then, I've been picking up the pieces one day at a time. I bought my home and refinanced it in my name. I paid off my car. I met a wonderful guy who showed me that I'm worthy of being loved as I am. An unexpected opportunity came to me a couple of months ago, working with breast cancer patients. This past weekend, they asked me to become full time, working with these patients, scheduling their surgeries and following them for months as they go through their mastectomies and reconstructions. I love my patients! I feel as though my situation, having changed, is driving me with this desire to help others get through their difficult times! I hope to still have time here and there to make things when the inspiration strikes me, and will continue to post my projects when I'm able. I don't want to give up crafting all together. I hope you will continue to stop by now and then to say hello. I will miss my Papertrey Ink family tremendously! Papertrey Ink has been my life the past 6 years!

Paper crafters are the most kind and amazing people, and I'm so thankful for the friendships I've made over the past 10 years through this hobby.

Visit the amazing design team to see more projects with the November release! Love this group of girls!!

Thursday, August 25, 2016

Creative uses for stamps...

This week at the Scrapbook Expo blog, I have a little post on looking at your stamps in a different way. Can you guess what stamp I used to create these corners that I used to make a frame around the sentiment?

Stop over to the Weekly Scrapper to read more, and leave a link with stamps you've used in unconventional ways...I'd love to see what you're making also!
Thank You card:
STAMPS: Pedal Pusher, Paper Clippings: Thankful For You by PTI
INK: Lovely Lady, Simply Chartreuse, Pure Poppy, Bright Buttercup, True Black by PTI
PAPER: white, Green Parakeet + White Basics
DIES: Die-Namics Four Way Chevron Cover Up by My Favorite Things
OTHER: seam binding, paper clip, sequins.

Sunday, April 10, 2016

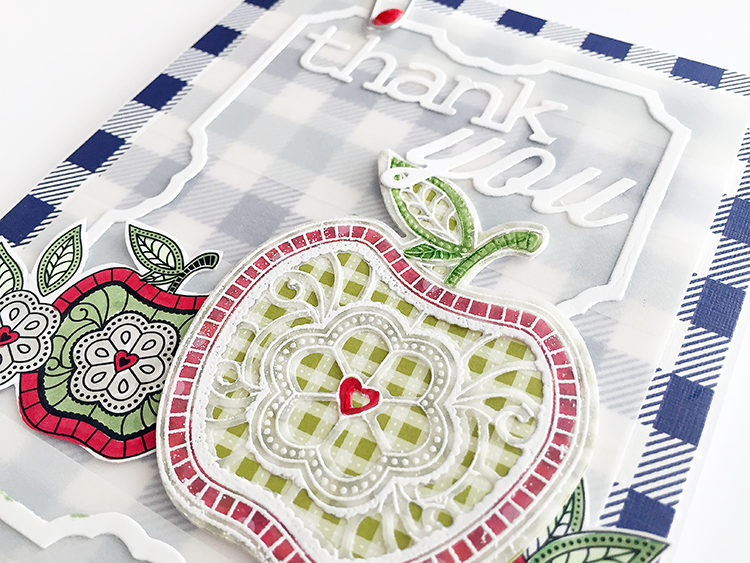
Introducing What The Doodle: Apple...

Welcome to the Papertrey Ink countdown for April! All of the new products you see here today will be available for purchase on 4/15 at 10pm EST at Papertreyink.com. Today I get to introduce to you a new stamp set and dies called What the Doodle: Apple. I loved working with these and can't wait to make more!
What the Doodle: Apple stamps, dies and Coloring Sheets were used to make 4 cards that I put in a clear card box with envelopes/and a tag for a teacher gift! 
On the first card, I added some Sheer Basics Vellum over a Chicken Scratch Gingham paper. I used a part of the Cover Plate: Pretty Frame Die to add a little frame. I colored one of the What the Doodle: Apple Coloring Sheets, and then I made a pretty apple to go over the top with vellum.

To make the large apple, I used the dies to cut a back layer from the tiny gingham and a top layer from vellum. I stamped the apple onto the vellum and embossed it with white embossing powder. Then colored it on the back of the vellum with Copics!

Next up are 3 cards with the What the Doodle: Apple Coloring Sheets, love these! I colored this one in with Copics and added 2 layers of the Thank you die cut with the Wonderful Words: Thank You die. I colored the die cut with a gray W3 Copic marker.
On the second one, I used some different colors and ink blended the background with New Leaf ink. The frames added are from the Cover Plate: Pretty Frame die again. (Just the outer portion)
The last one is another Coloring Sheet that I used slightly different colors on. 

Then I packaged them all up in a clear card box and created a tag with the Minute To Make: Holiday  Tags die.
The stamps were used on the tag and colored in with Copics again! 


Thanks Teacher gift card box:
STAMPS: What the Doodle: Apple
INK: True Black, New Leaf
PAPER: Sheer Basics Vellum, What the Doodle: Apple Coloring Sheets, 
Chicken Scratch Gingham, Ripe Avocado Pattern Pack
DIES: What the Doodle: Apple dies, Wonderful Words: Thank You die, 
Minute to Make: Holiday, Cover Plate: Pretty Frame die, 
OTHER: white embossing powder, paper clip, enamel dot, twine, 
Copic Markers = R29, W3, YG63, YG11.
------

Visit Nichole Heady to see more previews of what's coming this month!

Wednesday, January 20, 2016

Watercolor pencils: a video tutorial...

Happy Wednesday! Will you get any crafting time in today? Perhaps some watercoloring? If so, hop over to Scrapbook Expo's Weekly Scrapper blog to watch a new video tutorial I filmed yesterday using the new Bold Blossoms Watercolor Sheets by Papertrey Ink and watercolor pencils. You can view the video HERE.

There is also a Bold Blossoms stamp set and some Bold Blossom coloring sheets available at Papertrey Ink, if you are more of a stamper or prefer to color with Copics and other coloring mediums. I hope you enjoy seeing the process with the watercolor pencils, and let me know if you have any questions! Have a great day!

Saturday, August 29, 2015

SAF 2015: Threads Challenge...

Welcome to another challenge for the Stamp-a-Faire event today, this one is the Threads Challenge! I was assigned to work on a few projects using twine, so I came up with a "Ten Trendy Twine Techniques" video!


If you know me, you'll know I have a love for twine and seem to add it to almost every project! It gives that little touch of softness, color and dimension to a card that I just adore. In my video, you'll see ten twine techniques that I use quite often on my greeting cards...as well as some brand new twine techniques as well. Twine is inexpensive and so easy to add to your projects in so many different ways! CLICK HERE to watch the twine video, then create a project for your chance to win!


Official Customer Challenge:
Choose one of the ten twine techniques shown in this video and use it on a card, tag or project.

1. Wrap twine around a card where two patterns meet to create a border.
2. Add a piece of twine to a section of a card with staples.
3. Wrap twine around an embellishment before attaching to a card.
4. Create a twine nest or branches with jute twine.
5. Use twine as balloon strings.
6. Stitch with twine.
7. Bundle twine behind a focal point.
8. Tie twine onto a tag.
9. Create faux crocheted flowers with twine.
10. Create luggage tag tied buttons with twine.


Twine Techniques video supplies: 
STAMPS: Button Up, Cutting Garden, Background Basics: Herringbone
INK: True Black
PAPER: Spring Moss, white
DIES: Circle punch,Vintage Linens die, Button Up dies, 
Cover Plate: Stitched die, Tremendous Tags dies
OTHER: Twine (Colored twine, Rustic Cream Twine, Rustic Jute twine)

Wednesday, August 5, 2015

MFT Card Challenges...

Good morning! I have a special post today, as I am honored to guest design for My Favorite Things this month! Each Wednesday in August, I'll be posting a sketch and a card inspired by the sketch. Hope you can play along too! Here is the first sketch:
When I first looked at the sketch, I saw the four squares and decided to interpret that into four items. Then I grabbed a stamp set and matching dies to work with: the Count the Stars Clear Stamps and the Stars & Wishes dies by My Favorite Things. I went to die cutting 4 of the "Stars" words to use on my card and stacked them for a rainbow effect.
Four of the Star words ended up being too many, and I felt like it was too crowded on my card, so I ended up with three die cut words instead. To create a dreamy background, I stamped and embossed the little stars in white embossing powder. Then I used a felt pad and some aqua ink to rub over the star images. The effect is a dreamy, soft look that helps set off the die cut words! 

Last, I stamped the sentiment on a strip, and instead of placing it under the focal point like in the sketch, I placed it over the top. 

The sketch really gave me a starting point to start with, then I took it from there and went my own direction with it. See you next week with another sketch and card! Be sure to play along at MFT Card Challenges for your chance to win a prize from MFT!
Danielle

Sunday, May 31, 2015

Make It Market: Nostalgic Notions...

The next Make It Market Kit from Papertrey Ink will be available for sale on June 1st and is entitled "Nostalgic Notions".  Betsy has always had a way of making the style of the 1940's shine, and this new collection of products really demonstrates that.  From beautiful patterned papers to perfectly selected accents, you will see the 1940's come to life when you open this kit!  She makes it easy to put together coordinated projects that will only take minutes to make!  So prepare to step back into the past and create cards, tags and gifts that will stand the test of time!


NOSTALGIC NOTIONS KIT CONTENTS:


  • Nostalgic Notions stamp set (2 sheets)
  • Nostalgic Buttons mini stamp set + label
  • Nostalgic Notions die collection
  • Nostalgic Notions Accessories die collection
  • Nostalgic Notions paper collection, 36 A2 sheets
  • (12) Fold & Go Air Mail Envelope sheets
  • (2) Vintage Paper Lace Trim Strips, 3" x 39" each
  • Blue Floral Crochet Edged Bias Tape, 1 yard
  • Red Dot Crochet Edged Bias Tape, 1 yard
  • (3) Light Blue Resin Bows
  • Nostalgic Button Assortment, 15 buttons total
  • (1) Red Mulberry Flower bouquet, 5 flowers total
  • (1) Yellow Mulberry Flower bouquet, 5 flowers total
  • (2) Denim Mulberry Flower bouquets, 10 flowers total
  • (2) Light Blue Mulberry Flower bouquets, 10 flowers total
  • Notions storage box

  • The total retail cost of the "Nostalgic Notions" Kit is $100. There will be a limited number of these exclusive kits available, so be sure to get yours on Monday! The "Nostalgic Notions" Kit will be available for sale beginning on June 1st at 10pm EST, only at Papertrey Ink. Read all the details on Nichole's blog or contact Customer Service with any questions.

    Here are some things I made. First, a card with the pretty papers.
    The background is a paper from the kit. I stamped the sentiment and wrapped the little flowers up in a doily from the kit also.
    The little heart is cut out with a die and paper from the kit. And take a peek at those envelopes! So easy, just cut them out and fold!

    Next, a super simple card. I simply stamped the sentiment onto a kit paper.
    Betsy has done all of the hard work for us with these amazing patterns!!

    One more quick one, this is all stamping and die cutting. I used the scallop stamp for a border on white cardstock, then filled in with stamped flowers and dies cut from the papers.

    Then a button from the kit finishes off the corner.

    This kit is most definitely one of my favorites ever, one I will reaching for time and time again!

    P.S. I want to express my thanks to those of you who reached out to me this past month. I really, really do appreciate your prayers and thoughtfulness. My family is going through some very hard times right now. To be honest, for several weeks I just couldn't look at a piece of paper or a stamp. I couldn't even walk into my scrap room. I've cried, I've gotten angry. I have gone through every single emotion a person can go through. A couple of days ago, I found the courage to walk back in and create again. I do miss it. It was my happy place. I hope to try and plow through my feelings of what is happening and get myself back on track. I'm really sorry I don't feel comfortable enough talking about it at this time, but I will eventually...thank you for hanging in there with me. xo

    Danielle

    Wednesday, April 1, 2015

    Gossamer Blue kits for April...

    Happy Spring! Is it warm yet where you are? My girls were just on spring break for 10 days and are now back to school. We had a beautiful warm, sunny week! Went to the movies, to the Denver Zoo, flew kites and did some hiking...and of course, played with friends quite a bit. It was busy...but fun! I am so ready for summer and no schedules again. I love it!

    Just popping in to let you know that the Gossamer Blue kits for April are now available! I'll show you a few things I made with the kits. I received the main kit, the Life Pages kit, the Life Pages Themed Add-on and the Bits and Pieces kit.
    On the Hello card, I mixed some of the kits. I used two Life Pages cards layered together, a colorful 4x6" one and a smaller gray chevron Life Pages card. The I added a floral clip from the Life Pages kit, chipboard flower from the main kit and an arrow from the Life Pages Themed Add-on. (It comes glittered like that - by Crate Paper.) The hello is stamped with the Elle's Studio stamp from the Bits and Pieces kit.


    Next, a quick card made with another Life Pages card. Aren't these fun? Perfect for greeting cards!

    This Life Pages card is a gray dot with notebook lines on it. All I did here was cut a slit for the tab and slide it on, added a sticker and a chipboard word.
    Used another little clip here from the Life Pages kit. Chipboard word is from the Bits and Pieces kit. The word broke as I was taking it out of the bag, so I used it just like it was! Turned out that it fit just right this way!
    Added a tiny bit of machine stitching on the sticker for more dimension. (The pearl was added from my stash. I like how it repeats the white polka dots.)
    And last, a card made with the April main kit only. This one is more "handmade" looking with the paint and stitching.

    One of the Elle's Studio 12x12" papers in the main kit has little "journaling cards" printed on them, so I trimmed one out with the text on it. I wanted it to blend in with the background aqua cardstock a bit more, so I painted around the edges with white acrylic paint.

    Then I added some chipboard, Elle's Studio die cuts and little bits of paper along the edges to resemble washi tapes and to add little bits of pattern and color!

    Hope these inspire you in some way. :) Visit the online Gossamer Blue shop to see the April kits in full!

    Wednesday, January 28, 2015

    resist stamping with watercolor...

    You know me, I love my watercolors! I'm actually taking a watercolor class right now at Craftsy. Love learning more about this technique!

    For today's blog post at Elle's Studio, I've done some stamping with the January stamps (hearts in background) with VersaMark ink, then heat embossed them with white embossing powder. I painted over the top with my watercolor paints starting at the top with a darker, more saturated color, then adding more water to get a lighter color as I painted down the card for an ombre effect!

    You can always add more color if it's not dark enough at first! Watercolor paper is an easy medium to work with for blending color.

    After dry, I added some Elle's Studio die cuts and wood veneer that I've painted red. Visit the Elle's Studio blog for a complete supply list for these two cards and see a super cute Valentine card by Lisa Dickinson and one by Waleska Neris!

    It's been so nice here, almost 70 degrees, so we have been enjoying the sunny, warm break from winter here in Colorado! Hope all is well with you. Happy crafting!

    Saturday, January 10, 2015

    Elle's Studio: January...

    Today is the day the new items are available over at Elle's Studio! I thought I'd share a couple of cards that I made. Her stuff is so cute, I just can't resist it. Sweet colors, typed fonts, little journaling cards, wooden veneer and even stamps!

    On the yellow All My Heart card, I used the yellow frame die cut and popped out the center and angled it just slightly, then overlapped the two pieces over the colorful heart card.
    I added some of the wooden hearts and stamped "all my heart" with the stamp set. You can't see it very good in these pictures, but I also stamped some of the hearts in the background with pink ink and the big heart as a border in the background.
    The yellow card originally came with another saying, but I cut out the thank you from the Word Labels and layered it over the top. I can always use a thank you card!
    The XOXO card began with a white card base, and I used the stamp set to stamp the background sayings. I overlapped two of the die cuts (XOXO and love you), then stitched them together in the center before adhering.
    Elle's kits are limited, and once they sell out, they aren't restocked! Look for a new kit each month on the 10th at 8:00 am PST, and as a special bonus to celebrate launch day, kits will be on sale for $9.99 for today only, regular price after is $11.99. These kits can ship first class. Shipping for USA residents will start around $2.00 and go up from there, depending on the weight of what is in your cart. For overseas, it will run about $6+, depending on your location. The add-ons are also limited and while supplies last, and are made to coordinate with the kit.

    Visit the Design Team Gallery for brand new inspiration! Here are some links for you to shop:

    Saturday, September 27, 2014

    burlap and bouquets...

    Just a couple of cards for fun today made with Fancy Pants' new Burlap and Bouquets line...isn't it lovely? I just layered some of the Large Decorative Tags in the background, some of the Brag Cards on top of that, and then a few of the Ephemera pieces (florals).

    On the Thanks card, I stamped the sentiment with Papertrey Ink's Thank You Kindly stamp set and added some gold twine. The "And" is from the Button Set. It's chipboard, and I love the dimension it gives!
    I'm loving the color black lately. Not sure why, but I think it may be the contrast it lends with the other colors, just makes everything pop!

    Well, I'm very glad you stopped by and hope you are having a great weekend! I'm getting my house all spiffy for my friend Claudia to come over and visit tomorrow. Can't wait to see her again. What are you currently working on? I'll be back soon with some Gossamer Blue cards, the next Make It Market kit called Tinsel & Tags, and another Monthly Moments project, so lots coming!