Showing posts with label heat embossing. Show all posts

Tuesday, August 9, 2016

Cardmaking with washi tapes...

Is it too soon for a holiday card? :)
Today I'm up over at the Scrapbook Expo blog and am working with washi tapes in place of patterned papers. Stop over to read more about this card!

I've used the Tag Sale #4 die, Season's Greetings stamp set, Bigger Blooms stamps and dies and the Basic Bookmark 1 die by Papertrey Ink, along with the washi tapes and embossing powder, twine and sequins.

Swing over to the Weekly Scrapper blog to read more and to see how I store my washi tapes! Do you love washi? How do you use it?

Monday, August 1, 2016

Meadow Greens revisited...

Today the senior Papertrey Ink design team is doing a little blog hop to show you some fresh new ideas for using an older stamp set called Meadow Greens, which you can find HERE! I have two cards that I've used my Zing! Embossing Powders with to create a soft look to the flowers. I've used Powder and Blush.

On the first card, I used a background paper from the Beautiful Brushstrokes paper, an older paper set by PTI. I used the Meadow Greens dies to cut the flower and the stem and stamped and embossed with the Blush Zing! powder. The gray piece was cut from the Noted: Scalloped Square dies. The border is die cut with the Filigree Border die.
The next card also uses a background paper from the older Beautiful Brushstrokes paper pad. I used the Powder Zing! on this one with a little different color scheme from what I normally work with - yellow, blue and brown!
Another Filigree Border die was used here and a sentiment from Meadow Greens stamps again.
The seam binding is the pretty ribbon I often use and is from zipperstop.com. I get it wet with my fingers to scrunch it up, and it dries just how you leave it.
Hope you enjoyed these ideas! Visit Betsy, Dawn, Heather and Melissa for more Meadow Greens projects!

Friday, April 29, 2016

Vellum shakers...

Happy Friday! I'm so looking forward to the weekend, how about you? I wanted to share a quick card that I made for Scrapbook Expo this week that I forgot to post. It started with the butterfly background that I had leftover from cutting out the butterflies in my last post, and I thought I should put it to good use! I layered some leaves over the top, then a piece of vellum and a pretty chipboard floral bouquet. Love how the layers turned out!

To add even a bit more layering, I stamped a "hello" and some leaves over the vellum.

Stop by the Weekly Scrapper blog to read more about the details and process and to see the finished card. See you tomorrow with another post! 

Sunday, April 10, 2016

Introducing What The Doodle: Apple...

Welcome to the Papertrey Ink countdown for April! All of the new products you see here today will be available for purchase on 4/15 at 10pm EST at Papertreyink.com. Today I get to introduce to you a new stamp set and dies called What the Doodle: Apple. I loved working with these and can't wait to make more!
What the Doodle: Apple stamps, dies and Coloring Sheets were used to make 4 cards that I put in a clear card box with envelopes/and a tag for a teacher gift! 
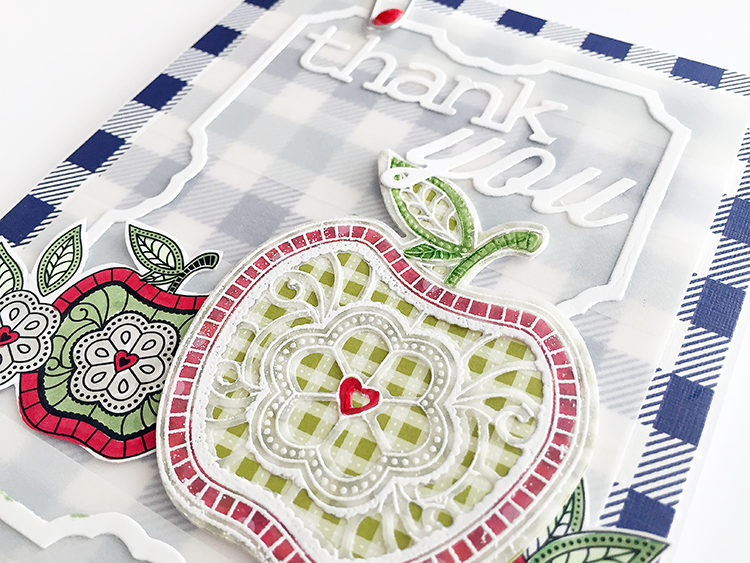
On the first card, I added some Sheer Basics Vellum over a Chicken Scratch Gingham paper. I used a part of the Cover Plate: Pretty Frame Die to add a little frame. I colored one of the What the Doodle: Apple Coloring Sheets, and then I made a pretty apple to go over the top with vellum.

To make the large apple, I used the dies to cut a back layer from the tiny gingham and a top layer from vellum. I stamped the apple onto the vellum and embossed it with white embossing powder. Then colored it on the back of the vellum with Copics!

Next up are 3 cards with the What the Doodle: Apple Coloring Sheets, love these! I colored this one in with Copics and added 2 layers of the Thank you die cut with the Wonderful Words: Thank You die. I colored the die cut with a gray W3 Copic marker.
On the second one, I used some different colors and ink blended the background with New Leaf ink. The frames added are from the Cover Plate: Pretty Frame die again. (Just the outer portion)
The last one is another Coloring Sheet that I used slightly different colors on. 

Then I packaged them all up in a clear card box and created a tag with the Minute To Make: Holiday  Tags die.
The stamps were used on the tag and colored in with Copics again! 


Thanks Teacher gift card box:
STAMPS: What the Doodle: Apple
INK: True Black, New Leaf
PAPER: Sheer Basics Vellum, What the Doodle: Apple Coloring Sheets, 
Chicken Scratch Gingham, Ripe Avocado Pattern Pack
DIES: What the Doodle: Apple dies, Wonderful Words: Thank You die, 
Minute to Make: Holiday, Cover Plate: Pretty Frame die, 
OTHER: white embossing powder, paper clip, enamel dot, twine, 
Copic Markers = R29, W3, YG63, YG11.
------

Visit Nichole Heady to see more previews of what's coming this month!

Monday, March 21, 2016

Make It Monday Video Tutorial: Ink Blending Over Embossing...

Happy Spring! I'm up with today's Make It Monday video #243 at Papertrey Ink this week, and I thought I would show you a technique of ink blending over a heat embossed/stamped image, like I did here on these two cards! It creates a pretty dimension to the design! You can try it on a whole background, part of a background like I did here, or maybe just on a focal point.
For stamps on these two cards, I've used the new Bloomin' Cute flowers and dies, the Bloomin' Cute Sentiment dies, the Background Basics: Text Style stamps, and the You've Been Framed: Oval stamps and dies.
Isn't it funny how different a design can look by simply using different colors?

Visit Nichole Heady's blog to see the video tutorial on these two projects! Thank you for stopping by today. Send me a link if you give this a try, would love to see how it inspired you!

My girls are off for Spring Break all this week, so I'm off to try to figure out how to keep them busy all week. :) Have a great one!

Danielle

Thursday, November 19, 2015

Creative Cardmaker: Inlaid Die Cuts...

Happy Thursday! This week I was up with another Creative Cardmaker post over at Scrapbook Expo's Weekly Scrapper blog. This time I have a tutorial on adding inlaid die cuts to your cards to get a really professional look!


This technique involves die cutting a word or shape out of the card front and inserting another of the same shape in a different color, like I did with the gold "birthday" here on this card.

The result is so lovely! I've used Papertrey Ink's Birthday Cheer dies, Confetti Toss stamps, The Sweet Life stamps and dies, gray paper from the new Stormy Sea + White Pattern Pack, True Black cardstock, and Luxe Gold Adhesive Sheets.

Stop by the Weekly Scrapper to read more about this process! Have a great day!
Danielle

Monday, September 21, 2015

Make It Monday: Two-Toned Sentiments...

Happy Monday! What do you have planned for today? I'm up with this week's Make It Monday video tutorial over at Papertrey Ink. Hope you'll swing by to watch the video and play along in this week's challenge!

The challenge this week is "two-toned sentiments". You can use Papertrey Ink's striped cover plates dies to get this look, or in the video I'll show you how to make these without the cover plates as well. Visit Nichole Heady's blog to see the Two-Toned Sentiments tutorial and play along for your chance to win a Papertrey Ink gift certificate! The Graceful Greetings and Bitty Bouquets stamp sets were used on these cards.

Two-toned sentiment cards:
(All supplies by PapertreyInk.com unless otherwise noted.)
STAMPS: Graceful Greetings, Bitty Blooms INK: True Black, Orange Zest, Raspberry Fizz, New Leaf inks; Versamark ink - craft supply
PAPER: True Black, white
DIES: Bitty Blooms, Cover Plate: Stripes Vertical
OTHER: twine - The Twinery, white embossing powder - craft supply.
______

Have an amazing day!
Danielle

Wednesday, April 15, 2015

Release day...

I have a few more cards to share with you using some new products coming out tonight, April 15th at 10pm EST at Papertrey Ink. First up, is the new Graceful Greetings stamp set!

On these, I stamped the sentiment in Versamark ink, then poured different colors of embossing powder on and heat embossed them to melt the powder. Then I stamped the flowers from Graceful Greetings. 
The papers are from last month's Chicken Scratch Gingham paper pad. These little cards make me so happy! I love all of the colors.

Graceful Greetings card:
(All supplies by Papertrey Ink unless otherwise noted.)
STAMPS: Graceful Greetings
INK: Aqua Mist, Pure Poppy, Summer Sunrise, Harvest Gold, New Leaf, Sweet Blush
PAPER: white cardstock, Chicken Scratch Gingham
DIES: none
OTHER: Zing! embossing powders, twine
______

Next is Petite Places: School stamps and dies and Keep It Simple: Teacher stamps.
The background is from the Black & White All Over paper pad (dot). The scallop is cut with the Scene It: Doily Tag Base.


Thank You, Teacher card:
(All supplies by Papertrey Ink unless otherwise noted.)
STAMPS: Petite Places: School, Keep It Simple: Teacher
INK: Pure Poppy, True Black, Tropical Teal
PAPER: Chicken Scratch Gingham
DIES: Petite Places: School, Scene It: Doily Tag Base, Shaker Shapes: Pencil (loop)
OTHER: Copic Markers, button from Wee Folk mini kit, ribbon-craft supply.
______

Next is Enclosed: Apple and Tucked In: Thank You.
Again I used the Black & White All Over paper pad and added some stamping to the background with Quilted: Spring stamp set. I had stamped this background previously and didn't end up using it, so I found it and pulled it out. I think it works nicely with the reds and greens of the apple! When you are feeling uninspired, try stamping a few backgrounds. Then maybe later on you'll be inspired to use them for something!
Thanks card:
(All supplies by Papertrey Ink unless otherwise noted.)
STAMPS: Enclosed: Apple, Tucked In: Thank You, Quilted: Spring
INK: New Leaf, Ripe Avocado, Pure Poppy, Pinefeather
PAPER: Pure Poppy Pattern Pack, Sweet Blush and Spring Moss cardstock, Black & White All Over Paper Pad
DIES: Enclosed: Apple
OTHER: sequins, twine.
______

Last is Flower Favorites stamps and dies and Lunchbox Love stamps.


Again a Black & White All Over paper is used in the background (frame), then I watercolored a piece to adhere in the center. 

Cheer Up Buttercup card:
(All supplies by Papertrey Ink unless otherwise noted.)
STAMPS: Flower Favorites, Lunchbox Love
INK: Hibiscus Burst, Pure Poppy, New Leaf, Aqua Mist, Harvest Gold, Summer Sunrise, Smokey Shadow Pattern Pack
PAPER: Black & White All Over
DIES: Flower Favorites
OTHER: sequins, watercolors.
______

All of the new things you see here will be available on April 15th at 10pm EST. Thanks for stopping by and please visit the other gals to see what they've made with the same products: 

Wednesday, January 28, 2015

resist stamping with watercolor...

You know me, I love my watercolors! I'm actually taking a watercolor class right now at Craftsy. Love learning more about this technique!

For today's blog post at Elle's Studio, I've done some stamping with the January stamps (hearts in background) with VersaMark ink, then heat embossed them with white embossing powder. I painted over the top with my watercolor paints starting at the top with a darker, more saturated color, then adding more water to get a lighter color as I painted down the card for an ombre effect!

You can always add more color if it's not dark enough at first! Watercolor paper is an easy medium to work with for blending color.

After dry, I added some Elle's Studio die cuts and wood veneer that I've painted red. Visit the Elle's Studio blog for a complete supply list for these two cards and see a super cute Valentine card by Lisa Dickinson and one by Waleska Neris!

It's been so nice here, almost 70 degrees, so we have been enjoying the sunny, warm break from winter here in Colorado! Hope all is well with you. Happy crafting!