Showing posts with label weekly scrapper. Show all posts

Monday, August 8, 2016

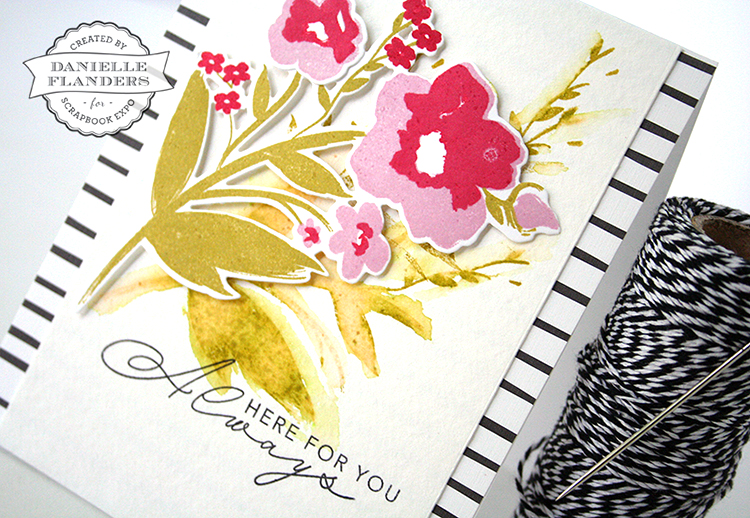
Scored backgrounds...

Recently I was inspired by a gorgeous card by Laurie Willison, which you can see HERE, where she stamped and ink blended her background and then added some amazing dimension with score lines. I wanted to give this neat technique a try!
Inspired by the ink blending on Laurie's card, I used The Sweet Life stamp set to create the flowers and leaves, then brushed some Sweet Blush ink over the top of the flowers with an ink blending tool.

Stop by Scrapbook Expo's blog to read more about this process and see more how-to photos! Thank you to Laurie for letting me use her beautiful card for inspiration!

Tuesday, July 5, 2016

Vellum frames...

It's Tuesday, and that means I'm up again over at Scrapbook Expo's Weekly Scrapper blog! I have a couple of cards created with vellum frames that I made from a 12" x 12" preprinted vellum paper. Please stop by to read more about these HERE!
I've used a couple of Papertrey Ink dies to trim out the centers of the vellum, one is the Fabulous Frames die and one circle die. This creates a pretty focal point for a sentiment or a flower, anything you want to highlight on your card as a focal point!
If you like these cards and would like to learn more about the techniques I typically use to achieve layering and embellishing, you can access my online Craftsy course for half-price right now!


Craftsy courses are online, self-paced, and you can rewind and watch again, ask questions, post pics of your projects, get feedback from instructors and so much more. In the class, I share over 70 cards with you and SO many ideas. Hope you will check it out, and stop over to the SBE blog to read more about these two cards.

Have a great day!
Danielle

Thursday, June 2, 2016

Quilted...

I love the quilted look and am a quilter myself, so I thought it would be fun to bring this look to a card again for today's Scrapbook Expo cardmaking post! I grabbed the Quilted: Summer stamps and dies to make my card. It came together so quickly, just love this set!
First, I die cut the frame and stamped all of the fun triangles! I left some of them white to make it look like a pinwheel. You could also take the frame off and just use the pinwheel, with a stamped stem using the stripe in the stamp set! I die cut a flower and stamped it also.
Then I attached these pieces to a white card base, added the flower over the top. The larger pinwheel pieces are popped up with dimensional adhesive.

The Scripted stamps were used for a sentiment at the bottom.


Hop over to the Scrapbook Expo post to read more about this card. Happy "almost" summer!

Tuesday, May 3, 2016

4x4" Mini Cards...

Happy Tuesday! It's my turn up at the Scrapbook Expo blog again today, and I really love my job over there, because I get to create whatever I want. Fun! I couldn't help but to play with my Don't Forget to Write kit by Papertrey Ink again! I just love these products!! It looks like the kits are still available, if you want to grab one here!

So I made some little 4x4" note cards. I'm not sure I'll be able to give these away. Ha. Aren't they pretty? I tell ya, it's so easy to create with such beautiful products. Makes my job super easy! I wanted to try the square on the diagonal this time and create a diamond shape. I trimmed the card bases with the scalloped card die, then cut and stamped the frames and flowers. Next, I stamped "birthday cheer" in Pure Poppy ink.

The red looks pretty with the aqua watercolor striped paper in the kit. I did some ink blending with a sponge tool to get the gradient effect on the "sending" die cut.
Then of course, I wanted to make another one in different colors, so I made "Just a Note" with Aqua Mist, Tropical Teal and New Leaf inks with Summer Sunrise ink blended onto the sentiment die cut.


Stop over to the Weekly Scrapper blog at Scrapbook Expo later today to see the full tutorial! Have a happy day!

Friday, April 29, 2016

Vellum shakers...

Happy Friday! I'm so looking forward to the weekend, how about you? I wanted to share a quick card that I made for Scrapbook Expo this week that I forgot to post. It started with the butterfly background that I had leftover from cutting out the butterflies in my last post, and I thought I should put it to good use! I layered some leaves over the top, then a piece of vellum and a pretty chipboard floral bouquet. Love how the layers turned out!

To add even a bit more layering, I stamped a "hello" and some leaves over the vellum.

Stop by the Weekly Scrapper blog to read more about the details and process and to see the finished card. See you tomorrow with another post! 

Tuesday, April 5, 2016

Creative Cardmaker: Coloring pages for cardmakers...

Coloring pages for adults seem to be all the rage right now… I mean, really, who doesn’t like to color? It’s so relaxing and reminds me of my childhood love of art! I’ve recently discovered that now cardmakers get to color, too! Check out these neat card-sized paper packs with different designs you can color in with Copic Markers, colored pencils, etc., so much fun: this one is called Fancy Pants Sentiments Coloring Pages by Papertrey Ink. They have others, including a feather-themed pack, a butterfly pack and more. And when you are done coloring, you get to send your finished artwork to someone special in the form of a card!

I’ve chosen this particular sentiment, because I had these tulips all stamped and ready to go, and this “Miss You” coloring sheet has a nice open space in the lower left corner where I can add my tulips. So this one, it is! I’ve also grabbed some Copic markers from my collection that I thought would go well with the colors in the tulips.


What I learned is that I’m not the best colorer in the world, but I had a lot of fun with it, and it sort of turned out with an “artistic” look. I used the R39 Copic Marker to color in the “Miss You,” then shaded around the words with R20. The swirls were colored in with BG10, then shaded with two greens on the ends, YG11 and YG63.


What do you think? Will this be a trend you’ll try? See the Scrapbook Expo blog for the finished product!

Wednesday, March 30, 2016

Watercoloring stamped images...

Happy hump day! Spring break is over for us, thank goodness. Ha. I love my kids, but honestly being with them for 10 days was exhausting. lol This week is flying by! Catching up on cleaning the house (I like when it stays clean for more than an hour!), laundry and some assignments. Yesterday I had a post due for Scrapbook Expo's Weekly Scrapper blog, and I felt like painting with watercolors. I started with some flowers and branches...

Then I wanted to add a pretty bird, so I used the Spring Woods stamp set, stamped it with Aqua Mist and Tropical Teal (it is a 2-step stamp), then added a tiny bit of water over the top to blend it to make it look painted.

Would you have guessed that the bird was a stamp? So easy, right!

Swing by to see the full tutorial and finished card at the Weekly Scrapper blog! I'll be back with more projects either today or tomorrow! :)
Danielle

Thursday, January 28, 2016

Creative Cardmaker: Drawing Inspiration from Scrapbooking Layouts...

Good morning! This week has FLOWN by, hasn't it? I can't believe it's almost the weekend again. Last weekend I had the chance to attend an amazing summit for Craftsy Instructors in Denver, CO! I really want the chance to tell you more about it, so I'll have to plan to write a little blog post about a few things I took away from it. It was so inspiring to be in the same room with hundreds of creative, like-minded people!! You can see a few pics from the 2016 Crafty Instructor Summit HERE on my Facebook page or HERE on my Instagram page.

Until then, I have a new card to share with you that I made for the Weekly Scrapper blog over at Scrapbook Expo. Sometimes I have a hard time figuring out where to get inspiration...especially when life takes over and seems to get in the way of creative time. Ever feel that way?
One of the biggest things that inspire me are scrapbooking layouts! I used to scrapbook before I was a card maker, so I always seem to find inspiration and creativity in scrapbooking...whether it's a color palette, or a cool technique, or an overall design, or even just a little section of layering that looks amazing! There are so many ways scrapbooking layouts can give you ideas for your cards!

Pop over to the Scrapbook Expo blog to read more about what inspired this card - which layout I loved and how I drew inspiration from it - and to get more info on the supplies I used. Thank you for swinging by and saying hello! I hope you're having a great week!!! Happy creating!


Wednesday, January 20, 2016

Watercolor pencils: a video tutorial...

Happy Wednesday! Will you get any crafting time in today? Perhaps some watercoloring? If so, hop over to Scrapbook Expo's Weekly Scrapper blog to watch a new video tutorial I filmed yesterday using the new Bold Blossoms Watercolor Sheets by Papertrey Ink and watercolor pencils. You can view the video HERE.

There is also a Bold Blossoms stamp set and some Bold Blossom coloring sheets available at Papertrey Ink, if you are more of a stamper or prefer to color with Copics and other coloring mediums. I hope you enjoy seeing the process with the watercolor pencils, and let me know if you have any questions! Have a great day!

Tuesday, December 8, 2015

Creative Cardmaker: Tags...

Today I have a quick post up on a couple of ideas using tags over at the Weekly Scrapper!
On this card, I've used the tags, labels and flair from the Happy Place line by Fancy Pants, designed by my sweet and super talented friend, Kim Watson! I've also added a Birthday Cheer die cut by Papertrey Ink.

Swing by the Weekly Scrapper to see another card using these Happy Place tags! Thanks for stopping by!

Thursday, November 19, 2015

Creative Cardmaker: Inlaid Die Cuts...

Happy Thursday! This week I was up with another Creative Cardmaker post over at Scrapbook Expo's Weekly Scrapper blog. This time I have a tutorial on adding inlaid die cuts to your cards to get a really professional look!


This technique involves die cutting a word or shape out of the card front and inserting another of the same shape in a different color, like I did with the gold "birthday" here on this card.

The result is so lovely! I've used Papertrey Ink's Birthday Cheer dies, Confetti Toss stamps, The Sweet Life stamps and dies, gray paper from the new Stormy Sea + White Pattern Pack, True Black cardstock, and Luxe Gold Adhesive Sheets.

Stop by the Weekly Scrapper to read more about this process! Have a great day!
Danielle

Wednesday, September 23, 2015

Creative Cardmaker: Adding unexpected dimension to cards...

Good morning! I'm up with another Creative Cardmaker post over at Scrapbook Expo's Weekly Scrapper blog. Today I'm talking about adding unexpected dimension to your stamped backgrounds, so break out your stamps and dies, and let's get started!

I've used Papertrey Ink's Quilted Summer stamp set for the flowers and stems, the Scripted stamp set for the sentiment, and the Life Is Beautiful dies to cut out the butterflies. For inks, I've used True Black, New Leaf, Pure Poppy and Aqua Mist.

Head over to the Weekly Scrapper to see the full tutorial!

Link me up if you give this a try. Would love to see how it inspired you. 
Have a great day!
Danielle

Tuesday, August 11, 2015

Creative Cardmaker: Stamped Shadows...

I have another post up over at the Weekly Scrapper blog for Scrapbook Expo. Today I'll be showing you how to create shadows with stamps, an ink pad, watercolor paper and a little bit of water!

Swing over to the Weekly Scrapper blog to see how to get the shadow look and play along with the technique. Would love to see what you are making!

Wednesday, August 5, 2015

The Creative Cardmaker...

I am so excited to announce that I will now be hosting a weekly blog column over at Scrapbook Expo's blog, the Weekly Scrapper! Each week, I'll post a handmade card or two along with techniques, videos and so much more to help inspire you in your card making. Hope you'll stop by!

Today I'm up with my first post. I've been asked a few questions on how I made the multi-colored embossed sentiments in my April 15th blog post, so I thought that would be a fun place to start. I'll share with you tips and techniques on how to achieve this multi-colored embossed effect.
Swing over to the Weekly Scrapper blog to see this new tutorial on achieving a fun look with these powders on your cards... and stop back each Tuesday for more card making ideas and inspiration!


And I have one more thing to tend to. I completely forgot to choose a random winner for the Craftsy class giveaway... Congrats Marianne-g! Please send me an email at dflanders71@hotmail.com to claim your free Craftsy class!
marianne-g said...

I've been a fan of your cards for years. I would love to take your class.