Showing posts with label embossing. Show all posts

Monday, March 21, 2016

Make It Monday Video Tutorial: Ink Blending Over Embossing...

Happy Spring! I'm up with today's Make It Monday video #243 at Papertrey Ink this week, and I thought I would show you a technique of ink blending over a heat embossed/stamped image, like I did here on these two cards! It creates a pretty dimension to the design! You can try it on a whole background, part of a background like I did here, or maybe just on a focal point.
For stamps on these two cards, I've used the new Bloomin' Cute flowers and dies, the Bloomin' Cute Sentiment dies, the Background Basics: Text Style stamps, and the You've Been Framed: Oval stamps and dies.
Isn't it funny how different a design can look by simply using different colors?

Visit Nichole Heady's blog to see the video tutorial on these two projects! Thank you for stopping by today. Send me a link if you give this a try, would love to see how it inspired you!

My girls are off for Spring Break all this week, so I'm off to try to figure out how to keep them busy all week. :) Have a great one!

Danielle

Thursday, November 19, 2015

Creative Cardmaker: Inlaid Die Cuts...

Happy Thursday! This week I was up with another Creative Cardmaker post over at Scrapbook Expo's Weekly Scrapper blog. This time I have a tutorial on adding inlaid die cuts to your cards to get a really professional look!


This technique involves die cutting a word or shape out of the card front and inserting another of the same shape in a different color, like I did with the gold "birthday" here on this card.

The result is so lovely! I've used Papertrey Ink's Birthday Cheer dies, Confetti Toss stamps, The Sweet Life stamps and dies, gray paper from the new Stormy Sea + White Pattern Pack, True Black cardstock, and Luxe Gold Adhesive Sheets.

Stop by the Weekly Scrapper to read more about this process! Have a great day!
Danielle

Monday, September 21, 2015

Make It Monday: Two-Toned Sentiments...

Happy Monday! What do you have planned for today? I'm up with this week's Make It Monday video tutorial over at Papertrey Ink. Hope you'll swing by to watch the video and play along in this week's challenge!

The challenge this week is "two-toned sentiments". You can use Papertrey Ink's striped cover plates dies to get this look, or in the video I'll show you how to make these without the cover plates as well. Visit Nichole Heady's blog to see the Two-Toned Sentiments tutorial and play along for your chance to win a Papertrey Ink gift certificate! The Graceful Greetings and Bitty Bouquets stamp sets were used on these cards.

Two-toned sentiment cards:
(All supplies by PapertreyInk.com unless otherwise noted.)
STAMPS: Graceful Greetings, Bitty Blooms INK: True Black, Orange Zest, Raspberry Fizz, New Leaf inks; Versamark ink - craft supply
PAPER: True Black, white
DIES: Bitty Blooms, Cover Plate: Stripes Vertical
OTHER: twine - The Twinery, white embossing powder - craft supply.
______

Have an amazing day!
Danielle

Thursday, August 13, 2015

Introducing Choose Joy + Twig Wreath...

Today we are previewing more new beautiful fall products coming out on August 15th at Papertrey Ink! My cards today are made with two new stamp sets, Choose Joy and Twig Wreath.

I've used the Twig Wreath die in white over the kraft paper that I stamped on with Choose Joy. I added some very fine glitter to the twig wreath, although it's hard to see in the photos. An Autumn Chicken Scratch Gingham Paper in navy brings out the orange flowers.


In Your Heart card:
STAMPS: Choose Joy, Twig Wreath
INK: Canyon Clay, Dark Chocolate, Classic Kraft
PAPER: Classic Kraft, Autumn Chicken Scratch Gingham paper pad
DIES: Twig Wreath, corner rounder
OTHER: fine glitter, seam binding.
______

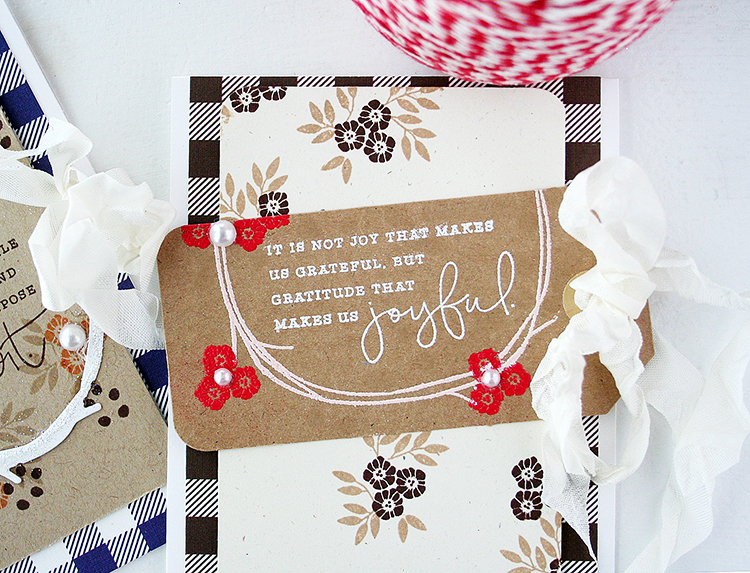
Next up, I used a kraft tag that I had on hand and stamped part of the Twig Wreath onto the tag. The twig wreath is embossed with pink embossing powder, the sentiment from Choose Joy is embossed in white, and I added red embossed flowers over the top. 

Had a difficult time getting a good picture of this one, but it's really pretty in real life!

Joyful card:
STAMPS: Choose Joy, Twig Wreath
INK: Versarmark, Dark Chocolate, Classic Kraft
PAPER: Classic Kraft, white, Autumn Chicken Scratch Gingham
DIES: none
OTHER: pearls, Zing embossing powders.
______

All of these new products will be available August 15th at 10pm EST at Papertrey Ink. Thanks for stopping by, visit the rest of the team to see more twiggy and joyful inspiration:

Wednesday, August 5, 2015

The Creative Cardmaker...

I am so excited to announce that I will now be hosting a weekly blog column over at Scrapbook Expo's blog, the Weekly Scrapper! Each week, I'll post a handmade card or two along with techniques, videos and so much more to help inspire you in your card making. Hope you'll stop by!

Today I'm up with my first post. I've been asked a few questions on how I made the multi-colored embossed sentiments in my April 15th blog post, so I thought that would be a fun place to start. I'll share with you tips and techniques on how to achieve this multi-colored embossed effect.
Swing over to the Weekly Scrapper blog to see this new tutorial on achieving a fun look with these powders on your cards... and stop back each Tuesday for more card making ideas and inspiration!


And I have one more thing to tend to. I completely forgot to choose a random winner for the Craftsy class giveaway... Congrats Marianne-g! Please send me an email at dflanders71@hotmail.com to claim your free Craftsy class!
marianne-g said...

I've been a fan of your cards for years. I would love to take your class.

Monday, April 13, 2015

Introducing Seeds of Knowledge...

The Papertrey Ink team is back with a group post to preview a few more new things coming out on April 15th! Today we are showing sneaks of the new Seeds of Knowledge stamp set, the new Pencil Blooms dies, Pint Size Wrap dies and Pint Size containers.
First, I have a pencil bloom bouquet to share with you. I really wanted to go a different direction than the typical apple red for a teacher gift. I found THIS pic on Pinterest that inspired me to do something different!

Here's my pencil bouquet! I'll tell you how I put it together...

To start, I remembered that I had this gold paint... it's called Liquid Gilding by Martha Stewart, so I painted all my #2 pencils gold. It dries almost immediately! And covers so well, I love it! I think it's oil based though, so use an old paintbrush if you try this, because it's hard to clean out the brush afterward.
Much better than the #2 yellow! (My girls saw these and both want one to take to school. lol)

Next, I used a Tag Sale #4 die to cut a black tag and stamped it with Seeds of Knowledge. I embossed the white portions with white embossing powder (sentiment). The blue flower was embossed with Powder colored Zing. Then to get the green flowers, I didn't have the right color of embossing powder. So I actually heat embossed them in white, then took a Copic marker and colored right over the top of the white embossing powder to make them green! I used YG63.

Here you can see the cute Pencil Blooms dies cut with the Sheer Basics Vellum and layered onto the pencils. I used the new Enclosed: Apple die to make the leaves. The large tag is taped onto a cute straw from Target. Adds just a bit more pattern.


This is a better shot of the gold pencils. I used the Pint Size Die to cut the white wrap for the inside. It slipped right in and fit nicely into the jar. It's stamped with the new Graceful Greetings stamp set (thanks and flowers). The mini tag is an American Crafts DIY Shop tag that I stamped with Seeds of Knowledge and embossed. Everything is tucked into a Kerr jar.


Thanks Pencil Bouquet:

STAMPS: Seeds of Knowledge, Graceful Greetings
INK: Aqua Mist, Spring Moss, True Black
PAPER: Sheer Basics Vellum, white and True Black cardstock
DIES: Pencil Blooms, Pint Size Wrap 
OTHER: DIY Shop tag by American Crafts, Papertrey Ink twine, #2 pencils, Kerr jar (5" high), gold
paint - Liquid Gilding by Martha Stewart, Zing embossing powders, straw from Target, Copic Markers.
______

Next are some coordinating tags that you could use on a card or just as a gift tag on a package.

They are cut with a Tag Sale #4 die, then stamped and embossed with white embossing powder. All of the images were then colored with Copics like I explained above! The line under the teacher tag is a Seeds of Knowledge die cut. You can add white ink over the top for the "chalkboard effect" with your finger or a blending tool, or you can leave it plain like the teacher tag for more contrast.


Embossed and Colored Gift Tags:
STAMPS: Seeds of Knowledge, Graceful Greetings
INK: Versamark ink for embossing
PAPER: True Black, white; Soft Granite by Hero Arts
DIES: Seeds of Knowledge, Tag Sale #4
OTHER: twine - The Twinery, Copic Markers.
______

Visit the rest of the team to see more with these products.
Everything will be available for purchase on April 15th at 10pm EST at Papertrey Ink!

Tuesday, April 7, 2015

Virginia's View challenge...

Happy Tuesday! Do you all know Virginia Lu? She is an extremely talented paper crafter...if you've never seen her work, you must check out her blog and say hello! Every month she hosts a new challenge at her challenge blog: Virginia's View Challenge. This month she is hosting a Layers and Dimension challenge! Right up my alley! This goes perfectly with what my Craftsy class was all about, Layers and Dimension, so I was honored to make a couple of cards for her blog today.
On the first card, I have used a Maggie Holmes floral embossing folder to dry emboss the white cardstock in the background. I love the subtle texture it adds! I love dimension, but don't like overshadowing the focal point of the card, so a great way to add dimension and interest to your card background is with dry embossing. The two flowers were die cut and stamped with Papertrey Ink's Quilted: Spring stamp and coordinating die set. The "Hello" is cut with the Noted die by Papertrey Ink with Aqua Mist cardstock. 

Also, did you notice the dots on the hello? I added texture to that also with a Swiss Dot embossing folder by Cuttlebug. Dry embossing is so addicting, and you can emboss almost anything...even wood veneer like I mentioned in my Layers and Dimension class with Craftsy. Although this card is full of texture and dimension, it's very flat for mailing, and since the embossing is done on white cardstock, the design isn't overwhelming to the pretty layered, colorful focal point. The embossing adds to the design, but doesn't overpower it.
––––––

Next, I created a watercolored stripe effect by cutting out a striped die cut to use as a stencil. To do this, I used the Cover Plate: Stripes Diagonal die by Papertrey Ink cut out of cardstock and placed it onto my card. Using it as a stencil, I misted over the open stripes on watercolor paper, then smoothed them out a bit with a wet paintbrush. When dry, I added a vellum panel to the center. I am just so addicted to adding vellum panels over the backgrounds to soften the whole look! You can see a bit of the stripes peeking out the sides. I've machine stitched the vellum at the top, then added a few more details. 


Vellum is another chapter that I included in my Craftsy class. There are so many things you can do with it to add dimension to your cards! Over the top of the vellum, I've added a Circle Scribbles die and another Quilted: Spring die cut that I've stamped. For a sentiment, I've cut a Big Hugs die and stamped a sentiment with Mat Stack 5 Collection. Small groupings like this on a card allow the design to have some "white space" around it and help keep the items on the card from feeling like they are floating away. This keeps the card feeling cohesive. If I were to scatter everything around the card, it wouldn't feel as clean and cohesive. The eye would have a hard time focusing on what's important on the card. Grouping everything together creates one focal point. Also, you can see that I have large, medium and small items on my card for varying scale.


Hope you enjoyed these tips on layering and adding dimension! Click the links above for 1/2 off my Craftsy class today, and stop over to Virginia's View challenge to enter a card in her layers and dimension challenge. You have until May 18th to enter, then two winners will be selected to win a $25 gift card to Simon Says Stamp. Have fun!!

Tuesday, February 24, 2015

Cards for a friend...

The past couple days I've been making cards just for fun...and have been having so much fun. :) Here are a few that I've made for a friend of mine back home!


The white "Hello" card was dry embossed with a Maggie Holmes embossing folder, then I added a Swoosh die cut and some die cuts made with the Quilted: Spring stamps and dies.

You might be wondering how I made the teal striped card? I'll show you how:

Step 1. Die cut two pieces of Tropical Teal cardstock from the Cover Plate: Stripes Diagonal.

Step 2. Trim the top 3 stripes out of one of the pieces. Remove them. (Keep the entire outer frame, just trim out the top 3 stripes.) Layer the second die cut underneath horizontally and trim the excess.
Step 3. Adhere the two pieces together. Add Bitty Dot patterned paper behind.
Really fun way to get a different look with the cover plates! I think it would be pretty in black and white also.

One of the other cards I made was a replicate of one done by Nichole Heady that you can see HERE. I couldn't wait to try this Hugs card! Isn't it stunning? I love all of Nichole's ideas and had to make a couple of these for my card stash!
For ink colors, I ended up using Pure Poppy, Raspberry Fizz, Hibiscus Burst, Lavender Moon and Sweet Blush inks by Papertrey Ink with the Big Hugs stamp set. 
It's about time I've used my Pinterest boards and actually make some things I have pinned. :) Can't wait to put a bundle of these together for her! 

Sunday, February 8, 2015

Honoring Moms!

For today's group post, we are highlighting some of the new Mother's Day products that are coming out this month at Papertrey Ink! I can't tell you how much I love the new Bitty Bouquets stamps and dies! I stamped a few different ones here and tucked them around the new Keep It Simple Frames dies. I can see so many uses for these!

Hopefully you can see the beautiful embossed stitched detail on the frame. And the Sheer Basics Vellum paper pack is new to Papertrey Ink too! You get 3 sheets of 6 different patterns in an 8.5 x 11" format. I'll be using these quite a bit, love them! :)


Don't you think the card above could be used for so many occasions? I was thinking Mother's Day, but now that I look at it more, it reminds me of Easter. The "enjoy" is embossed with white embossing powder. I tried to stamp onto the vellum with permanent ink, but the polkadots resist the ink, so embossing is the way to go on this sheer vellum paper if you are going to be stamping on it!

Enjoy card:
STAMPS: Bitty Bouquets, Mini Blooms (tiny light pink flowers)
INK: Pure Poppy, Sweet Blush, Raspberry Fizz, New Leaf, Simply  Chartreuse, Spring Moss
PAPER: Sheer Basics Vellum, Raspberry Fizz cardstock, Summer Sunrise Bitty Dot
DIES: Bitty Bouquets, Keep It Simple Frames
OTHER: white embossing powder.
______

Next if you have a mom that's not really a pink person, I have one more that has a little more modern color combination, yet still feminine. :)

This card utilizes the Keep It Simple Frames dies again, love these. And the Bitty Bouquets. And the Sheer Basics Vellum. The sentiment is from a new stamp set called Tucked In: Mother, meant to be tucked inside, but you can see I used it on the front of the card instead of the inside! Works both ways, if you ask me!

The vellum can be easily attached under the flower bouquets where you won't see the adhesive. I tied the seam binding around the frame to hold it on.


Words Can't Express card:
STAMPS: Tucked In: Mother: Bitty Bouquets
INK: True Black, Harvest Gold, New Leaf, Pure Poppy, Summer Sunrise, Spring Moss
PAPER: white and gray cardstock, Sheer BasicsVellum Paper Pack
DIES: Bitty Bouquets, Keep It Simple Frames, Edgers #4
OTHER: seam binding by Zipperstop.
______

Visit Nichole Heady's blog for more details on these products and how you can win a year of free stamps! Also, you can be entered to win an $80 gift certificate by building a bouquet on a card cover by combining more than one floral set like I did on my first card.  Good luck and have fun with it!

Tuesday, November 11, 2014

A card tutorial: embossing over stamping...

I'm up at Gossamer Blue today with a tutorial on how to dry emboss your cards over the top of stamping or rub ons like I've done here! I've used the November kits on this card. First, I stamped the sentiment from the Heidi Swapp stamps, "The Best is Yet to Come".
Next, I cut out some of the gold floral rub-ons from the Open Book rub-ons and applied them with my stylus. These rub on like butter! Love them. You'll be seeing a lot more from me with these rub ons, as I'm currently working on a class with the Open Book line by Maggie Holmes. (Online class with me coming in January!)
Here you can see I've added a few more of the floral rub ons to the upper right corner, and a rub-on dotted line under the sentiment. Next, I'll be running this through my Cuttlebug Swiss Dot embossing folder.
Place the card front into the embossing folder and run it through your die cutting/embossing machine. I use the Cuttlebug.
Last, I added the card front to a white card base, dressed up my envelope with paper in the kit cutting it with the Envelope Liner die by Papertrey Ink, and added a few wooden hearts.
Would be a wonderful card for a wedding, graduation, etc.

Swing by the Gossamer Blue blog if you haven't lately. Such a great blog, love all of the beautiful projects the gals come up with!!

Friday, September 12, 2014

Monthly Moments: September...

This month, the Monthly Moments products are all about fall...back-to-school, harvest, leaves falling, hayrides, football and autumn days. I've done a scrapbook layout and a pocket page with the Monthly Moments: September products. Here are some sneaks of the stamps, dies and pretty papers available on Sept. 15th at 10pm EST at Papertrey Ink.

On this 8.5 x 11" page, I used some of the Monthly Moments: September Journal Cards in the background.

Then a pocket was die cut with the new Monthly Moments: Journal Pocket 3 die to hold photos of Kati on her first day back to school this year. I used the lined stamp in the Monthly Moments: September stamps to stamp lines for the journaling.

The cute little chalkboard shapes were made with a die and chalkboard paint! I cut some Tremendous Tags out of thin chipboard and painted them with Martha Stewart Chalkboard paint. Found the paint at Michaels for $1.99. They dry quick and are hard like little chalkboards! So fun to make!

Then the Monthly Moments: September stamps and Tag-Its #6 stamps were used on the little chalkboards - stamped with white ink and heat embossed with white embossing powder to really make the white stand out. To create the "chalk" look, I dipped my finger in white stamping ink and rubbed it over the embossed sayings.

The book saying was stamped with the new Book Club stamp set coming out this month also. Kati loves to read, and I thought it would be cute to add this saying onto a back-to-school page!

Back-To-School scrapbook layout:
STAMPS: Monthly Moments: September, Tag-Its #6, Book Club
INK: True Black, Fresh Snow by PTI; Soft Granite by Hero Arts\
PAPER: Monthly Moments: September Journal Card Collection, White/Sweet Blush/Pure Poppy cardstock, Fine Linen Bitty Dot Patterned Paper
DIES: Monthly Moments: September die, Monthly Moments: Journal Pocket 3, Tremendous Tags\
OTHER: twine, chipboard stars by Studio Calico, embossing powder - white, chalkboard paint, chipboard, hole punch, washi tape.
______

The next one is a 2-pager/pocket style scrapbooking layout from our apple picking days when the girls were little. I used the Monthly Moments: September die and stamp set and the coordinating Journal Card Collection.


From the Journal Card Collection, I chose 3 of my favorite papers from the pack. They make it easy to do a quick page, just fill some of the pockets with these, some pockets with pictures, then embellish a bit if you want, and you're done!

Some of the little chalkboards were used on this layout too, using the same idea of stamping on them and embossing. The long, skinny photo was trimmed down to 2x7" from a 5x7" picture. The pocket was cut with Monthly Moments: Journal Pocket 3 to hold my journaling. I couldn't resist adding an apple and some sayings from Apple Prints ..."I love you to the core" and "I pick you" were perfect for this!
Washi tape always adds a little bit more pattern and interest to my pages. (I forgot to round the corners of the Fall card like the rest of the pages, will go back and do that.) Anyway, that's it! A quick and simple page.

Fall Into Fun pocket page:
STAMPS:  Monthly Moments: September, Apple Prints
INK: True Black, Fresh Snow, Canyon Clay by PTI; Soft Granite by Hero Arts
PAPER: Monthly Moments: September Journal Card Collection, Vintage Cream cardstock
DIES:  Monthly Moments: September, Tremendous Tags, Monthly Moments: Journal Pocket 3, Apple Prints
OTHER: washi tape, chalkboard paint, chipboard, twine.