Showing posts with label teacher. Show all posts

Sunday, April 10, 2016

Introducing What The Doodle: Apple...

Welcome to the Papertrey Ink countdown for April! All of the new products you see here today will be available for purchase on 4/15 at 10pm EST at Papertreyink.com. Today I get to introduce to you a new stamp set and dies called What the Doodle: Apple. I loved working with these and can't wait to make more!
What the Doodle: Apple stamps, dies and Coloring Sheets were used to make 4 cards that I put in a clear card box with envelopes/and a tag for a teacher gift! 
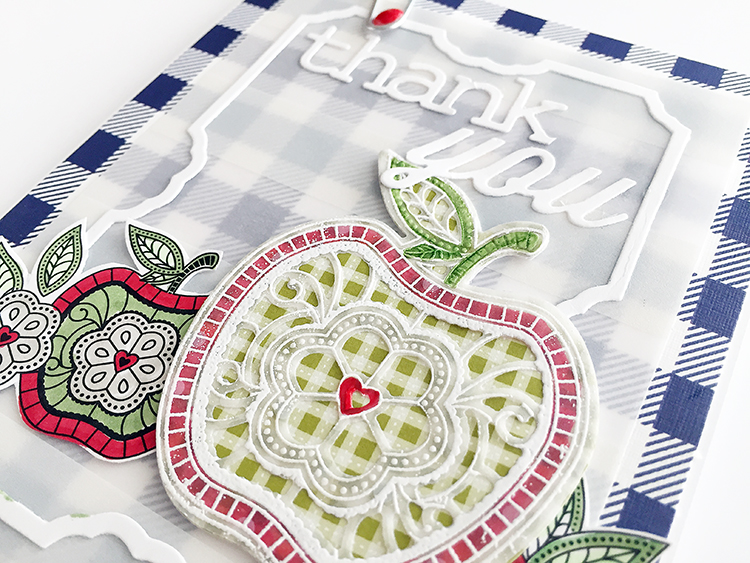
On the first card, I added some Sheer Basics Vellum over a Chicken Scratch Gingham paper. I used a part of the Cover Plate: Pretty Frame Die to add a little frame. I colored one of the What the Doodle: Apple Coloring Sheets, and then I made a pretty apple to go over the top with vellum.

To make the large apple, I used the dies to cut a back layer from the tiny gingham and a top layer from vellum. I stamped the apple onto the vellum and embossed it with white embossing powder. Then colored it on the back of the vellum with Copics!

Next up are 3 cards with the What the Doodle: Apple Coloring Sheets, love these! I colored this one in with Copics and added 2 layers of the Thank you die cut with the Wonderful Words: Thank You die. I colored the die cut with a gray W3 Copic marker.
On the second one, I used some different colors and ink blended the background with New Leaf ink. The frames added are from the Cover Plate: Pretty Frame die again. (Just the outer portion)
The last one is another Coloring Sheet that I used slightly different colors on. 

Then I packaged them all up in a clear card box and created a tag with the Minute To Make: Holiday  Tags die.
The stamps were used on the tag and colored in with Copics again! 


Thanks Teacher gift card box:
STAMPS: What the Doodle: Apple
INK: True Black, New Leaf
PAPER: Sheer Basics Vellum, What the Doodle: Apple Coloring Sheets, 
Chicken Scratch Gingham, Ripe Avocado Pattern Pack
DIES: What the Doodle: Apple dies, Wonderful Words: Thank You die, 
Minute to Make: Holiday, Cover Plate: Pretty Frame die, 
OTHER: white embossing powder, paper clip, enamel dot, twine, 
Copic Markers = R29, W3, YG63, YG11.
------

Visit Nichole Heady to see more previews of what's coming this month!

Wednesday, April 15, 2015

Release day...

I have a few more cards to share with you using some new products coming out tonight, April 15th at 10pm EST at Papertrey Ink. First up, is the new Graceful Greetings stamp set!

On these, I stamped the sentiment in Versamark ink, then poured different colors of embossing powder on and heat embossed them to melt the powder. Then I stamped the flowers from Graceful Greetings. 
The papers are from last month's Chicken Scratch Gingham paper pad. These little cards make me so happy! I love all of the colors.

Graceful Greetings card:
(All supplies by Papertrey Ink unless otherwise noted.)
STAMPS: Graceful Greetings
INK: Aqua Mist, Pure Poppy, Summer Sunrise, Harvest Gold, New Leaf, Sweet Blush
PAPER: white cardstock, Chicken Scratch Gingham
DIES: none
OTHER: Zing! embossing powders, twine
______

Next is Petite Places: School stamps and dies and Keep It Simple: Teacher stamps.
The background is from the Black & White All Over paper pad (dot). The scallop is cut with the Scene It: Doily Tag Base.


Thank You, Teacher card:
(All supplies by Papertrey Ink unless otherwise noted.)
STAMPS: Petite Places: School, Keep It Simple: Teacher
INK: Pure Poppy, True Black, Tropical Teal
PAPER: Chicken Scratch Gingham
DIES: Petite Places: School, Scene It: Doily Tag Base, Shaker Shapes: Pencil (loop)
OTHER: Copic Markers, button from Wee Folk mini kit, ribbon-craft supply.
______

Next is Enclosed: Apple and Tucked In: Thank You.
Again I used the Black & White All Over paper pad and added some stamping to the background with Quilted: Spring stamp set. I had stamped this background previously and didn't end up using it, so I found it and pulled it out. I think it works nicely with the reds and greens of the apple! When you are feeling uninspired, try stamping a few backgrounds. Then maybe later on you'll be inspired to use them for something!
Thanks card:
(All supplies by Papertrey Ink unless otherwise noted.)
STAMPS: Enclosed: Apple, Tucked In: Thank You, Quilted: Spring
INK: New Leaf, Ripe Avocado, Pure Poppy, Pinefeather
PAPER: Pure Poppy Pattern Pack, Sweet Blush and Spring Moss cardstock, Black & White All Over Paper Pad
DIES: Enclosed: Apple
OTHER: sequins, twine.
______

Last is Flower Favorites stamps and dies and Lunchbox Love stamps.


Again a Black & White All Over paper is used in the background (frame), then I watercolored a piece to adhere in the center. 

Cheer Up Buttercup card:
(All supplies by Papertrey Ink unless otherwise noted.)
STAMPS: Flower Favorites, Lunchbox Love
INK: Hibiscus Burst, Pure Poppy, New Leaf, Aqua Mist, Harvest Gold, Summer Sunrise, Smokey Shadow Pattern Pack
PAPER: Black & White All Over
DIES: Flower Favorites
OTHER: sequins, watercolors.
______

All of the new things you see here will be available on April 15th at 10pm EST. Thanks for stopping by and please visit the other gals to see what they've made with the same products: 

Monday, April 13, 2015

Introducing Seeds of Knowledge...

The Papertrey Ink team is back with a group post to preview a few more new things coming out on April 15th! Today we are showing sneaks of the new Seeds of Knowledge stamp set, the new Pencil Blooms dies, Pint Size Wrap dies and Pint Size containers.
First, I have a pencil bloom bouquet to share with you. I really wanted to go a different direction than the typical apple red for a teacher gift. I found THIS pic on Pinterest that inspired me to do something different!

Here's my pencil bouquet! I'll tell you how I put it together...

To start, I remembered that I had this gold paint... it's called Liquid Gilding by Martha Stewart, so I painted all my #2 pencils gold. It dries almost immediately! And covers so well, I love it! I think it's oil based though, so use an old paintbrush if you try this, because it's hard to clean out the brush afterward.
Much better than the #2 yellow! (My girls saw these and both want one to take to school. lol)

Next, I used a Tag Sale #4 die to cut a black tag and stamped it with Seeds of Knowledge. I embossed the white portions with white embossing powder (sentiment). The blue flower was embossed with Powder colored Zing. Then to get the green flowers, I didn't have the right color of embossing powder. So I actually heat embossed them in white, then took a Copic marker and colored right over the top of the white embossing powder to make them green! I used YG63.

Here you can see the cute Pencil Blooms dies cut with the Sheer Basics Vellum and layered onto the pencils. I used the new Enclosed: Apple die to make the leaves. The large tag is taped onto a cute straw from Target. Adds just a bit more pattern.


This is a better shot of the gold pencils. I used the Pint Size Die to cut the white wrap for the inside. It slipped right in and fit nicely into the jar. It's stamped with the new Graceful Greetings stamp set (thanks and flowers). The mini tag is an American Crafts DIY Shop tag that I stamped with Seeds of Knowledge and embossed. Everything is tucked into a Kerr jar.


Thanks Pencil Bouquet:

STAMPS: Seeds of Knowledge, Graceful Greetings
INK: Aqua Mist, Spring Moss, True Black
PAPER: Sheer Basics Vellum, white and True Black cardstock
DIES: Pencil Blooms, Pint Size Wrap 
OTHER: DIY Shop tag by American Crafts, Papertrey Ink twine, #2 pencils, Kerr jar (5" high), gold
paint - Liquid Gilding by Martha Stewart, Zing embossing powders, straw from Target, Copic Markers.
______

Next are some coordinating tags that you could use on a card or just as a gift tag on a package.

They are cut with a Tag Sale #4 die, then stamped and embossed with white embossing powder. All of the images were then colored with Copics like I explained above! The line under the teacher tag is a Seeds of Knowledge die cut. You can add white ink over the top for the "chalkboard effect" with your finger or a blending tool, or you can leave it plain like the teacher tag for more contrast.


Embossed and Colored Gift Tags:
STAMPS: Seeds of Knowledge, Graceful Greetings
INK: Versamark ink for embossing
PAPER: True Black, white; Soft Granite by Hero Arts
DIES: Seeds of Knowledge, Tag Sale #4
OTHER: twine - The Twinery, Copic Markers.
______

Visit the rest of the team to see more with these products.
Everything will be available for purchase on April 15th at 10pm EST at Papertrey Ink!

Sunday, April 12, 2015

Introducing Pencil Me In...

Today is a fun group post with the Papertrey Ink team, and we are all introducing some cute new products that are great for personalizing gifts for your little book worms or your favorite teachers.

First up is a quick card. I used the new Pencil Me In stamp set and Pencil Me In Patterned Paper Collection on the card. The edge of the card was cut with the new Moments Inked: Edged die. The pencil on the card was die cut with the Pencil Me In dies.

Also above you can see some customized pencils I made. The cute patterned papers I used, Pencil Papers Patterned Paper Collection, are adhesive-backed and have a little open label where you can stamp a name or icon on the front. I used the Pencilgrams stamp set to stamp my daughter's name (Kati) on all of the labels before wrapping them around my pencils. What's fun is there are other icons in the stamp set, one of them being a heart, and Kati always signs her name with a heart at the top of her "i". So I had to replicate that on her pencils! She'll love it!

Write Stuff card and Customized Pencils:
STAMPS: Pencil Me In, Pencilgrams
INK: Aqua Mist, Orange Zest, Classic Kraft, True Black, Hibiscus Burst, Pure Poppy
PAPER: Pencil Me In papers, Hawaiian Shores
DIES: Pencil Me In
OTHER: Copic Markers.
______

Last is a felt pouch made with the new Pencil Pouch dies and Papertrey Ink felt = Lavender Moon and Summer Sunrise. My pencil pouch was made to fit over the cover of my PTI planner. Actually I would consider it more of a "pen" pouch, with it's shorter length. Pens fit perfectly. It has magnets stitched in under the circles to hold it closed.

Erin has a terrific video that you must bookmark if you are going to make one of these. She explains it so well, and I followed her instructions exactly. A couple of tips for you to keep in mind while you are making one of these: one is to mark your magnets that you'll be using (if you are using magnets to hold it closed like I did on mine) with a + and - so you'll know which side up when placing them in the spots where they get sewn in. I found some tiny magnets at Michaels by ProMAG. They are 1/4" and strong enough to stick to each other through the two layers of felt. (Couldn't find the Basic Grey ones locally that she used.)

And second, the magnets WILL stick to your needle, so stitching them in can be a challenge! My needle constantly wanted to stick to the magnet! My tip here is to stitch the circles on at least half way and then insert the magnet and stitch the rest of the circle. It's a little bit easier than having your needle pulled by the magnet the whole time you are trying to stitch the circles on. (Watch Erin's video - she will explain the directions much better.) :)
This pouch was made with an elastic band that wraps around my planner cover and holds it on, just like Erin did in her video. (My rectangles on the back are orange to match the circles in the front, sorry I forgot to get pics of the back of it.) I love it! So much fun. It's a happy little pouch.
Pencil Pouch:
STAMPS: none
INK: none
PAPER: none
DIES: Pencil Pouch dies
OTHER: Papertrey Ink felt, floss, magnets.
______

Be sure to visit the rest of the Papertrey Ink team to see more with these new products!

Monday, August 4, 2014

Creating shaped borders with non-border dies...

Good morning, all! I have another new Make It Monday video up this morning at Papertrey Ink. Today I'm showing how to create shaped borders to your cards without using border dies. You can use almost any dies in your stash for this technique! Visit Nichole's blog to see the video: Make It Monday #175. My girls start school in one week, so I've got school on the brain lately. Shopping for school clothes and school supplies has me in the mood to make something special for the new teachers.

I've used the Apple Prints dies and coordinating stamp set, along with Teach & Inspire stamp set. You'll want to work with some dies that have a coordinating stamp set to go along with it, so you can stamp the shape into the cut out and make the shaped edges look seamless.

During the last monthly release, I made a card with this technique using Life Is Beautiful stamps and dies, you can see that one here, just to get more ideas of what you can do with this fun technique. I hope you have fun with it! Join us in this challenge, and you might win a $25 gift card!

Monday, April 14, 2014

Desktop Design...

The Papertrey Ink team is back again today with a couple of new things to show you that will be released this month on the 15th, the Desktop Design stamps and dies! My favorite thing about this set is this adorable little typewriter. It actually has a tiny piece of paper that you can stamp a saying on and slide into the slot! So cute!


I stamped the background with this set also. Kept this one a little bit on the simpler side with just a small focal point in the center.
 Thank You card:
STAMPS: Desktop Design
INK: Tropical Teal, True Black, Pure Poppy, Summer Sunrise, New Leaf, Aqua Mist by Papertrey Ink, and Soft Granite by Hero Arts
PAPER: white
DIES: Desktop Design
OTHER: none.
______

On the next card, I added a few more steps with die cutting the desk and changing out the sentiment.
You know how when you were younger, the teacher would stamp little sayings in red on your paper? I tried to recreate that look by stamping the "teacher" in red ink on the background notebook paper that I made. :)
 Teacher, Happy Birthday card:
STAMPS: Desktop Design
INK: Tropical Teal, True Black, Pure Poppy, Summer Sunrise, New Leaf, Aqua Mist by Papertrey Ink, and Soft Granite by Hero Arts
PAPER: white, Aqua Mist by PTI, red polka dot by Crate Paper
DIES: Desktop Design
OTHER: chipboard stars - Studio Calico.
______

This stamp set will work for secretaries, bosses, co-workers, friends, miss you cards, and hello cards as well as teacher cards! Visit the rest of the PTI team to see more with Desktop Design:

Friday, September 27, 2013

Studio Calico's October card kit, Antiquary...

It's that time again when the Studio Calico card kits (and all the other fun kits) are available - up for preorder at noon today. I used the main card kit, Antiquary, and the card kit add-on, Athens. Really loved the typography in this month's stamps!
On the first card, I loved the blue cardstock that came in the kit, so I stamped the big "happy" in Aqua Mist ink (by PTI), with another sentiment over the top in Ocean Tides. I stamped the flowers from the Athens add-on and colored them in with Copic markers.

The next card was stamped several times with Versamark ink and then embossed with white embossing powder. I had an old gold mist in my stash by Tattered Angels that I just painted over the top with a paint brush. I wanted a warm color to go with the pretty autumn patterned papers in the kit.
The flower was die cut from vellum with Papertrey Ink's Lovely Layers dies. Love those gold buttons!

On this card, I used one of Shanna Noel's cut files, the Antiquary Thankful cut design with my Silhouette Cameo machine to cut it out of paper from the kit. I used ink refills by PTI to paint the background in Pure Poppy, Summer Sunrise, Harvest Gold and Classic Kraft (red, orange, yellow and brown) with a sentiment stamped from the kit on the bottom.

And after I trimmed out the background for the card above, I had a little piece of cardstock left over with the "ends" of the painted brush strokes - loved how it looked, so I used it on another card.
Added some stamped hearts in matching colors and then stitched a bit.

Here I stamped the "thank you friend" in all different inks. Makes a quick, easy card. And it's fun to boot! (The twine is from my stash, not in the kits.)
You can use a circle punch to add some patterned paper to your cards by just punching a circle, trimming it in half and add a little hole to tie on a piece of twine.
Next up are a couple of teacher cards stamped with the apple from the stamp set!

On this one, I simply stamped the background with the apple. These stamps are two-step, so I stamped the outline in one color and the inside of the apple in another.
I used a Papertrey Ink die to trim the polkadot paper into a scallop: Edgers #4.

My favorite paper in the whole kit was this gray floral. I wanted to use it, but not cover it up too much, so this one has a simple design across the top.
The banner was cut out with the Bountiful Banners die. You can't see it well in these pics, but I shaded the banner with a blue Copic marker...from top to bottom so it kind of has an ombre effect on the banner. I think I may have used these gold dots on almost every card!

Last up is a fun one with the fruit stamps in the main card kit. I added the large leaves from the Athens add-on. The wooden buttons in the kit are to die for also!
You can see that I stamped the inside of the fruit separately and cut them out, then stitched them down the center.


So there you have it! 8 cards this month, and I could have kept going if I had more time in the day. Such fun stamps this time. I just got a peek of next month's card kit and you are gonna LOVE it with a capital L! I can't wait. These kits are getting better and better, I tell ya. Studio Calico is really listening to our feedback about what we as card makers want to see. :) Grab a kit today!