Showing posts with label get well. Show all posts

Tuesday, April 7, 2015

Virginia's View challenge...

Happy Tuesday! Do you all know Virginia Lu? She is an extremely talented paper crafter...if you've never seen her work, you must check out her blog and say hello! Every month she hosts a new challenge at her challenge blog: Virginia's View Challenge. This month she is hosting a Layers and Dimension challenge! Right up my alley! This goes perfectly with what my Craftsy class was all about, Layers and Dimension, so I was honored to make a couple of cards for her blog today.
On the first card, I have used a Maggie Holmes floral embossing folder to dry emboss the white cardstock in the background. I love the subtle texture it adds! I love dimension, but don't like overshadowing the focal point of the card, so a great way to add dimension and interest to your card background is with dry embossing. The two flowers were die cut and stamped with Papertrey Ink's Quilted: Spring stamp and coordinating die set. The "Hello" is cut with the Noted die by Papertrey Ink with Aqua Mist cardstock. 

Also, did you notice the dots on the hello? I added texture to that also with a Swiss Dot embossing folder by Cuttlebug. Dry embossing is so addicting, and you can emboss almost anything...even wood veneer like I mentioned in my Layers and Dimension class with Craftsy. Although this card is full of texture and dimension, it's very flat for mailing, and since the embossing is done on white cardstock, the design isn't overwhelming to the pretty layered, colorful focal point. The embossing adds to the design, but doesn't overpower it.
––––––

Next, I created a watercolored stripe effect by cutting out a striped die cut to use as a stencil. To do this, I used the Cover Plate: Stripes Diagonal die by Papertrey Ink cut out of cardstock and placed it onto my card. Using it as a stencil, I misted over the open stripes on watercolor paper, then smoothed them out a bit with a wet paintbrush. When dry, I added a vellum panel to the center. I am just so addicted to adding vellum panels over the backgrounds to soften the whole look! You can see a bit of the stripes peeking out the sides. I've machine stitched the vellum at the top, then added a few more details. 


Vellum is another chapter that I included in my Craftsy class. There are so many things you can do with it to add dimension to your cards! Over the top of the vellum, I've added a Circle Scribbles die and another Quilted: Spring die cut that I've stamped. For a sentiment, I've cut a Big Hugs die and stamped a sentiment with Mat Stack 5 Collection. Small groupings like this on a card allow the design to have some "white space" around it and help keep the items on the card from feeling like they are floating away. This keeps the card feeling cohesive. If I were to scatter everything around the card, it wouldn't feel as clean and cohesive. The eye would have a hard time focusing on what's important on the card. Grouping everything together creates one focal point. Also, you can see that I have large, medium and small items on my card for varying scale.


Hope you enjoyed these tips on layering and adding dimension! Click the links above for 1/2 off my Craftsy class today, and stop over to Virginia's View challenge to enter a card in her layers and dimension challenge. You have until May 18th to enter, then two winners will be selected to win a $25 gift card to Simon Says Stamp. Have fun!!

Saturday, November 15, 2014

Release Day: November...

The big reveal is today! The new items for November will be available tonight at 10pm EST at Papertrey Ink. First, I've used Mat Stack 7 Basics and Holiday Thanks on this card.
When I saw the image in the Mat Stack 7, I immediately thought  of the Cover Plate: Hexagon die and that it would be a good match for this focal point, then I used the big hexagon as a snowflake with a Damask Snowflake in the background. A few mica flakes and some berries punched from Scarlet Jewel cardstock finish it off nicely.

Thank You for the Holiday Gift card:
(All supplies by Papertrey Ink unless otherwise noted.)
STAMPS: Holiday Thanks, Mat Stack 7 Basics
INK: True Black
PAPER: White, Scarlet Jewel, Aqua Mist
DIES: Cover Plate: Hexagon die, Mat Stack 7 dies
OTHER: hole punch, mica flakes.
______

Next up is A Cheerful Heart stamps and the new Floral Flaps dies. The Floral Flaps are really fun for creating your own cards that look like petal cards with 4 flaps that open up to reveal the inside (stamped with A Cheerful Heart).
Creating the card with the flaps is quite easy, you just cut 4 of the flaps and adhere them between 2 4x4" pieces of cardstock, scoring the flaps and folding them over. I made white flaps that are embossed and then I added 2 Aqua Mist flaps over the top that were cut. 
To hold the card closed, I created a little white band of cardstock that you can slide off. The tag was made with the Cuppa Love dies (tag), and the little felt flower was cut with lovely layers. I snipped the flower and overlapped it to create a more dimensional look.

Praying For You card:
(All supplies by Papertrey Ink unless otherwise noted.)
STAMPS: A Cheerful Heart
INK: True Black, Pure Poppy; Soft Granite by Hero Arts
PAPER: White, Aqua Mist, Sweet Blush
DIES: Floral Flaps, Cuppa Love (tag)
OTHER: washi tape, twine, felt - Pure Poppy and Tropical Teal, pearl.
______

Next are the new Pompom Pals and Fair Isle Motifs stamps.
The Fair Isle Motifs were stamped in the background, and the reindeer from Pompom Pals was colored in and popped up with pop dots.
On the inside, I created a little pocket that folds over to hold money or a gift card and used "just for you" from Mat Stack 7 Basics.

Something Special card:
(All supplies by Papertrey Ink unless otherwise noted.)
STAMPS: Fair Isle Motifs, Pompom Pals, Mat Stack 7 Basics (just for you on inside)
INK: Pure Poppy, Dark Chocolate, Sweet Blush
PAPER: Sweet Blush cardstock, white, Pure Poppy Pattern Pack
DIES: none
OTHER: markers, corner rounder.
______

This is Phrase Play #10. I liked the saying in the stamp set, so I used it with some colorful cardstock strips and the Confetti Garland Borders stamps and dies. It's been awhile since I've done something so colorful.

Life Brings card:
(All supplies by Papertrey Ink unless otherwise noted.)
STAMPS: Phrase Play #10
INK: Tropical Teal, Raspberry Fizz, Summer Sunrise, New Leaf, Sweet Blush
PAPER: Tropical Teal, Raspberry Fizz, Summer Sunrise, New Leaf, Harvest Gold, Sweet Blush, White, Aqua Mist cardstock
DIES: Phrase Play #10, Confetti Garland Border dies
OTHER: none.
______

Last is the new stamp set and die called Happy New Year and also Type Strips (celebrate).

With the new Type Strips stamps, you can now make your own letter stickers! How fun! I added some colorful cardstocks under the cut out triangles.
Celebrate New Beginnings card:
(All supplies by Papertrey Ink unless otherwise noted.)
STAMPS: Type Strips, Happy New Year
INK: Summer Sunrise, True Black by PTI; Soft Granite by Hero Arts
PAPER: Raspberry Fizz, White, Hibiscus Burst, Summer Sunrise, Harvest Gold, New Leaf, Tropical Teal, Aqua Mist
DIES: Happy New Year, Type Strips
OTHER: mica flakes - Tinsel & Tags kit, pearls by Melissa Frances.
______

Is there a product you like the best? All of these new items will be available on Nov. 15 at 10pm EST at Papertrey InkVisit the the PTI team to see more with these new products, and thanks for stopping by:

Friday, November 14, 2014

Introducing Cuppa Love...

Welcome back to another group post by Papertrey Ink! Today we are previewing a new stamp set and die called Cuppa Love! You are SURE to love these pretty patterns you'll see today. I know I do, can't wait to play with them more to create backgrounds and such.
The first card is unique in that I cut out the front of the card in the shape of the cup with the Cuppa Love die, and at the same time, embossed the back of the card. To do this, I folded the card in half and placed the die on top, just ABOVE the fold, so it won't cut on top of the fold.
What happens is it will cut the top piece out (the card front), but just emboss the bottom piece of cardstock (the back of your card). Sort of happened as a happy accident! Used the Cuppa Love stamps and dies to adorn the front of the card. Kept it simple, because when I looked up Fire King mugs, most of them were white with colorful flowers on the front center.
Here is the inside, stamped with Keep It Simple: Get Well.

The second card is simply embossed on the front with the cup die. To do this, I add a scrap piece of cardstock over my folded card and then run it through. It will cut the top cardstock out (scrap), but not the second piece underneath (your card front)! I made a pocket with the Cuppa Love die and stamped some of the florals on it from the set.
This is the stamping I did before assembling the second card. I decided to do the pocket after playing around with the stamps, so some of it was covered up. Cute just like that, isn't it? But you know me, I have to add, add, add...
Added the pocket and the little tag. I just adore this little card set, so cute!
Take Care/Feel Better Soon cards:
(All supplies by Papertrey Ink unless otherwise noted.)
STAMPS: Cuppa Love
INK: Tropical Teal, Pure Poppy, Simply Chartreuse, Sweet Blush inks
PAPER: white, Aqua Mist cardstock; Aqua Mist Pattern Pack
DIES: Cuppa Love
OTHER: twine.
______

The other gals have more to show you with Cuppa Love, don't miss it!

Thursday, November 14, 2013

Inside & Out: Get Well Wishes...

We're back with group post #2 for Papertrey Ink's November countdown. Today we are showcasing a new set called Inside & Out: Get Well Wishes. There are so many pretty sentiments in this set that have just the right words you might need during a difficult time when you aren't sure what to say. This set will be available on Nov. 15th.

I stamped the Inside & Out: Get Well saying on graph paper and cut a Rustic Wreath from text paper to put around it. Some Rosie Posie flowers are stamped in the background and on the Rosie Posie dies to add over the wreath, with polka dot leaves from Mighty Oak tucked in as well.
The inside of the card is stamped another sentiment from this set...
I'm Here For You card:
STAMPS: Inside & Out: Get Well Wishes, Rosie Posie, Mighty Oak
INK: True Black, Pure Poppy, Sweet Blush, Aqua Mist
PAPER: white, Aqua Mist, patterned paper by Crate Paper, graph paper
DIES: Rustic Wreath, Rosie Posie
OTHER: pearls by Melissa Frances.

----------

On the second card, I tried my hand at more of a masculine feel, so instead of stamping flowers in the background, I stamped the leaves from Rosie Posie in Classic Kraft ink. I kept this card very similar, just changing a few colors.
The blues, greens and browns add a more masculine feel.
Inside of Feel Better Soon card:

Feel Better Soon card:
STAMPS: Inside & Out: Get Well Wishes, Rosie Posie, Mighty Oak
INK: True Black, Classic Kraft, Enchanted Evening, Ripe Avocado
PAPER: white, Classic Kraft, graph paper
DIES: Rustic Wreath, Rosie Posie
OTHER: none.

----------

Visit the rest of the PTI team to see more with these products:

Wednesday, November 30, 2011

Winter Wonderland event...

Starting tomorrow, Pink Paislee is holding a Winter Wonderland event right on their blog, it will be chock full of fun projects for the holidays with full instructions, giveaways, etc for you!
You won't want to miss it. Check back to the blog daily for inspiration and your chance to win!
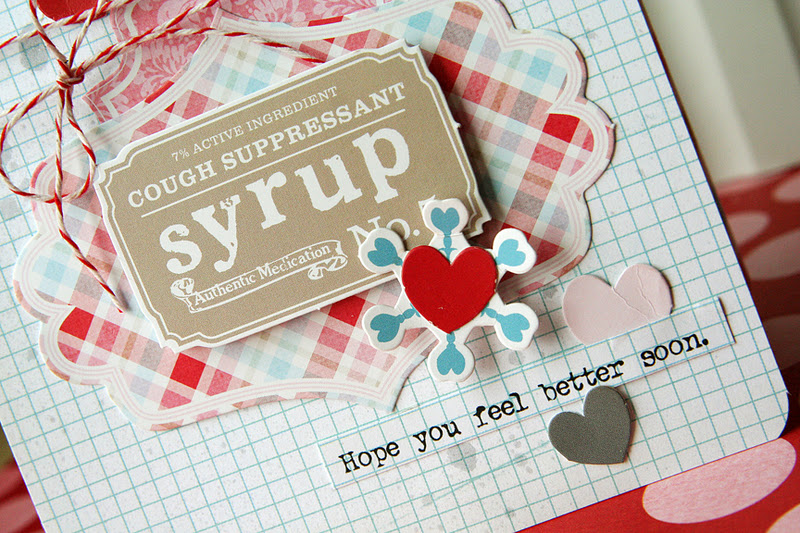
We are featuring the Snow Day line by Pink Paislee for this event. I made some ornaments for the blog, so I can't show you those yet, but here is a little peek at a "Get Well" card made with this adorable line! I used one of the papers for the background and sprayed it with Silver Sugar Glimmer Mist by Tattered Angels, then added lots of die cuts from the Snow Day - Ephemera package!
Some of the die cut frames are layered, then I printed out the sentiment with my computer on this graph paper, cut it out and added it to my card. I was inspired by the "cough syrup" die cut for a Get Well card. After printing out the sentiments on graph paper, I adhered them to the card front. The lines make it easy to line it up nice and straight.
A couple of the elements are popped up with dimensional adhesive, just to give it some life. The twine is from Scrap Pantry. The font I used is called Typewriter. Not sure where I downloaded it from, but it was free. I never pay for my fonts!
Anyway, I hope this whets your whistle and gets you excited for the blog event! I can't wait to see what the girls came up with. See you there. xo