Saturday, September 14, 2013

Quick and easy holiday photo cards...

Happy countdown, everyone! We're back with another group post, this time we are showing you some new ways to create holiday photo cards.

All photos you see today were taken by my talented friend, Becky Novacek. Her photography is unbelievable, and I'm honored she allowed me to use some of her amazing photos today for my projects! WAIT 'til you see all these cute families...

For the first card, I chose a fun design in a watercolor look that's so popular right now. Since the photo was so fun and energetic, I wanted a fun look to go with it, and the "Merry & Bright" sentiment just seemed fitting! I used the new Instant Photo: Holiday stamps and the Instant Photo Pull Out Die mixed with an older set called Watercolor Wonder. The die creates a pocket for your 2.5" photos and a tag that slides out.

I chose ink colors that I thought would work well with the photo on the front: Hawaiian Shores, Limeade Ice and New Leaf. I stamped the Merry from Instant Photo: Holidays, curving the stamp a bit on my block to match the curve of the Watercolor Wonder stamps. Then two more stripes in Limeade Ice and New Leaf. Last I stamped "& bright" with Versamark ink over the bottom stripe and embossed it in white.

On the inside of the tag, I chose a larger sentiment from Instant Photo: Holidays in Hawiian Shores, then added a few more stripes from Watercolor Wonder over the top to make the look cohesive. (I didn't use New Leaf on the inside, because it would have been too dark and would have covered up the sentiment, so I opted for Harvest Gold instead.)

Next up are the One Liners dies.
THESE are my favorite item of the whole release this month!!! Here I've cut one to place on the 5x7" photo with white cardstock. It fits perfectly and is adhered with 1/8" Scor-Tape directly onto the photo. Easy! Save all that money you would put into getting them printed like this and GET this die! I'm so doing this after we get our holiday picture taken.

Here's a One Liner on a 4x6" photo. I just snipped off a little bit of the left side of the line to make it fit the 4x6" photo. Added a piece of twine.


You can also put these One Liner dies to use on cards! These aren't JUST for photo cards, oh no! They also work great for regular greeting cards too. Can you tell I love them? This one is cut in Aqua Mist and layered over a Crate Paper patterned paper.
I used Dawn's new Background Basics: Stitching stamp set with Melon Berry ink on the bottom of the card. (Melon Berry + Aqua Mist = love.) I wish I could get better photos for you! It's been raining cats and dogs here.

And the two little leaves are stamped in Melon Berry with Mighty Oak stamps/dies from last month, with a Studio Calico chipboard star added over the top.
I really enjoyed these products, hope you will too. Visit the team to see more:

All supplies by Papertrey Ink unless otherwise noted.

Merry & Bright card:
STAMPS: Instant Photo: Holidays, Watercolor Wonder
INK: New Leaf, Hawaiian Shores, Limeade Ice, Aqua Mist, Harvest Gold, Soft Stone
PAPER: White cardstock
DIES: Instant Photo Pull Out Die
OTHER: twine.

Photo cards with One Liners:
STAMPS: none
INK: none
PAPER: white cardstock
DIES: One Liners
OTHER: twine.


From Our Family card:

STAMPS: Mighty Oak, Holiday Cheer
INK: Melon Berry, True Black
PAPER: white and Aqua Mist, patterned paper by Crate Paper
DIES: One Liners
OTHER: seam binding by Hug Snug, chipboard star by Studio Calico.

Friday, September 13, 2013

Two Feet Deep...

The Papertrey Ink team is back with another group post, this time we are featuring a few new things being released on Sept. 15th: the Two Feet Deep stamp set and dies, the Double Bow Die, and the Fancy Flakes Dies. These are so pretty for gift wraps, tags and cards!

First, I decorated a kraft box and added a gift tag. The tag is made with the skis and sentiment from Two Feet Deep. I used a stripe stamp from an older set (Candy Cane Christmas) with red and pink inks to create a border for my tag and my package. Then I die cut the skis, stamped them and added Martha Stewart white craft glue and white embossing powder to make them extra "snowy". I didn't heat emboss the powder, just left it as is. I used Ripe Avocado patterned paper and the Holiday Button Bits dies to add a bit more color.

The Double Bow is so easy to make!! I was pleasantly surprised at how quick it went together. Visit Nichole's blog for a video on how to use this die. I used Melissa Frances Crepe Paper in Cream to make my bow. It comes in large sheets. I actually cut 2 layers of the crepe paper the same time to make it a little thicker and not so see-through... and just love how it turned out. I glued the 2 layers together at the tabs with Scor Tape (just like Nichole did it in the video). The center is an adhesive resin swirl by Melissa Frances also, just attached it right on top.

To decorate a craft gift box, I cut a strip of Classic Kraft cardstock about 4" wide by the same length of the box. I stamped/embossed the snowflake from Two Feet Deep in a random fashion. The stamp matches the larger Fancy Flakes dies! (You can see on the tag above, I cut a smaller Fancy Flakes snowflake to top the tag!) To help the package tie in with the tag, I created a similar striped border for my package just like on the tag with red/pink inks.

And I have one more card...

I used the "Let it Snow" sentiment from Two Feet Deep, the Mistletoe & Holly stamp set, Candy Cane Christmas and the Fancy Flakes dies. And a strip of Pure Poppy cardstock and a strip of Classic Kraft cardstock.

The Fancy Flakes look so pretty layered. And how cute is that star center!
Many of you have been asking for more "design tips", so I'd like to share a little something about my projects today. I have found that a design is more interesting when you have an element that is placed vertically AND something that is placed horizontally. So on my box, you'll see the snowflakes are horizontal, but the red dots are vertically placed. On the ski tag, the skis and sentiment are vertical, but the holly breaks up the vertical lines, because it's placed horizontally. Same with the card...the sentiment and holly are placed across the card, while the stripes and cardstock strips are placed up and down. Hope that makes sense. It moves your eye around the card and makes all of the detail so interesting to find.

Also, to make sure everything coordinated in my set, I took a couple of elements I loved the most and repeat them on each project...the snowflakes, the stripes, and the red dots.

I can't wait to see what the rest of the team has done with these products. I have a feeling everything is going to be so different!

Ashley Cannon Newell
Betsy Veldman
Cristina Kowalczyk
Dawn McVey
Erin Lincoln
Heather Nichols
Laura Bassen
Maile Belles
Melissa Phillips
Nichole Heady

All supplies by Papertrey Ink unless otherwise noted.

Warm Winter Wishes tag and gift box:
STAMPS: Two Feet Deep, Candy Cane Christmas
INK: Fresh Snow, Classic Kraft, Dark Chocolate, Pure Poppy, Sweet Blush
PAPER: Classic Kraft, white, Pure Poppy, Ripe Avocado Pattern Pack
DIES: Holiday Button Bits dies, Two Feet Deep dies, Double Bow die, Fancy Flakes dies
OTHER: Twine, white embossing powder, crepe paper and resin swirl by Melissa Frances.


Let It Snow card:
STAMPS: Two Feet Deep, Candy Cane Christmas, Mistletoe & Holly
INK: Sweet Blush, Pure Poppy, Ripe Avocado
PAPER: Pure Poppy, Classic Kraft, White cardstock
DIES: Fancy Flakes dies
OTHER: Twine.

Thursday, September 12, 2013

Scent-imentals...

Have you ever made a scratch & sniff element on a card before? Papertrey Ink has a new stamp set that was released early to those who purchased the Stamp-a-faire kits several weeks ago, entitled Scent-imentals. It has images designed to work perfectly with the scratch & sniff technique. It now will be available for purchase on Sept. 15th. If you didn't get one during Stamp-a-faire, you can still get one. And the dies are now available too!
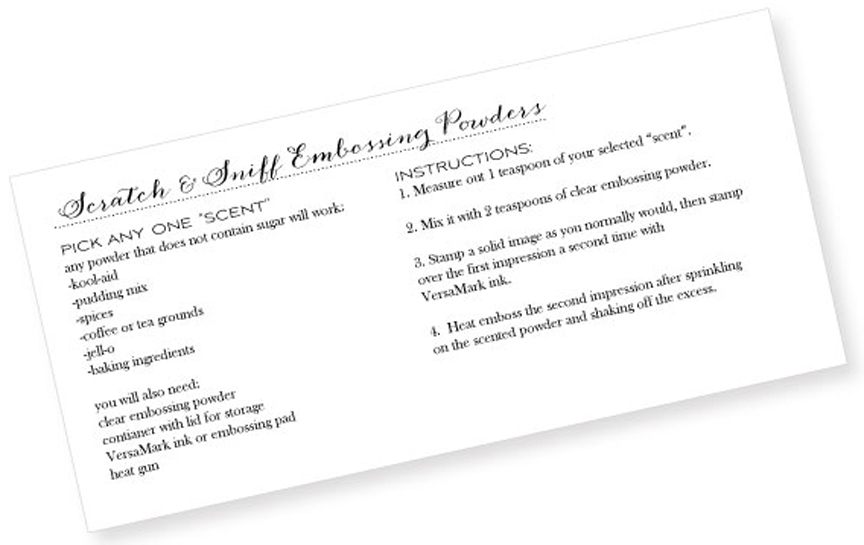
Another cool thing about this set? The arrows that allow you to bring the scratch & sniff feature to the recipient's attention, while still designing a stylish card. Below are the instructions for this technique. Nichole Heady also has created a video to help you visualize this process as well: HERE.

I went on the hunt for some sugar-free powders and found sugar-free strawberry jello, pumpkin spice and ginger. They all smell so good! I mixed one part spice with two parts clear embossing powder in little bowls.
I played around with the cherries, pumpkin and gingerbread man images. You can die cut them, then stamp them in the color you want, then you stamp them again with versamark ink, and dip them in the mixture. Heat emboss the image.

I came up with a little scratch & sniff card set. My  kids thought this was the coolest thing since sliced bread!


I used Think Big Favorites #4 stamps in the background and kept with the same design for the whole card set. :) Keeping it simple!


I stamped one of the Think Big Favorites on each card repeatedly in the background with Sweet Blush ink, leaving room for the Scent-imentals saying in the center in Pure Poppy. Then I added the cute scented shapes per the how-to on Nichole's video, then a strip of Ripe Avocado patterned paper at the top of each card.


I'll be back tomorrow with another post. See you soon, and thanks for dropping by!


All supplies by Papertrey Ink unless otherwise noted.

Scent-imentals card set:
STAMPS: Scent-imentals, Think Big Favorites #4
INK: Sweet Blush, Pure Poppy, True Black, Summer Sunrise, Ripe Avocado, Dark Chocolate, Classic Kraft
PAPER: white, Ripe Avocado patterned paper
DIES: Scent-imentals
OTHER: machine stitching.