Showing posts with label dies. Show all posts

Saturday, September 14, 2013

Quick and easy holiday photo cards...

Happy countdown, everyone! We're back with another group post, this time we are showing you some new ways to create holiday photo cards.

All photos you see today were taken by my talented friend, Becky Novacek. Her photography is unbelievable, and I'm honored she allowed me to use some of her amazing photos today for my projects! WAIT 'til you see all these cute families...

For the first card, I chose a fun design in a watercolor look that's so popular right now. Since the photo was so fun and energetic, I wanted a fun look to go with it, and the "Merry & Bright" sentiment just seemed fitting! I used the new Instant Photo: Holiday stamps and the Instant Photo Pull Out Die mixed with an older set called Watercolor Wonder. The die creates a pocket for your 2.5" photos and a tag that slides out.

I chose ink colors that I thought would work well with the photo on the front: Hawaiian Shores, Limeade Ice and New Leaf. I stamped the Merry from Instant Photo: Holidays, curving the stamp a bit on my block to match the curve of the Watercolor Wonder stamps. Then two more stripes in Limeade Ice and New Leaf. Last I stamped "& bright" with Versamark ink over the bottom stripe and embossed it in white.

On the inside of the tag, I chose a larger sentiment from Instant Photo: Holidays in Hawiian Shores, then added a few more stripes from Watercolor Wonder over the top to make the look cohesive. (I didn't use New Leaf on the inside, because it would have been too dark and would have covered up the sentiment, so I opted for Harvest Gold instead.)

Next up are the One Liners dies.
THESE are my favorite item of the whole release this month!!! Here I've cut one to place on the 5x7" photo with white cardstock. It fits perfectly and is adhered with 1/8" Scor-Tape directly onto the photo. Easy! Save all that money you would put into getting them printed like this and GET this die! I'm so doing this after we get our holiday picture taken.

Here's a One Liner on a 4x6" photo. I just snipped off a little bit of the left side of the line to make it fit the 4x6" photo. Added a piece of twine.


You can also put these One Liner dies to use on cards! These aren't JUST for photo cards, oh no! They also work great for regular greeting cards too. Can you tell I love them? This one is cut in Aqua Mist and layered over a Crate Paper patterned paper.
I used Dawn's new Background Basics: Stitching stamp set with Melon Berry ink on the bottom of the card. (Melon Berry + Aqua Mist = love.) I wish I could get better photos for you! It's been raining cats and dogs here.

And the two little leaves are stamped in Melon Berry with Mighty Oak stamps/dies from last month, with a Studio Calico chipboard star added over the top.
I really enjoyed these products, hope you will too. Visit the team to see more:

All supplies by Papertrey Ink unless otherwise noted.

Merry & Bright card:
STAMPS: Instant Photo: Holidays, Watercolor Wonder
INK: New Leaf, Hawaiian Shores, Limeade Ice, Aqua Mist, Harvest Gold, Soft Stone
PAPER: White cardstock
DIES: Instant Photo Pull Out Die
OTHER: twine.

Photo cards with One Liners:
STAMPS: none
INK: none
PAPER: white cardstock
DIES: One Liners
OTHER: twine.


From Our Family card:

STAMPS: Mighty Oak, Holiday Cheer
INK: Melon Berry, True Black
PAPER: white and Aqua Mist, patterned paper by Crate Paper
DIES: One Liners
OTHER: seam binding by Hug Snug, chipboard star by Studio Calico.

Monday, February 18, 2013

a thank you card set...

I made a little card set just for fun today! It felt good to make something just because I wanted to and just because I felt creative, not for any assignments. :) I didn't get a chance to play with the new Mini Blooms stamp set and dies as much as I wanted to when they first arrived, so I wanted to sit down and play with them a bit.

On my first card, I used the banner from Papertrey Ink's In Stitches dies and wanted to layer it over the Mini Blooms flowers, so I cut some of the Mini Blooms and stamped them in Melon Berry, Pure Poppy and Sweet Blush inks. The leaves are stamped in New Leaf and Spring Moss inks. You can even layer the blooms like I did here by the banner.

I cut the "you" from the Wonderful Words dies with a dark gray cardstock from my stash and stamped "thank" from the Wonderful Additions Words in Soft Stone ink. I backed the Aqua Mist banner with Hawaiian Shores cardstock for more of a shadow effect on the banner.

The second card is very similar in that I used almost all of the same products, just a little bit different placement of them. I stamped "thank" in Hawaiian Shores and Aqua Mist inks (stamping them twice, not re-inking in between) to get the different shades of blue, starting at the bottom with the darkest color.

A few Mini Blooms flowers were added over the top and another "you" cut with Pure Poppy cardstock.

"So Much" is from the Mini Blooms set. When finished with the front, I added a little strip of Pure Poppy cardstock and a Melon Berry patterned paper card base. Hope you enjoyed these today!


Friday, April 27, 2012

A home decor project.

Finally, my internet is back up! It's been out all day today. It was actually a good thing to disconnect from the world and work on something else for a bit. My older daughter Taylor who is almost 13 wanted to change her room up a bit and have teal and dark purple in her room, so I made her a little pillow for her bed today to match her teal and purple comforter.
I used to quilt and had a bin of fabrics stashed away in my basement, so I dug through them today and found this pretty black and white check, that from a distance looks gray. I think the gray, yellow and lime green will make nice accents to the teal and purple! I started by sewing four white squares together in the front and adding the gray borders around the outside. (see top photo)
The second step was to add the white circle borders around the front. I needed something to dress up the plain white. I used the Simple Circles Border die by Papertrey Ink to cut these out! The border wasn't quite long enough to go all the way down each side, so I cut multiple borders and overlapped them, sewing as I went and just trimming them off when I got to the end of each side.

I finished decorating the front with some flowers made with Papertrey Ink felt and the Frilly Flowers die, along with the Turning a New Leaf die for the leaves. After cutting the flowers, I just stacked them up and put a quick hand-stitch through the center of each flower to hold them together! The felt is attached to the pillow with Elmer's Fabric Glue. It was so quick and simple.

After the top was finished, I made a back for the pillow and machine stitched them together. I inserted a plain white pillow (that can be taken in and out). I'll be honest, the flowers were the QUICK part, making the pillow cover took the longest! But...I saved probably $25 by not having to buy a cute decorative pillow like this for her room at a department store, and I had all of these supplies on hand!

Would you believe the yellow check is actually fabric that I made her nursery curtains with almost 13 years ago? It was very meaningful for me seeing it again, and putting it to good use!

I'm going to get a pretty body pillow for the back of the day bed, and I think we are going to paint the wall with her bed on it a gray color and hang some colorful lanterns or something fun to add pops of color with silver accents around the room. (Right now her walls are a light lavender and she wants to change that.)

What do you think? Is it "teen" enough so far? :)


Friday, February 3, 2012

In between projects, I get the itch to get more organized. I tend to be a VERY messy scrapbooker. Usually before a project is finished, my entire desk is covered - I mean covered - with stuff, and I have about a 5x5" square of space in which to work. It takes me awhile to get things back in order! I tend to be visual, so if there are things out on my desk I can see, they will be more likely to get used.
I don't have a big, fancy scrapbook room. While I love our house, we only have 3 small bedrooms. So, I decided awhile back to set up camp down in the basement. About a year ago, I posted about my scrap space. It still looks pretty much the same, with a few slight adjustments!
I've added a thread rack to hold the colorful threads...the little cup holds my needles.
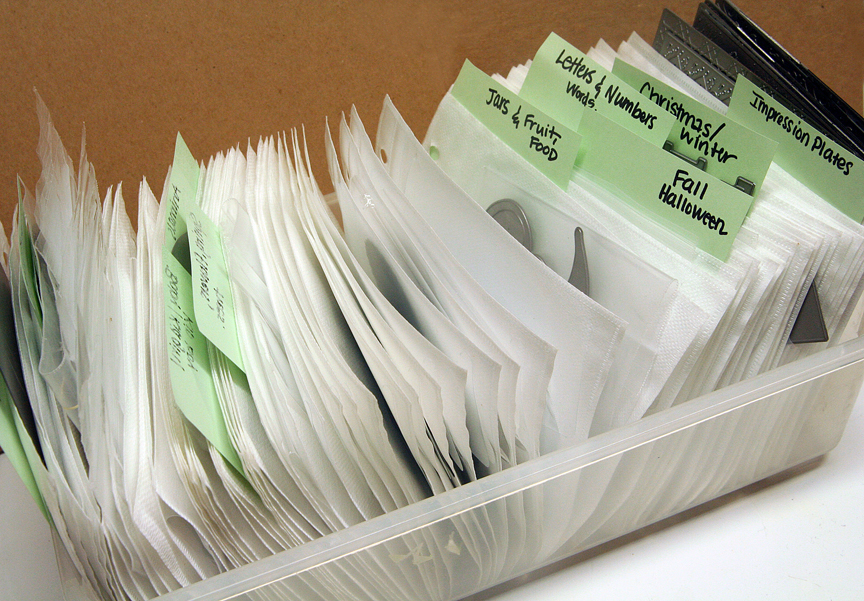
Recently, I needed to figure out a new die organization system for my Papertrey Ink dies. I wasn't quite sure how to get them organized. I tried them in a binder with CD sleeves, but that didn't really work for me because when I flipped the pages of the binder, the dies would fall out. I decided to take the CD sleeves out of the binder and put them in a container.

Now I can flip through them easily. For now, I'm just using sticky notes to divide them into sections. I divided them into these categories so far:

People (like the Simply Jane dies)
Tabs, Notebooks, Envelopes
Frames, Tags, Shapes (circles, Ad Sense shapes, etc)
Animals
Baby, Kid (Little Princess die, Truckin' It, etc)
Spring, Flowers, Trees
Jars, Food, Fruit
Fall, Halloween
Letters, Numbers, Words
Christmas, Winter
Impression Plates

What I love about this system is that I can add more or change my categories when I need to. Love flipping through to see all of my dies! I still need to label the actual CD sleeves with the die set names. The larger dies like the borders, Favor It boxes, etc. are in a large plastic baggie in my Papertrey Ink box next to my desk.

I have all my punches and stamping inks on the pull-out keyboard drawer of my desk, easily accessible...

My Papertrey Ink stamps are on the bookshelf organized by title alphabetically in CD cases, along with my Cricut cartridges.
Trust me, it's not always this clean! Oh, I organized my blog recently also and added some links to the top to clean it up a bit. What do you think?

Thanks for stopping by today. This week will be an exciting one -- Papertrey Ink celebrates its 5th ANNIVERSARY! So stay tuned to lots of projects, blog posts, giveaways and such.

Saturday, December 10, 2011

Made of Snow Mini...

You can't help but smile when you see a snowman, right? There's something so fun and enchanting about them that brings you back to childhood. I have a few projects to share with you made with a new stamp set and dies by Papertrey Ink called Made of Snow Mini, which will be available on the 15th.

Bear with me, I have a lot of ideas to show you! :)

The first thing I tried with the set is stamping a little background. I wanted to try out all of the different scarves, hats, mittens, faces and button choices! So many fun options...


I used Aqua Mist ink for the snowmen, and I placed all 3 of the snowmen on my stamping block, then created a pattern with them. I kept the 3 snowmen on the block, and stamped the image again below the first image. Then I filled in the corners of the background with one of the snowmen.

After stamping all the snowmen, I had fun filling in the hats, faces, etc. with Spring Moss ink, Aqua Mist ink and Pure Poppy ink!

You can see I also wrapped a little tag around the front of the card with felt and stitched it on. (The heart is die cut with a new border die by PTI coming out this month! I just trimmed one of the hearts out of the border!)
Here's a peek at the inside. I thought these would be fun as thank you cards after the holidays! The "Thanks so Much" is from an older set called Think Big Favorites #1.


Now, after having fun with the stamps, I wanted to try out the cute dies that go with these!
I imagined 2 cute friends holding hands...
"Hello, friend!" is a sentiment that is coming out this month from another set (and the tiny stamped hearts)! I die cut them, their scarves and hats, and then filled in any empty spaces with chalk, like the hats. I had to add some pink cheeks as well. A little die cut tab was stitched to the side.
After I die cut the snowmen out of white cardstock, I had this negative piece leftover and thought I could put it to good use, hence the next card!
Here you are seeing a peek at the new heart border die again. :) I used it with red felt. I backed the snowmen with an older October Afternoon Detours paper from my stash.

Last, I wanted to show you how fun these little guys can be on a layout! We had a dusting of snow the other day and I had to take pictures of our view from the front of our house! It was so pretty, just enough to cover the ground for Christmas.
I used a large Papertrey Ink calendar page as the base of my layout. The little stamped bubbles/circles are from the 2008 Holiday Tags collection.

The stickers and snow day chipboard are by Pink Paislee, and the number 8 and houndstooth paper are by a new company I recently discovered called Pretty Little Studio! "Happy" is from the Birthday By the Numbers set.
I hope you enjoyed the projects!

Please also visit Nicole, Betsy, Beth, Heather, Melissa B.,  Lisa, and Dawn for more peeks at some other new things this month at PTI!

Friday, December 9, 2011

i wonder if she wonders...

I've been scrapping up a storm the past few days trying to play catch up! The Little Black Dress kit club asked me to create some things with their December kit. It's a really pretty mix of teal blues, yellows and purples with a hint of black and oh. my. I am loving it!

I'm usually not a big user of purple, but I really like how this first page turned out. There is a really great mix of patterns in the kit!! Chevron. Check! Vintage book paper. Check!. Pockets and gems and beautiful ribbons. Check! I love that I tried a color that I don't usually use. Made me step out of my comfort zone just slightly!

THIS chevron-looking paper is my favorite in the kit, the one I grabbed first!
I was actually inspired for the page by the clear acetate title by Glitz here that says, "I wonder if you wonder." I wanted to use it for my focal point. This page came straight from the heart. My daughter's ADHD has been really tough on us as a family.

She has had it all her life, and struggled, she has to work harder than her peers. She doesn't talk about it much...and I really don't know how it's affecting her personally, or if she thinks about it at all. She has troubles articulating what she feels. She's a very resilient kid and doesn't let much get to her, which is good. I just wonder what she thinks, what the future will hold for her, or if she will overcome some of it when she matures a bit more. Right now, she is on medicine and doing great in school, getting all A's and B's. I don't want it to define her, but it is really a big part of her life right now.

A note about the design here: I wrapped the yellow and white ribbon around the pocket, so the pocket is hanging by the ribbon on the layout. The flower on top of the ribbon is a clear sticker in the kit. The dark yellow houndstooth is another one of my favorite patterns here! The white ribbon is gorgeous too, it's stitched with a white on white rose/leaf pattern. The title transparency is added right over the white ribbon. I cut the leafy shapes with the vintage book paper in the kit using a Papertrey Ink die called Turning a New Leaf.  I took this photo of Taylor and a friend when she was at a cheerleading game recently. I always wonder how her ADHD is affecting her friendships...
-----------------

The next project made with the kit was a card from one of the transparencies in the kit. I just folded it in half to create an anniversary card.


I wanted a place to write on the inside of the card, so I cut out a doily shape with my Cuttlebug from white cardstock with Papertrey Ink Doily Details die. I love how it shows through the front of the card and highlights the flower!

To create the little tag on the front that says "US", I simply punched a scalloped border punch out of white cardstock, then trimmed the piece down into little tags. Each scallop makes its own little tag. (See how-to photos.) It's a quick way to make your own mini tags!
----------------

My third project is another layout. The photos are of Kati and me at Thanksgiving this year!
Adding punched shapes and strips of paper are a great way to add color and pattern to a layout. Here I punched out a heart from the yellow paper and kept the negative of it, then added more hearts to create flow down the page. I also added stitching down the side of the page for an extra detail and some white paint splatters to brighten up the dark background. I am a big fan of keeping my layouts even and formal looking because I love unity, however placing some of the items off-center makes the layout more fun and not so predictable.

--------------------

Next up, a card. I cut the background with a Papertrey Ink die called Mat Stack 1, then added a chipboard frame from the kit. I rolled the kit ribbons into flowers.
Added a chipboard banner piece under the frame.(The paper is already glittered like that!)
------------------

This last one is actually my favorite - and it was the quickest page! I cut stars from some of the fun patterns and added a pic of Kati and our dog Maggie. I used one of the transparencies behind the photo to frame it. "Happy" is cut with a Papertrey Ink die called Wonderful Words.
I added some white cardstock on the edges cut with pinking shears, just to frame the whole layout without overpowering the page and taking attention away from the photo. Isn't that little silhouette button so CUTE?

Thank you for swinging by today. Please check out the Little Black Dress kit club!