Showing posts with label guest designer. Show all posts

Monday, April 20, 2015

Guest post for Bella Blvd...

Good morning and happy Monday! Before I am off to Taylor's high school today to help pack all of the band and choir uniforms for their upcoming Disney trip this week, I wanted to share a few projects I made for a guest post over at Bella Blvd!

Stop over to see full supply lists and read more about these, but on this first card, I created a background with Papertrey Ink's Cover Plate: Stitched die and die cut some of the papers with Circle Scribbles dies and Doodlie-Do dies for the leaves. Don't you love the font in the "hello"? That is from Bella Blvd's Color Chaos line, which I really liked and used a lot of for today's projects!

Simple and clean, yet very layered and colorful!

Next, another Color Chaos paper that I just added a few details over the top- chipboard, a few hearts in patterned paper and vellum and a seam binding ribbon. Seriously easy!

On the next card, I absolutely loved the paper from Color Chaos that had the color splashes all over it! I cut out a Cover Plate: Hearts die to add over the top. I love how the color is bursting through, yet it still has clean look with some white space to allow the eye to rest.
Some of the Color Chaos stickers and chipboard finish it off!

Here I added some chipboard sentiments from Bella Blvd's Ciao Chipboard collection, then cut a Big Hugs die to add over the top.
Adds a little bit of fun dimension.

My last card was inspired by all of the sticker borders and chipboard borders in the Bella Blvd collections. I created a background with them here as my base.

The saying was cut from one of the papers with a Mat Stack 5 die.

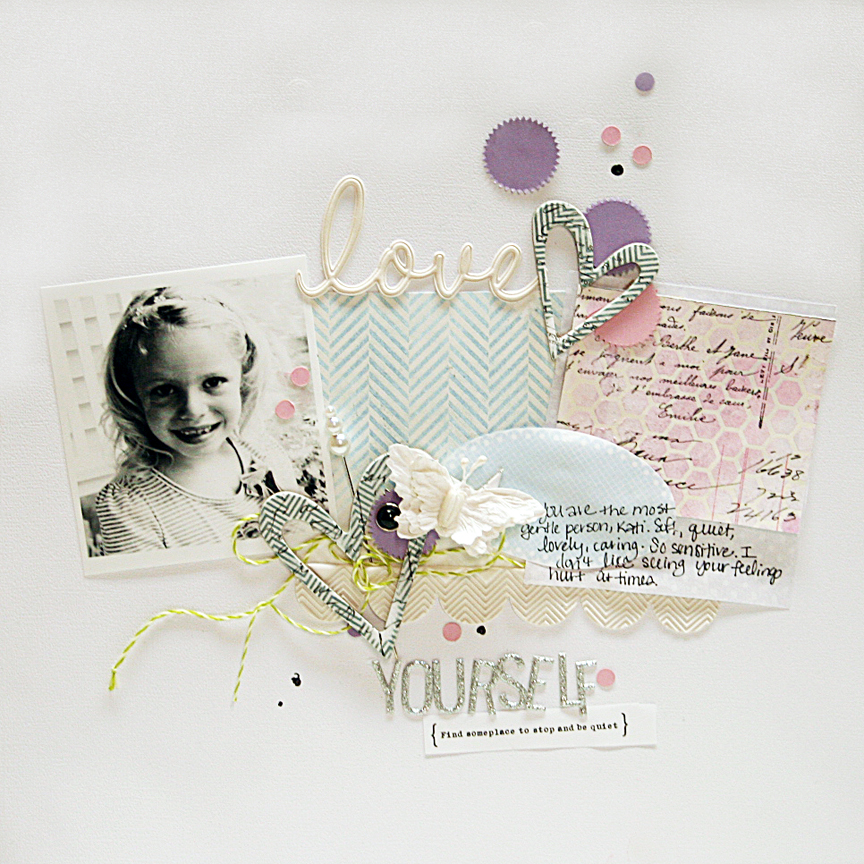
Last a layout with all of the pretty papers. It's been awhile since I've made a layout.

Trimming out these Life Is Beautiful butterflies from the lovely papers gave me a starting point to work with some great pattern and color! I decided to watercolor the background in sort of a rainbow effect with pinks, oranges and yellows. Then I added the butterflies in coordinating colors across the top to anchor the photo and journaling, which is about my relationship with my 15 year old right now...getting a little bumpy as any teen/mom relationship, but I know things will come full circle again one day, and I have to allow her to fly right now! It's so hard to let them go though, isn't it? I always write notes to my girls about my current feelings. I hope one day, these will have great meaning to them. Until then, it's a creative outlet for me... and a therapeutic one at that!

Hope you will stop over to check out Bella Blvd's collections, they are colorful and lots of fun to work with! Thank you to Bella Blvd for having me as a guest this month!

Wednesday, April 16, 2014

Inspired by a card sketch...

With just a few supplies, you can make a layered card like this that looks like you spent a ton of time on it. Working with a particular collection from a scrapbooking manufacturer really helps make the process quick, because everything coordinates in the line. For example, this Twirly Girly line by Chickaniddy Crafts...
All you need to make a card is a few items that coordinate to create a background and a focal point, and it was so easy to find pieces I loved in this collection!

Stop over to the Chickaniddy Crafts blog to read more about how their card sketch inspired the little bits and pieces I chose for this project. Thanks for reading today! Come by again soon!

Wednesday, April 9, 2014

You can never have too much pattern...

Are you looking for a way to use those stacks of patterned papers you have lying around? For my guest spot this week at Chickaniddy Crafts, we were to use a color combo they gave us, which inspired me to use lots of pattern and color. I love their Twirly Girly patterned papers, so I wanted to use a variety of patterns on my cards this week! 


On the first card, I created a chevron pattern by punching lots of the patterned papers with a 1 3/4" square punch and trimming them in half on the diagonal. Then I lined the triangles up to form a chevron pattern (just offset them slightly) and added a tiny bit of machine stitching across the rows. HERE is a tutorial I did on this technique before. A sticker label holds the sentiment and is popped up for dimension. Another sticker that says, "Thank You" was added over the top, a great way to add a sentiment to the card. 


On the second card, I went butterfly crazy and punched many butterflies from the patterned papers. To coordinate with the other card, I used a label sticker again with a sentiment sticker, "Party Girl". This one is one of those really quick cards you can make when you are on your way out the door to a birthday party and need a card in a hurry! Punches are often forgotten these days, but are a great way to use up those patterned papers you have and add so much color and pattern to your projects!

Want to try this color combo? Stop over to the Chickaniddy Crafts blog. It's a beautiful one that I think will really inspire you. :)

Wednesday, April 2, 2014

Chickaniddy Crafts guest designer...

Good morning, peeps! There is a super cute new scrapbooking company called Chickaniddy Crafts. Have you heard of them? I was delighted to receive an email from Heidi asking me to guest design for April with her new line, Twirly Girly! Well, she knows me all too well, because this line is certainly right up my alley. The prints and colors are so much fun. Swing by the Chickaniddy Crafts blog for a tutorial on how to create this card, and I'll be there each Wednesday this month with something new! :)


Friday, January 4, 2013

color, stories, inspiration...

First order of business today is choosing an eBook winner! Thank you ALL so much for the sweet comments. It's fun to see this book actually come to life. I truly hope you like it! The winner is #6 Kinnari! Please email me at dflanders71@hotmail.com to claim your copy, Kinnari.
Next, I have a layout to share. I don't know if you have heard of CSI: Color Stories Inspiration? Pink Paislee is sponsoring them this month, so they asked me to create a layout with one of their "Case Files". They give you a color story to work with, and also some other inspirations and journaling prompts to choose from. My color story was #53: lavender, light blue, light green (twine), gray, and soft pink. Here is what I came up with.


I chose to use scallops and embossed paper, and the journaling prompts "soft, lovely, quiet" from the list of inspirations they gave me. For products, I used Pink Paislee's Artisan line - Artisan Elements, Artisan Words (love), Artisan Chipboard (hearts rubbed with gray ink), Artisan Wings and the papers that are embossed. I added mist to the papers to bring out the patterns. The glittery silver alphas are from the Portfolio collection. My daughter Kati is soft spoken like me, and sometimes gets her feelings hurt very easily, so I wrote a little note about this. She lets people get to her just like I do.  She is the sweetest, most loving, caring person. I want her to know how special she is and not to forget that sometimes! ...

Speaking of Pink Paislee, we have announced our NEW design team for 2013 today on the blog. Please stop over and welcome the new girls! Can't wait to see what they'll make this year. And we have a new look to our website too - come check it out! On Monday, we'll begin our CHA sneak peeks. Have a great weekend!


Saturday, October 27, 2012

make your own chevrons and a challenge...

Are you up for some scrapbooking fun this weekend?

Cocoa Daisy is having a crop all weekend with challenges, mini classes and prizes! I was asked to guest design for them for November, so I played along with one of the challenges for the crop.

Here is my challenge if you want to play along: Create your own chevrons using my tutorial below on a layout or card!

Tutorial: make your own chevrons very quick and easy with a square punch...


Easy, right? You can see on my layout that I used this technique on the left side of the page and adhered them onto my page...then on the right side of the page, I used the same technique except I misted over the chevrons and removed them from the page, journaling over the design after it was dry. Love how it extends the chevron look!

I used the papers and stamp from the main kit and the Dear Lizzy tags from one of the add-ons to create the title work, then I journaled about things that make me happy today! I don't often do layouts about myself, so I really had fun with it.

Create a layout or card, or anything you dream up with this technique and post it over at Cocoa Daisy! We would love to have you play along with us!


Monday, April 2, 2012

Scrapkit Studio...

I have been working on this little mini album the past week or so, coming back to it here and there and adding more when I have time! That seems to be the trick for me, as I usually like things more on the simpler side, but when I leave a project and come back to it, I can see better where something might need to be added in or where it feels empty!
This mini album was made with a kit by ScrapKit Studio. When I received this kit in the mail, I was pleasantly surprised...it's like no other kit I've ever tried! EACH piece is already pre-cut for you! I didn't cut a thing in this little album.
You can either follow the directions provided to you to complete the album, or go more on your own and complete it how you'd like. I decided to just wing it, and do what feels natural to me. The only thing I really added to this kit was the black houndstooth tape by Pink Paislee, some white paint and machine stitching.

On this first page spread, I decided to leave one of the chipboard pages blank with no patterned paper and instead added some paint around the edges, then journaled over the top.

I've included some pictures of our family that we took of us at Thanksgiving. We were trying to get a family photo for our Christmas picture (which I never sent out because I ran out of time!)

There are chipboard shapes included with paper shapes to match, so I covered the chipboard frame here with the blue paper and stitched around it. I also added some messy stitching to the red heart. The white and black alphas are in the kit - as well as every punched shape you see! Yes, everything! The owner of this kit club works so hard to pre-cut everything you will need to create the album.
Here I used the white letters on white cardstock. I love the tone-on-tone effect! Another thing I like to do is tie twine or ribbons around the rings in between pages. You can also add more photos on the rings! Simply punch holes and add the photos in between pages.
This little pocket came in the kit also. All you do is fold the pocket and adhere the sides. I decided to do a little zig zig stitching on the sides of my pocket. I added the banner and felt word over the top from the kit. I used the red ribbon to twirl around into a little rose and attached a pin through it.
Here is another chipboard piece that I painted instead of adding paper to it...love how that looks.
A couple of little embellishments add to the page and photos, but don't completely take it over like this page below.
Some of our pictures were blurry from that day, but I scrapped them anyway...we were having fun together in the pics being silly!
And another peek at the cover!
Don't be afraid to mix and match colors when making a mini album - as long as you have a reoccurring color scheme throughout the book, it will keep it looking cohesive. All of the Basic Grey Picadilly papers are double sided, so you could end up with a book looking totally different than mine if you chose the other sides! Many options with this kit, yet what I loved was not so many decisions on what shapes to cut, etc. It was fast and super easy.


Here is the link to the Live Love Laugh kit. Hope you enjoyed my take on this little album! :)

Wednesday, March 28, 2012

an idea for twine

Twine always lends a helping hand to any project! :) Here I've used twine from Trendy Twine's Original Mini Pack of colors. I cut a Pink Paislee - London Market die cut in half and punched holes on the two ends to hang a little paper heart banner with the "Strawberry Cupcake" twine.
I really like how the kraft paper looks with the fun colors! The pink and white twine shows up nicely on the kraft. Twine can be used for so many things, but hanging things with the twine is one of my favorite ways to use it! You can punch any shape from patterned paper, then use a small hole punch to create a hole for hanging. String them on the twine, and you have a cute banner for a card or layout!
Want more twine ideas? Visit the Trendy Twine blog!

4 You Friend card:
Stamps: Mat Stack 2 and Mat Stack 5 by Papertrey Ink
Ink: True Black by Papertrey Ink
Paper: Raspberry Fizz Pattern Pack by Papertrey Ink, Aqua Mist Pattern Pack by Papertrey Ink, kraft cardstock by Papertrey Ink, teal paper by Heidi Swapp
Dies: border punch by Fiskars
Other: twine by Trendy Twine, die cuts - London Market Ephemera by Pink Paislee, number - London Market Jumbo Numbers by Pink Paislee.
---------

WE HAVE A WINNER for the Sketchbook 4 class, since the class starts SOON, April 1st! Congratulations to SUSAN!

Random Integer Generator

Here are your random numbers:
8
Timestamp: 2012-03-27 23:14:09 UTC

susan said... 8
This is the inspiration I need! My fingers are crossed :)