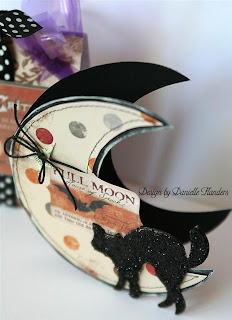
 Here is a how to:
When you open Photoshop, click File, New and then size your document about 6x6 inches to start with. Click OK. You will see a blob looking shape on the left hand side in the tool bar. (If you can't see your tool bar, click Windows and then Tools to open the tool palette.) This tool is otherwise known as the Custom Shape Tool (not the blob tool as I like to call it...LOL).
Click on these to see them in better detail.
 Next, you will go up to the top of the screen and you'll see a drop down menu of shapes. I chose the moon shape. Then put your cursor to your document box up in the left corner and click the mouse, holding it down and drag it across your document to "DRAW" the shape. You can click View and Rulers to see the ruler on your document and tell what size you are drawing your shape. You can make your shape any size, depending on how big you would like your card. To resize, click Control and T at the same time, and it will allow you to make your shape bigger or smaller.
 That's it! Then you just print out your shape, cut it out and trace it onto a piece of folded black cardstock. Make sure when cutting out your card that you leave a bit of a fold, so the card doesn't fall apart! I decorated this with Melissa Frances paper, sticker and fall chipboard covered with black glitter and a Making Memories button.
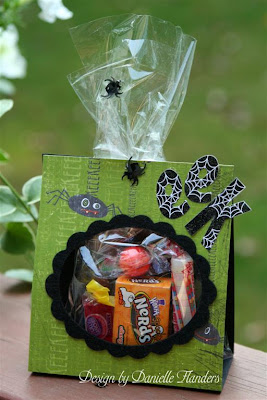
 To create the Creepy Critters treat bag, I cut a piece of Melissa Frances paper 12" x 4" and folded in at 5" on both ends, leaving a 2" bottom. Then I wrapped some candy in purple cellophane and tucked it inside the folded paper and stapled it all together at the top! I cut the cellophane into strips to give it a funky look. Lastly, I wrapped a strip of ribbon around the bag and tied in a knot at the top, then added a Halloween sticker over the front.
I made a similar treat bag last year (the green EEK bag), with the exception that I cut a hole in the front to allow the candy to peek through. The little confetti spiders were a fun addition!

We had fun this weekend picking up some more pumpkins at the patch, carving them and roasting the seeds!
I'll be back soon with some photos! Have a great Monday!
Edited to add: Yes, I forgot one step! You DO have to change the moon to another color besides white for printing purposes! Click the color button at the top of the screen in Photoshop and choose another color. Thanks!


32 comments:
*gasp* GORGEOUS works of art....lovely creations...TFS!!!
Oh my goodness, how stunning!
A great work of art!!!!!!!!!!
Beautiful! Errrrr...spooktacular! =)
Your 'shape' cards are always amazing. Thanks for the tutorial! Cute bags as well, Dani!
OMG!!!! I LOVE, LOVE this card!!!! I spent this weekend making the cards in your card kit, and I love everyone of them. It was fun to sew around, and put together the pumpkin!!! can't wait to try this one!!! Have a wonderful week!! Char
So nice work.
These are too cool and thanks for the tutorial!
Oh, these all look so fabulous!! Well done, Dani!!
Absolutely gorgeous Dani!! Can I just be you for like 5 minutes? I LOVE your creations. I can't tell you that enough!!! :)
HUGS to you today,
Leslie
AAHHHHHHHHHHHHHHHHHH!!!!! GIRRRRRL! I just love your shaped cards! So much fun! I can't get over it!
Truly a FABULOUS card!!!
Danielle, your creations are really beautiful. It is always a great inspiration to visit your site. How do you come up with all of these ideas? I wish I had some of your talent.
How clever!!! I would have never thought of doing the shape on the puter. Thanks for the tutorial!
Well hello Queen-o-Shaped-Cards!!!
;D
This one is incredible Dani... LOVE every little bit of it girl!!!
you are a clever girl! gorgeous! i just want to eat everything you do right up!
I absolutely adore your Cardalicious projects, Dani! You are so truly amazing. That moon shape is just fabulous. Thanks for the tutorial..I have no idea how to do stuff like that. Love the treat package, too. I think the cello looks really great with the fringe cut. I've never thought of that before.
Have a great day!
mmmm...hmmmm...YOU are amazing. How awesome is this card? And that treat bag? Fabulous! I love your creativity and thanks for sharing the secret on how to create the treat bag and that fun moon! Lotsa inspiration here! Can't wait to see the pumpkin pics! I love carving pumpkins and roasting the seeds but no doing it this year! *sad*
man...i'm running out of words..you never seize to amaze me..awesome work as always!
These are all fabulous! I realllly love your moon card! :D
you never cease to amaze me! Gorgeous work girl! :)
Rae
This is a great idea - thank you for sharing with us. For those using Elements 5, there is one additional step, otherwise a white shape can not be printed: EDIT > STROKE > 2pixels in any foreground color that is dark - now Print!
You and your card are amazing.. I'm so in love with this card. The glitter, the papers, the shape.. you rock!
Amazing!! You are so talented!! Everything you make is incredible!! Thank you for being such an inspiration! Hugs...
That card is so adorable Danielle! I just adore it!
~Lea
I've visited your blog for a few months and had to finally post! I absolutely just love this card, it is just gorgeous, as is all your creations!
This cute little card and candy bag got a shout out on ScrapScene. Kewl.
how awesome is that moon card?? Wow...
This card is so beautiful, Dani! Great tutorial! Thanks so much for the inspiration!
You even make halloween things look super cute!!
Wow..this card is amazing!
What a fun card, Dani! Thanks for the computer tip!
Post a Comment