
Showing posts with label baby. Show all posts
Showing posts with label baby. Show all posts
Thursday, May 7, 2015


Tuesday, April 14, 2015
Introducing NEW! Make It Market kit: Wee Folk...
Welcome back to another group post for Papertrey Ink. Today we are previewing the new mini Make It Market Kit called Wee Folk by Betsy Veldman! This mini kit comes with pre-printed patterned papers, dies, a stamp set and few extras.

On the first two cards, I simply cut out the pre-printed animals with the dies in the kit and popped them up on pre-printed papers. Added a strip of pattern at the top and twine from the kit.
 The pins were from my stash. I poked them through the twine, then cut off the sharp tip with wire cutters.

These two cards were super quick and easy! Betsy's done all the hard work already by creating these adorable papers and icons. I just wanted to add a tiny bit of dimension by popping up the deer.

Last, a card that required a little more effect, but totally worth it in my opinion! I love how it turned out. I cut out a Mat Stack 5 piece from Classic Kraft cardstock, then used the stamps and dies to create a little scene on the front.

The background was made with the Bookprint Alphabet Die. I left the die letters wired in tact on the metal die sheet (didn't cut them apart yet), so I was able to place the whole alphabet die over two layers of cardstock and run it through my Cuttlebug, which created an embossed look, instead of die cutting the alphas out. It almost looks like a little book plate for a book, doesn't it? I think it would make a cute notebook cover also! On the inside I stamped "sweet baby" from the kit stamps.

Well, I hope you enjoyed these ideas. The Wee Folk mini kit will be available at Papertrey Ink on April 15th at 10pm EST. Now head on over to the other DT blogs to see what they've made also!
The pins were from my stash. I poked them through the twine, then cut off the sharp tip with wire cutters.These two cards were super quick and easy! Betsy's done all the hard work already by creating these adorable papers and icons. I just wanted to add a tiny bit of dimension by popping up the deer.
Little One card set:
STAMPS: Make It Market Mini Kit: Wee Folk
INK: none
PAPER: Make It Market Mini Kit: Wee Folk
DIES: Make It Market Mini Kit: Wee Folk
OTHER: twine - Make It Market Mini Kit: Wee Folk, pins - My Mind's Eye, pearls - Melissa Frances.
______
Last, a card that required a little more effect, but totally worth it in my opinion! I love how it turned out. I cut out a Mat Stack 5 piece from Classic Kraft cardstock, then used the stamps and dies to create a little scene on the front.
Welcome Sweet Baby card:
STAMPS: Make It Market Mini Kit: Wee Folk
INK: Versamark for embossing, Dark Chocolate
PAPER: Make It Market Mini Kit: Wee Folk
DIES: Make It Market Mini Kit: Wee Folk
OTHER: embossing powder, pearl - Melissa Frances.
______
STAMPS: Make It Market Mini Kit: Wee Folk
INK: Versamark for embossing, Dark Chocolate
PAPER: Make It Market Mini Kit: Wee Folk
DIES: Make It Market Mini Kit: Wee Folk
OTHER: embossing powder, pearl - Melissa Frances.
______
Well, I hope you enjoyed these ideas. The Wee Folk mini kit will be available at Papertrey Ink on April 15th at 10pm EST. Now head on over to the other DT blogs to see what they've made also!
Saturday, March 7, 2015
butterflies, stitching and Cienna...
There's a new collection coming to town, and it's called Cienna by Elle's Studio. How cute is that name! It will be available on March 10th. I wanted to use some of the beautiful patterned papers together, so I trimmed out a bunch of butterflies and added some machine stitching over the top for a quick baby card.

You can read more about this card at the Elle's Studio blog!

I'm currently waiting on my next Papertrey Ink box to arrive, and this morning I filmed a little card making segment with 9News here in Denver on Craftsy.com's behalf! Card making is taking over the world one town at a time! hee! It was a fun experience and to see where they film the news and to be a part of it! It will be on air later in March on the Friday noon news. One thing I learned: 6 minutes FLIES by when you are showing someone how to make a card. Just simply not enough time to talk about what I love! Have a crafty day, friends!
Tuesday, May 13, 2014
Ultimate Baby Inspiration...
((UPDATE: HERE is a video on how to make the felt roses that I've done on these booties.))
I have a sweet little baby ensemble to show you today! My project started out with these baby booties and then I made the tag to match and the card to coordinate also! Let's start with the card...
I have a sweet little baby ensemble to show you today! My project started out with these baby booties and then I made the tag to match and the card to coordinate also! Let's start with the card...

This is made with a new stamp set called Rattled. I used the new Instant Photo 1 die to cut the frame around it and stamped the dots with Polkadot Basics III. I popped it up with foam adhesive and tied seam binding around the frame before attaching. In the center, I used the Rattled stamps and dies. I used Glossy Accents on the rattle to make it shiny and dimensional.

Oh Baby! card:
(All supplies by Papertrey Ink unless otherwise noted.)
STAMPS: Rattled, Polkadot Basics III
INK: Plum Pudding, Lavender Moon, Simply Chartreuse, True Black
PAPER: Vintage Cream
DIES: Rattled, Instant Photo 1 die
OTHER: pearl by Melissa Frances, Glossy Accents - craft supply.
______
(All supplies by Papertrey Ink unless otherwise noted.)
STAMPS: Rattled, Polkadot Basics III
INK: Plum Pudding, Lavender Moon, Simply Chartreuse, True Black
PAPER: Vintage Cream
DIES: Rattled, Instant Photo 1 die
OTHER: pearl by Melissa Frances, Glossy Accents - craft supply.
______
Next, we have some baby shoes made with the new Baby Booties dies and Baby Bootie Detail dies! Aren't they adorable? I can't wait to see what everyone else made with these. Erin Lincoln came up with these dies, and they are so creative! Now I really want to go to a baby shower (girl, of course!), so I can give them away!

The felt colors I chose for my booties were Vintage Cream, Lavender Moon and Spring Moss. These were WAY easier than I thought they were going to be to make. Erin's videos explain it perfectly! Not hard at all, just takes a little bit of time to get them all stitched up. I think this pair took me about an hour at the most, but I had so much fun and was amazed at the result when I was finished! (I ran to show my hubby, but he gave me a funny look! HA!) To be so excited about something like this...I guess men just don't "get it", do they?

To decorate the tops of these, I used the "Spatted Bow" with the scalloped edge. (Except I didn't use the bow piece on top, just the scalloped piece.) Instead of the bow, I made my own felt flower with a strip of felt and die cut leaves with the The Sweet Life dies.

To add a little tag for the recipient, I cut the same scalloped die I used on the shoe, except this time I cut it out of cardstock instead of felt, so I could stamp on it. I stitched it up with cream floss to coordinate with the booties, then I used Rattled stamp set for the sentiment and bow on the tag.

Erin Lincoln has posted a video on how to use these dies to create baby booties. Watch it HERE. She shows you how to make all of the different kinds: Fringed Moccasins, Penny Loafers, Mary Janes, etc. Be sure to watch the main video first on making the basic bootie!
Erin Lincoln has posted a video on how to use these dies to create baby booties. Watch it HERE. She shows you how to make all of the different kinds: Fringed Moccasins, Penny Loafers, Mary Janes, etc. Be sure to watch the main video first on making the basic bootie!
Baby Booties and Just For You Gift Tag:
(All supplies by Papertrey Ink unless otherwise noted.)
STAMPS: Rattled
INK: Lavender Moon, Simply Chartreuse
PAPER: Vintage Cream
DIES: Baby Booties dies, Baby Booties Details dies, The Sweet Life dies (leaves), Rattled (bow on tag)
OTHER: Vintage Cream felt, Lavender Moon felt, Spring Moss felt, cream floss, safety pin, pearl by Melissa Frances.
STAMPS: Rattled
INK: Lavender Moon, Simply Chartreuse
PAPER: Vintage Cream
DIES: Baby Booties dies, Baby Booties Details dies, The Sweet Life dies (leaves), Rattled (bow on tag)
OTHER: Vintage Cream felt, Lavender Moon felt, Spring Moss felt, cream floss, safety pin, pearl by Melissa Frances.
______
What do you think, will you be getting these dies? They'll be available in just a couple of days, May 15th at 10 pm EST at Papertrey Ink. Visit the rest of the PTI team to see more baby booties!
Tuesday, July 23, 2013
Studio Calico's Storytime...
Studio Calico is revealing their new lines, so I can share a couple of cards made with their new Storytime line for CHA...a girl card and a baby boy card...
 On the girl card, I cut some large butterflies from the text paper and layered them. The dies are the Beautiful Butterflies dies by Papertrey Ink. They are layered over the soft pink graph paper and a pretty floral journaling card! I added a bit of ribbon, a pin and some stitching. I love these new flair pieces that match the line! And the pearls!

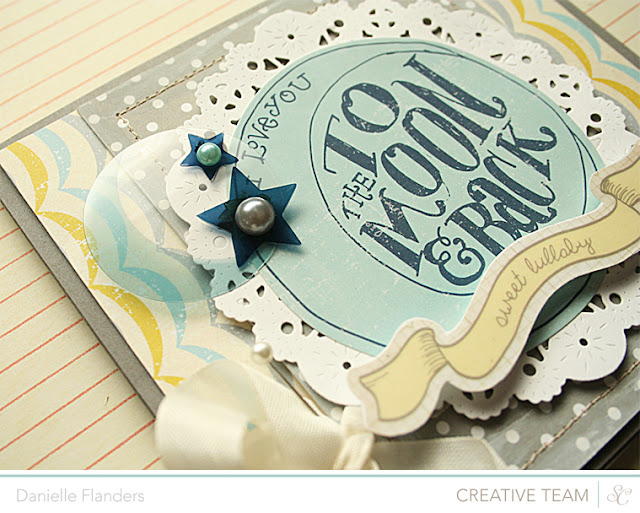
Next, a baby boy card... love the papers from this line. I used the soft gray dot and the pretty scallops. I wanted to highlight the big "to the moon and back" sticker, so I cut out a Parisian Lace doily with a die and backed the sticker with it.
 Here you can see these cute acrylic shapes - the moon and stars! A-dorable! I used a clear sticker (sweet lullaby) and just backed it with white cardstock, so it shows up a bit better. New pearls to match the line will be available too!
You won't want to miss all of the gorgeous projects by the team. HERE is a link to the new Storytime collection (projects), HERE is the new Thataway line and HERE is the new Magical line. :)


You won't want to miss all of the gorgeous projects by the team. HERE is a link to the new Storytime collection (projects), HERE is the new Thataway line and HERE is the new Magical line. :)
Thursday, June 27, 2013
Studio Calico's Valley High card kit...
Like totally, for sure!

The Valley High card kit is available tonight at midnight EST at Studio Calico for non-subscribers (available now for subscribers)! I made 9 cards just with the kit you see above - this is the main card kit! Isn't it fun?

On this first card, I used the floral stamps in the kit and stamped onto the lighter blue patterned paper to create a background. The big background flower was die cut with the Lovely Layers dies by Papertrey Ink. To make the ribbon ruffly, I stitched on it with my machine a little bit and pulled on the strings to ruffle it. Then I wrapped it around the card front and folded it over in the front a bit and stapled it for a soft look. The top piece is cut with Papertrey Ink's Edgers #3 dies.

Here I wanted a white background, but with a textured feel, so I cut the white cardstock with a Parisian Lace Doily die.
 I have a butterfly punch by Martha Stewart that is an oldie, but still a goodie! Punches are a great way to add lots of pattern and color. I stamped the "hello" speech bubble with Harvest Gold ink by Papertrey Ink, but trimmed off the extra and just used the hello part.

I wanted to use the stamps in the kit to create a fun and colorful background, so here I used Sweet Blush ink, Raspberry Fizz ink, Aqua Mist and Hawaiian Shores ink by PTI. To get the stamped off look, just keep stamping the saying without reinking.
 A quick and simple one layer card, but yet it has lots of dimension to it.

I wanted to feature this gorgeous paper, one of my favorites in the kit, so I used it as a background here and stamped the two flowers and "friends" sentiment onto the tag.
 The heart is cut with a Heart Border die.

Isn't this chipboard fun? I had to use it up on a card. To keep the design simple, yet fun, I wanted to punch circles and add lots of color.
 The stripe is actually from the 6x6" paper pad front!
This one was very simple also, I layered some of the papers in a crooked manner for a fun feel and punched a big 2" circle for the center. There is an index strip in the 6x6" paper pad which shows all the fun patterns in the pad, so I cut a piece of that index strip to use on this card to add lots of color.

Another cute chipboard piece from the kit...you could paint these, but I left mine plain.

On the baby card, I used a Button card die to cut the little squares and a Wonderful Words: Baby die for the word. You could also use your Cameo die cutting machine to cut a saying if you don't have these dies!
 I love using my dies on my cards and use my Cuttlebug machine to cut them, it's so easy, love that I don't have to turn it on...simply layer my paper and my dies on the plate and hand-roll it through the machine.
 Next, I decided to use the rest of the paper pad cover on a card! ha Just love those stripes!
 I used the Button Card Die again and trimmed around the negative to make a frame. The "happy" was cut with the Wonderful Words Die Collection.
 Are you still with me?! :) The papers in this kit are so cute, aren't they!
Last, but not least the sunburst or floral stamp was used as a border. I stamped it half way off the edges with Classic Kraft ink to create a frame around the design.

The ribbon in the kit was used to make little ribbon roses, and the leaves were cut out of white cardstock with the Turning a New Leaf die. Here's a little video I made a very long time ago on making these rolled ribbon roses. Skip ahead to the 2 minute mark! Or I have this video also with crepe paper rolled flowers, but it's the same idea.

If you liked this kit, get signed up for the monthly card kits at Studio Calico!
The Valley High card kit is available tonight at midnight EST at Studio Calico for non-subscribers (available now for subscribers)! I made 9 cards just with the kit you see above - this is the main card kit! Isn't it fun?


I wanted to use the stamps in the kit to create a fun and colorful background, so here I used Sweet Blush ink, Raspberry Fizz ink, Aqua Mist and Hawaiian Shores ink by PTI. To get the stamped off look, just keep stamping the saying without reinking.


I wanted to feature this gorgeous paper, one of my favorites in the kit, so I used it as a background here and stamped the two flowers and "friends" sentiment onto the tag.


Isn't this chipboard fun? I had to use it up on a card. To keep the design simple, yet fun, I wanted to punch circles and add lots of color.
 The stripe is actually from the 6x6" paper pad front!
This one was very simple also, I layered some of the papers in a crooked manner for a fun feel and punched a big 2" circle for the center. There is an index strip in the 6x6" paper pad which shows all the fun patterns in the pad, so I cut a piece of that index strip to use on this card to add lots of color.


On the baby card, I used a Button card die to cut the little squares and a Wonderful Words: Baby die for the word. You could also use your Cameo die cutting machine to cut a saying if you don't have these dies!
 I love using my dies on my cards and use my Cuttlebug machine to cut them, it's so easy, love that I don't have to turn it on...simply layer my paper and my dies on the plate and hand-roll it through the machine.
 I used the Button Card Die again and trimmed around the negative to make a frame. The "happy" was cut with the Wonderful Words Die Collection.
Last, but not least the sunburst or floral stamp was used as a border. I stamped it half way off the edges with Classic Kraft ink to create a frame around the design.

The ribbon in the kit was used to make little ribbon roses, and the leaves were cut out of white cardstock with the Turning a New Leaf die. Here's a little video I made a very long time ago on making these rolled ribbon roses. Skip ahead to the 2 minute mark! Or I have this video also with crepe paper rolled flowers, but it's the same idea.

If you liked this kit, get signed up for the monthly card kits at Studio Calico!
Wednesday, May 15, 2013
Release day...

The first card is made with the new Tiny Triangles stamp set and the Cover Plate: Triangles. The triangles all patched together reminded me of a baby quilt.

When I first sat down to make something with the triangles, I was stamping directly onto my practice cardstock. I am not very good at stamping them all straight and getting them just right, so I used the new Cover Plate: Triangles to cut a bunch of triangles out first and then stamped these little pieces. This way you can adhere them onto your card or project and get them straighter, and you can play around with the patterns and move them around as you'd like before deciding on a design!

"Baby" is cut out with the new Wonderful Words: Baby die. The "congratulations" sentiment came from the new Wonderful Words: Baby stamp set.

New Baby card supplies:
STAMPS: Wonderful Words: Baby, Tiny Triangles
INK: Berry Sorbet, Harvest Gold, Sweet Blush, Aqua Mist, Soft Stone, Hawaiian Shores
PAPER: Rustic White
DIES: Wonderful Words: Baby die
OTHER: Pebbles clothespin, seam binding, washi tape from a Studio Calico kit.
----------
On the second card, I used Pure Poppy and Sweet Blush ink stamped directly onto Sweet Blush cardstock. It shows up a little better in real life! I love the tone-on-tone of the inks and matching cardstocks by Papertrey Ink.
 I used Fresh Snow (white) ink and just rubbed the ink pad onto the cardstock around my sentiments for a soft look. The stamps are new, and they are Side By Side Sentiments and Pedal Pusher stamp set (thank you).
 A fun little banner was created with some chipboard I had on hand and a couple of the Tiny Triangles. The frame was die cut with the Mat Stack 4 dies. I cut the larger one first, then laid the smaller one on top of the cardstock that I had just cut, and I cut it again, leaving this outline that I can use as a frame. Fun technique!
With Love. From Me to You. card supplies:
STAMPS: Side By Side Sentiments, Pedal Pusher, Tiny Triangles
INK: Pure Poppy, Sweet Blush, Fresh Snow
PAPER: Sweet Blush, Rustic White, and Aqua Mist cardstock, Harvest Gold Patterned Pack
DIES: Mat Stack 4, Cover Plate: Triangles, Tiny Tags
OTHER: Opaque Gems by Studio Calico, banner chipboard by My Mind's Eye (Boy Crazy line).
----------
The next one was made with Stitched Sentiments (to spell out "sweet"), the new Boutique Borders: Baby stamps and Ruby Rose (flowers and dots on the butterflies). Oh, and the small "sweet" saying on the butterfly is from Polka Dot Parade #4.


Beautiful New Baby card supplies:
STAMPS: Boutique Borders: Baby, Stitched Alphabet, Ruby Rose and Polka Dot Parade #4
INK: Sweet Blush, Pure Poppy, Spring Moss, Aqua Mist, Vintage Cream, Fresh Snow
PAPER: Rustic White, Aqua Mist, Classic Kraft cardstock
DIES: Butterfly Kisses die
OTHER: Rustic Twine, buttons by My Mind's Eye (Boy Crazy line).
----------
Can you guess what I made these photo corners with? These are the florals that go in the basket of the bicycle from Pedal Pushers! "Sweet, little and baby" are from the Wonderful Words: Baby stamps and dies.


Sweet Little Baby card supplies:
STAMPS: Wonderful Words: Baby, Pedal Pushers
INK: Sweet Blush, Pure Poppy, Vintage Cream, Fresh Snow, True Black
PAPER: Rustic White, Sweet Blush, Classic Kraft
DIES: Wonderful Words: Baby
OTHER: seam binding.
----------
I wanted to go more boy-ish on this one, which was made with the new Polka Dot Parade #4 stamps and dies. A bunch of cute teddy bears in many colors steal the show. :)


STAMPS: Polka Dot Parade #4
INK: Summer Sunrise, Harvest Gold, Pure Poppy, Hawaiian Shores, Classic Kraft, Dark Chocolate
PAPER: Classic Kraft, Rustic White, Aqua Mist
DIES: Polka Dot Parade #4 dies
OTHER: Rustic Twine.
----------
Last but not least, a patriotic card. I used Papertrey Ink's new shimmer cardstock (black) and stamped the fireworks in Fresh Snow ink. I stamped the circle stamp in Pure Poppy, cut it out and layered it with some chipboard stars by Pink Paislee from their Artisan line. The stars were rubbed with Hawaiian Shores ink to add some color.


Land of the Free card supplies:
STAMPS: Red, White & Blue
INK: Fresh Snow, Hawaiian Shores, Pure Poppy
PAPER: Shimmer Cardstock, Aqua Mist, Rustic White
DIES: Star Border
OTHER: Rustic Twine by Papertrey Ink, Artisan Chipboard by Pink Paislee.
----------
That's it for me! For more ideas, visit the other team members to see what they've made with these same sets. All of these products will be available on May 15th at www.papertreyink.com.
Betsy Veldman
Nichole Heady
Subscribe to:
Posts (Atom)