Showing posts with label aqua mist. Show all posts

Saturday, August 24, 2013

Noon EST: "Mixing mists to match"

Welcome back. We are here with another Stamp-a-Faire group post, mixing mists. With this technique, you'll learn how to use ink refills to create perfect coordinating mists for all of your favorite stamping ink colors.
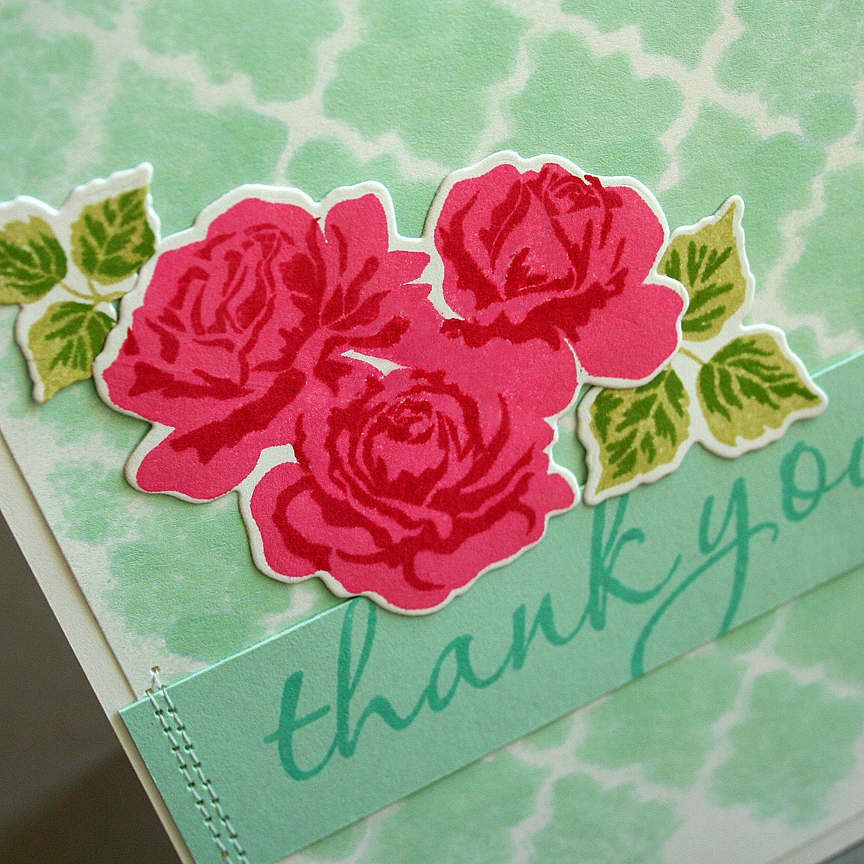
Here I have made my own mist to match the Aqua Mist cardstock and Aqua Mist stamping ink. I wanted to create my own background by misting over a die cut. You can see it creates a very soft, dreamy background!


Here's how I made my own mist!

I used a Maya Road Mister Bottle and put in about 75 drops of Aqua Mist refill ink. (This is the ink that you refill your stamp pad with.) I mixed in about 1/2 cup of rubbing alcohol. That's it! Super easy!
Now I can mist to create a background. I die cut a piece of cardstock with the Quatrefoil Cover Plate die and placed it over white cardstock. Spray until you achieve the look you want.

Now you can leave it as is and trim it out (like I did) or you can try layering the cover plate over the top offsetting it a little for a layered look! 

But I chose to leave mine plain for today, so you could see how it looks by itself with just the misting, however. (Just another idea for you to try in the future.) I added some die cut flowers from The Sweet Life and a strip of Aqua Mist cardstock with a "thank you" stamped from Think Big Favorites #5.

Hope you'll give mixing your own mists a try! Visit Nichole's blog for more mist ideas.


Thank You card:
STAMPS: The Sweet Life, Thing Big Favorites #5
INK: Aqua Mist, Hibiscus Burst, Pure Poppy, Spring Moss, New Leaf inks
PAPER: white and Aqua Mist cardstock
DIES: The Sweet Life, Quatrefoil Die Cover Plate
OTHER: Aqua Mist refill ink, Maya Road Mister Bottle, rubbing alcohol, machine stitching.

Friday, June 14, 2013

Round Repeats...

We're back with another Papertrey Ink group blog post to share peeks of a new stamp set called Round Repeats. You'll have so much fun with this one, I promise you! There are several stamps in this set, just waiting for your creativity to be unleashed. :)

On the first card, I kept it simple and used the stamps to create a fun border around the sentiment. Very simple and quick card, one layer. Well, technically it's a two layer with the card front added to the base. :)

I started with the Raspberry Fizz ink in the corners, then added the Summer Sunrise ones. Last, Sweet Blush ink fills in the centers. I used a Boutique Borders: Thanks sentiment and frame.

Sending Sincere Thanks card:
STAMPS: Round Repeats, Boutique Borders: Thanks
INK: Raspberry Fizz, Summer Sunrise, Sweet Blush, True Black
PAPER: White, Harvest Gold
DIES: none
OTHER: none.

--------

After making a border, I wanted to try stamping these Round Repeats in a pattern to create a focal point. I made a flower with them by stamping them 4 times in a circle with Summer Sunrise ink. I popped the finished flower up over two Bountiful Banner die cuts. (I made two die banner cuts, one for each side of the flower in Raspberry Fizz ink, something different than the typical green leaves!) 
I used Background Basics: Text Style in Fresh Snow ink on Classic Kraft cardstock. A sentiment finishes it off from the new Bigger Blooms stamp set!

I was out of brown cardstock, so I found a chocolate colored tag in my stash from Creative Cafe (remember them?) and trimmed it down to fit with my card.

You're Sweet card:
STAMPS: Round Repeats, Background Basics: Text, Bountiful Banners, Bigger Bloosm (sentiment)
INK: Fresh Snow, Dark Chocolate, Summer Sunrise, Raspberry Fizz, Pure Poppy
PAPER: Classic Kraft, Harvest Gold
DIES: Bountiful Banners
OTHER: tag from my stash from Creative Cafe, twine.

--------

Last, I stamped white on white and heat embossed the Round Repeats flowers that I made. After cool, I inked over them with a Vintage Cream ink to set them off slightly from the white cardstock. They would work as snowflakes as well on a holiday card, but I decided to go with a birthday card instead this time. I made another large flower with another one of the Round Repeats with Hawaiian Shores ink, cut it out and added a Bountiful Banner over the top. Sentiment is from the new Bigger Blooms.

If you used a more elegant flower and color scheme, instead of a playful look like I have here, this would make a nice wedding card also with the embossed background.
Best Day Ever card:
STAMPS: Round Repeats, Bountiful Banners, Bigger Blooms
INK: Hawaiian Shores, Raspberry Fizz, Vintage Cream
PAPER: white, Harvest Gold, Aqua Mist
DIES: Bountiful Banners
OTHER: butterfly punch, seam binding, white embossing powder, corner rounder.

--------

Visit the team to see more with Round Repeats!
Ashley Cannon Newell
Betsy Veldman
Cristina Kowalczyk
Dawn McVey
Erin Lincoln
Heather Nichols
Jessica Witty
Maile Belles
Melissa Phillips
Nichole Heady

Tuesday, April 24, 2012

happy birthday to my niece, Rachel!

A quick card today made with the Framed Out #3 stamp set and die cut frame by Papertrey Ink. I added some felt and some new My Mind's Eye chipboard pieces from their "Follow Your Heart" line.
Kraft looks so pretty with these colors, don't you think?
A little bit of stitching was added to the Aqua Mist felt. The date stamp is something I just picked up at Target - it's the Smash Date Stamp by K&Co. The Framed Out #3 die cut frame was cut with Melon Berry felt.
The polka dot paper is Melon Berry... love me some polka dots.(You can buy it with just this pattern, or you can get the whole Melon Berry Pattern Pack here!)

You can use your leftover Papertrey Ink twine spools for little lollipop holders, as place holders at a party, or for a fun little gift. Spools are useful for so many things!!