Saturday, April 30, 2016

Make It Market: Don't Forget to Write...

The next Make It Market Kit by Papertrey Ink will be released on May 1st, and it is entitled "Don't Forget to Write".  There is nothing quite like that feeling when you open your mailbox and experience opening a handwritten letter from a loved one. With this kit, you can create beautiful letter-writing necessities for yourself or as a gift. 
There is a shaped notecard die, monogram stencils, pretty label stickers and envelope seals, gorgeous envelopes and SO much more! Betsy has integrated so many amazing details into everything here, not only will your projects be beautiful, but quick and easy to put together too.  From stationery sets as gifts, pretty notecards to have on hand, and even monogrammed tags, you will never run out of options with this kit! You will have fun experimenting and playing with all of the contents once they show up at your door!

Let me show you some things you can make with the kit! First, I've made a card using the kit stamps. I die cut the circle and stamped the details and sentiment onto it, then die cut the pre-printed flowers and added them over the top. See the red border? I used the scalloped note card die, but didn't fold it in half, just left it long and used the edge! Don't you love these stamps? Oh my goodness, they are beautiful. The fonts in the sentiments are amazing! I did add a few sequins from my stash. The pretty envelopes come in the kit too (30 all together)!

Next up is a note card set. I created a boxed set and added a few coordinating cards to tuck inside... each with a similar design, but different sentiment, which I'll show you!


For each of the three cards, I used a white card base, then used the scalloped note card die to cut a long piece and trimmed it down to fit over the card front to add a scalloped layer in white. Then I cut a white frame and stamped on it with the kit stamps.

The flower is die cut from the pre-printed papers, making these quick and easy! I stitched the scalloped layer onto the card front on top.

Here is the second card in the set, "A Gift For You" card. I used the same design with slightly different colors and sentiment, so it coordinates with the rest of the cards.

"Gift" is die cut from one of the kit papers.

Here is the third card in my stationery set, "Sending Hugs". Again, I used the same design, yet different colors and sentiment.

The top flower is die cut from the pre-printed papers, the frame stamped with the kit stamps. "Sending" is cut from a kit paper.

So those are the 3 cards I put in the stationery set!

Next up is a little scalloped note card set. These next 2 cards measure 3.75" x 3.75" and there are 4" square envelopes included to go with them!

This card set was die cut with the scalloped note card die, then I added patterned paper, a circle sticker and die cut the "Note" and "Sending" to go on top of these.


Now that you've seen a few new projects, what do you think? 
Are you as in love with this kit as I am?! 
Here is a bit more info:

DON'T FORGET TO WRITE KIT CONTENTS:


-Don’t Forget to Write Stamps- 2 sheets w/ labels
-Don’t Forget to Write Basics die collection
-Don’t Forget to Write Extras die collection
-Monogram Stencil Collection (set of 2)
-A1 Paper Collection- 1 sheet each of 6 patterns
-A2 Paper Collection- 1 sheet each of 10 patterns
-Enclosure Collection- 1 sheet each of 6 patterns
-Sticker Sheets- 2 sheets each of 4 designs
-(10) A1 Gold Seam Envelopes
-(10) 4x4 Gold Shimmer Envelopes
-(2) A2 Gold Shimmer Envelopes
-(2) A2 Lovely Lady Envelopes
-(2) A2 Winter Wisteria Envelopes 
-(2) A2 Hawaiian Shores Shimmer Envelopes 
-(2) A2 Mint Julep Envelopes
-Custom "Don't Forget to Write" Imprinted Pen
-------------

The total retail cost of the "Don't Forget to Write" Kit is $110. There will be a limited number of these exclusive kits available, so be sure to get yours on Sunday! The "Don't Forget to Write" Kit will be available for sale beginning on May 1st at 10pm ET, only at Papertrey Ink. Read all the details on Nichole's blog or contact Customer Service with any questions. Be sure to grab a kit, you won't regret it!!!

Friday, April 29, 2016

Vellum shakers...

Happy Friday! I'm so looking forward to the weekend, how about you? I wanted to share a quick card that I made for Scrapbook Expo this week that I forgot to post. It started with the butterfly background that I had leftover from cutting out the butterflies in my last post, and I thought I should put it to good use! I layered some leaves over the top, then a piece of vellum and a pretty chipboard floral bouquet. Love how the layers turned out!

To add even a bit more layering, I stamped a "hello" and some leaves over the vellum.

Stop by the Weekly Scrapper blog to read more about the details and process and to see the finished card. See you tomorrow with another post! 

Monday, April 25, 2016

Papertrey April blog hop challenge...

It's Monday again? Wow, where does the time go? April has almost come and gone! I decided to play in this month's blog hop at Papertrey Ink just for fun... hop over to see the inspiration piece that inspired my card HERE! I can't wait to dig in and see what everyone else made. So here is my card...


Inspired by the ombre effect of the reds and oranges in the inspiration photo on Nichole's blog, I cut some butterflies from the Cover Plate: Bitty Butterflies die and ink blended over them to add color and shading from light to dark. I arranged them in the colors I saw from the inspiration piece: red (Pure Poppy), orange (Summer Sunrise), cream (Vintage Cream), white and gray (Soft Stone). The white slashes in the photo reminded me of stitching, so I added some stitching to the butterflies. The sentiment was die cut with Color Pop Butterflies dies from the Make It Market mini kit that just came out! The papers are from Gossamer Blue's On My Desk line.

I'm off to hop! See you soon, hope you are having a great day!
Danielle

Tuesday, April 19, 2016

What inspires your cardmaking?

Today on Scrapbook Expo's Weekly Scrapper blog, I share what inspired these cards! It's probably something you'll never guess...:)

To create the background, I used an older stamp set from Papertrey Ink called Grid Lines Two for the grid and floral design. Then I added a layered butterfly cut with Color Pop Butterflies dies and used the With All My Heart stamps for the tag and sentiment (on a Tiny Tag die).

Stop over to the Weekly Scrapper blog to read more. What are you creating today?

Friday, April 15, 2016

Make It Market: Don't Forget to Write...

Betsy Veldman designed another GORGEOUS Make It Market kit coming May 1st at Papertrey Ink called Don't Forget to Write! I had the pleasure of working with this kit to show you a sneak peek of it, and let me tell you, I think this is the best one yet! It's sooo pretty! The dies and stamps are some of my all time favorites! Here is a tiny peek of the kit...there is so much more.

What do you think? This is just a small sample of what's to come! Love, love, love! Visit Nichole Heady's blog for more info on this kit - coming soon on May 1st!

Release day...

Welcome to the release group post! Today we get to share with you any remaining projects we've made with all of the new products being released tonight at Papertrey Ink! Here I've used the new Friendship Jar Flowers stamps and dies and a sentiment die cut from the new Bold & Beautiful stamps and dies.

This new color is called Green Parakeet and is so lovely! I've paired it with Pure Poppy ink and kept it with white for a clean and simple look. I added some ink blending in the background with Green Parakeet ink very softly, then stamped the Friendship Jar Flowers over the top with the same color. Last, I die cut a few of the Friendship Jar Flowers in white to layer over the top. The vellum sentiment was cut, stamped and embossed with Bold & Beautiful. Note to self (and whoever else might want to know this info): don't use Glossy Accents to adhere vellum! It warps the vellum! I added a background with a Green Parakeet + White Basics Patterned Paper.

Love card:
STAMPS: Friendship Jar Flowers, Bold & Beautiful
INK: Green Parakeet, Pure Poppy
PAPER: white, Green Parakeet Pattern Pack
DIES: Friendship Jar Flowers, Bold & Beautiful
OTHER: corner rounder, ink blender, washi tape (red dot), sequins.
------

This card is made with the new Paper Clippings: Thank You stamps and dies.

When die cutting the large saying, I left it in the paper before popping it out, as I wanted to add some ink blending over the top. After ink blending the whole sheet, I popped it out and added it to my card. This one was very quick to make.

Thank You So Much card:
STAMPS: Paper Clippings: Thank You
INK: Pure Poppy, Summer Sunrise, Bright Buttercup and Green Parakeet, Aqua Mist
PAPER: white
DIES: Paper Clippings: Thank You
OTHER: enamel dots, ink blender.
------

Next is Splits: Get Well Soon. I used the saying from Splits on vellum and layered it over a So Striking paper. I added a small stamped sentiment from Rainy Day Sentiments.

The frame is from the Cover Plate: Pretty Frame die. (I seem to be using this one a lot lately!)
Get Well Soon card:
STAMPS:  Splits: Get Well Soon
INK: True Black
PAPER: So Striking, white
DIES: Cover Plate: Pretty Frame
OTHER: vellum, white embossing powder, sequins, twine.
------

Next is Dress Up Dolls: School Days. I used the sentiments and apple from the set, along with the older Script Alpha dies to create this card. Isn't this alpha fun? I love it!
The outer frame was cut with a new die called Cover Plate: Delightful. I love how the corner hearts pop up, but don't fall out! The inner panel was cut with Cover Plate: Pretty Frame.  Then the rest of the sentiment and the apple were added with Dress Up Dolls: School Days.


To the Best Teacher card:
STAMPS: Dress Up Dolls: School Days
INK: True Black
PAPER: white, Summer Sunrise, Harvest Gold, Hawaiian Shores, Aqua Mist, Raspberry Fizz, Pure Poppy
DIES: Dress Up Dolls: School Days (apple), Script Alpha die collection, Cover Plate: Delightful, Cover Plate: Pretty Frame (inside panel)
OTHER: enamel heart dot, Copics: R29 and G09.
------

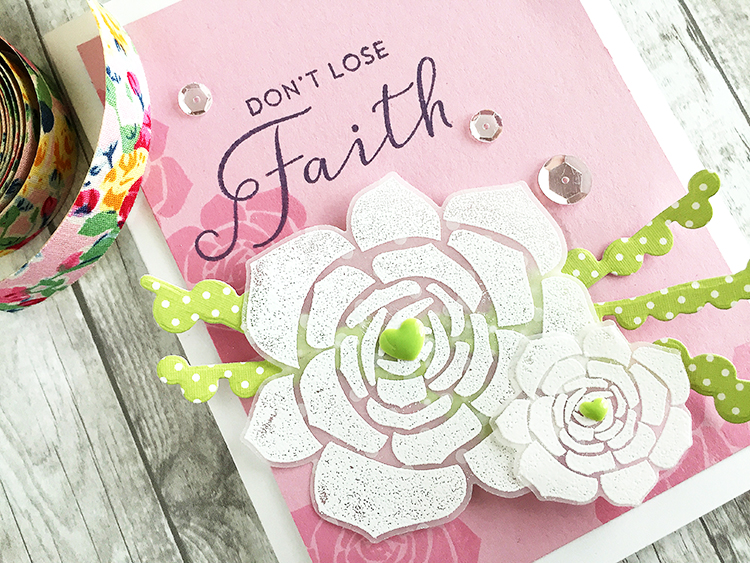
This one was stamped with Super Succulents and Inspired: Faith.


The Super Succulents were die cut, stamped onto vellum and heat embossed. I adore the font in "faith", don't you? I'll be using this set again for sure.

Don't Lose Faith card:
STAMPS: Super Succulents
INK: Lavender Moon, Plum Pudding
PAPER: Lavender Moon, vellum, Green Parakeet Pattern Pack
DIES: Super Succulents
OTHER: enamel heart dots, white embossing powder, sequins.
------

Last is a Father's Day card made with the new Shaped Sayings: Father's Day die! I added some stripes in the background with Boxed Background Stripes stamps, originally made to use on the popcorn box die, but they are fun on cards too to draw your eye to the focal point!


Just a few stars and a piece of twine help keep this one simple for the dad's in your lives.

Happy Father's Day card:
STAMPS: Boxed Background Stripes
INK: Bright Buttercup
PAPER: white, Tropical Teal, Canyon Clay, Summer Sunrise Pattern Pack
DIES: Shaped Sayings: Father's Day, Sketched Stars, Star Scribbles
OTHER: enamel dots, twine.
------

Don't forget to shop tonight, 4/15 at 10pm EST, at Papertrey Ink to get all of the new products we have been previewing this week! Stop by each of the design team member's blogs to see more: 

Thursday, April 14, 2016

The Hoopla Stitching Collection and more...

Welcome back to another group post for Papertrey Ink! We are previewing a bunch of new stitching dies today that will be available on 4/15 at 10pm EST, and I chose to work with the adorable cupcake! I went to town with a variety of Papertrey Ink FELT colors...

My first thought was to create a patchwork of felt colors on a hoop and add the cupcake over the top, but then I felt like I wanted to put the cupcake on a smaller hoop and just make it a focal point! I thought maybe all of the squares would be too distracting from the cupcake. So the hoop pair was born. I used the larger 6" hoop for the patchwork design and added "Sprinkled" with the older Make It Market Shakers & Sprinkles die. (Kit is still available, it looks like! If you haven't gotten in on these Make It Market kits yet, you really need to!! They are so much fun! **wink**)
To create the squares on the larger hoop, I die cut the squares with Heart Squared and stitched them onto a random piece of fabric I had in my stash. Then to create the smaller 4" cupcake hoop, I used the new Hoopla: Stitched Banners (for the banner) and the Stitched Cupcake dies. 

The Stitched Cupcake dies help you stitch lines down the cupcake liner and the border around the top. I added my own "sprinkles", by just stitching little lines with colored floss - red, hot pink and orange. If you wanted to recreate this for a boy instead, just change out the pink squares and banner shapes for a dark blue. Hope you enjoyed this post! Here is a supply list:

Patchwork and Cupcake Embroidery Hoops:
STAMPS: Shakers & Sprinkles, Polka Dot Basics III
INK: Pure Poppy, Raspberry Fizz
PAPER: Summer Sunrise Pattern Pack, Sweet Blush
DIES: Shakers & Sprinkles, Hoopla: Stitched Banners, Stitched Cupcake, Heart Squared
OTHER: Felt, 4" and 6" embroidery hoops, floss, enamel dot.
------

Don't forget to shop on 4/15 at 10pm EST at Papertrey Ink to get all of the new products we have been previewing this week! Stop by each of these blogs to see more: 

Wednesday, April 13, 2016

Make It Market Mini Kit: Color Pop Butterflies...

I am so excited to share my post with you today, as I had a great time working with these new products and know you will too! Squeal! Today we are introducing the new Color Pop Butterflies mini kit that comes with stamps, dies, papers and stencils! First up is a card made with just the stamps and dies from the mini kit.
Originally, I stamped the butterfly and the flowers directly onto watercolor paper, but then I decided to die cut and stamp a butterfly to add over the top for dimension. I used a teal watercolor paint around the butterfly.
When dry, I added clear sequins from Pretty Pink Posh and a die cut sentiment from the mini kit! The font is gorgeous, isn't it!

So Happy watercolored card:
STAMPS: Color Pop Butterflies
INK: Summer Sunrise, Pure Poppy, Lavender Moon, New Leaf
PAPER: watercolor paper, white cardstock
DIES: Color Pop Butterflies
OTHER: watercolor paints.
------
Next is a card using the Color Pop Butterflies stencils in the mini kit!

The card background was stenciled with 3 different layers of stencils: the yellow, the aqua and the pink. Then I used the stamps over the top to add detail to the butterflies and flowers. I trimmed out the center with the Center Style: Feminine Frame and popped it up with dimensional adhesive!

Last, the dies were used to add a sentiment, a vellum butterfly and some extra dimensional flowers.

So Happy stenciled card:
STAMPS: Color Pop Butterflies
INK: Bright Buttercup, Raspberry Fizz, Aqua Mist, Enchanted Evening, Summer Sunrise
PAPER: white
DIES: Center Style: Feminine die
OTHER: stencils - Color Pop Butterflies mini kit, blending tool by Tim Holtz.
------

Don't forget to shop on 4/15 at 10pm EST at Papertrey Ink to get all of the new products we have been previewing this week! Stop by each of the design team blogs to see more: 

Tuesday, April 12, 2016

Fathers, Food, Fun and more...

Welcome to a fun group post for Papertrey Ink! Today we are all about foodie-themed type gifts and how to wrap them. First, I used a new die called the Paper Puff Topper die to make this cute cupcake looking topper for these little plastic dishes! I put Skittles in the dish, put the lid on, then added the topper and tag.
The tag was made with the new Treat Box Tag Lines stamps and the new Keep It Simple: Just For You stamps. 


Wouldn't a bunch of these be cute in all different, bright colors for a party table/gift favors?

Just For You Party Favor:
STAMPS: Treat Box Tag Lines, Keep It Simple: Just For You
INK: Lovely Lady, Pure Poppy
PAPER: Pure Poppy and Tropical Teal Pattern Packs, white
DIES: Paper Puff Topper
OTHER: Skittles candy, enamel dot, condiment cups,
------

Next is a fry box made with the new Favor It: Fry Box die. I stamped the inside with Boxed Backgrounds: Stripes, then stamped the hamburger with King of the Grill stamps.
For the fries, I rolled up some dollars, taped them so they would stay, and tucked them in the box. I think someone would have fun unrolling to see how much they've received!
I've used a girly color scheme, but this would certainly work with a masculine color scheme too!


Happy Birthday Fry Box:
STAMPS: King of the Grill, Boxed Background: Stripes
INK: Fine Linen, New Leaf, Pure Poppy, Summer Sunrise, Lovely Lady, Dark Chocolate
PAPER: Sweet Blush, white
DIES: Favor It: Fry Box
OTHER: Pure Poppy ribbon, twine.
------
Don't forget to shop on 4/15 at 10pm EST at Papertrey Ink to get all of the new products we have been previewing this week! Stop by each of these blogs to see more: 

Sunday, April 10, 2016

Introducing What The Doodle: Apple...

Welcome to the Papertrey Ink countdown for April! All of the new products you see here today will be available for purchase on 4/15 at 10pm EST at Papertreyink.com. Today I get to introduce to you a new stamp set and dies called What the Doodle: Apple. I loved working with these and can't wait to make more!
What the Doodle: Apple stamps, dies and Coloring Sheets were used to make 4 cards that I put in a clear card box with envelopes/and a tag for a teacher gift! 
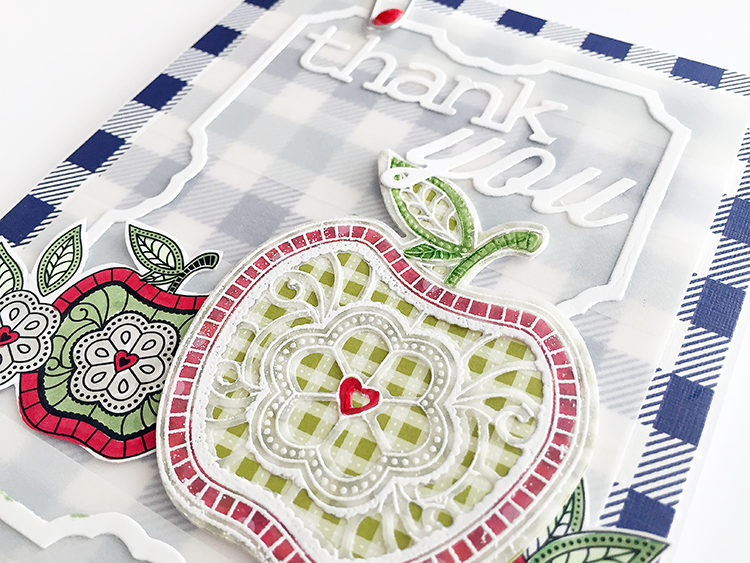
On the first card, I added some Sheer Basics Vellum over a Chicken Scratch Gingham paper. I used a part of the Cover Plate: Pretty Frame Die to add a little frame. I colored one of the What the Doodle: Apple Coloring Sheets, and then I made a pretty apple to go over the top with vellum.

To make the large apple, I used the dies to cut a back layer from the tiny gingham and a top layer from vellum. I stamped the apple onto the vellum and embossed it with white embossing powder. Then colored it on the back of the vellum with Copics!

Next up are 3 cards with the What the Doodle: Apple Coloring Sheets, love these! I colored this one in with Copics and added 2 layers of the Thank you die cut with the Wonderful Words: Thank You die. I colored the die cut with a gray W3 Copic marker.
On the second one, I used some different colors and ink blended the background with New Leaf ink. The frames added are from the Cover Plate: Pretty Frame die again. (Just the outer portion)
The last one is another Coloring Sheet that I used slightly different colors on. 

Then I packaged them all up in a clear card box and created a tag with the Minute To Make: Holiday  Tags die.
The stamps were used on the tag and colored in with Copics again! 


Thanks Teacher gift card box:
STAMPS: What the Doodle: Apple
INK: True Black, New Leaf
PAPER: Sheer Basics Vellum, What the Doodle: Apple Coloring Sheets, 
Chicken Scratch Gingham, Ripe Avocado Pattern Pack
DIES: What the Doodle: Apple dies, Wonderful Words: Thank You die, 
Minute to Make: Holiday, Cover Plate: Pretty Frame die, 
OTHER: white embossing powder, paper clip, enamel dot, twine, 
Copic Markers = R29, W3, YG63, YG11.
------

Visit Nichole Heady to see more previews of what's coming this month!