Showing posts with label stamping. Show all posts

Monday, September 5, 2016

Make It Monday #260 video tutorial: From Black and White to Color...

Good morning! Today is my day for another video tutorial! I have a fun technique for you to try that involves creating a black and white background, and then popping a portion of that up, coloring it and lining it up with the image underneath. Stop by Nichole's blog for the video HERE! Here are a couple of samples that I made to show this technique...

Here I just left a border of black and white and colored the rest with Copics...

The next one utilizes the same technique, but the center is trimmed out and popped up and colored to give a pretty focal point!
What do you think? Will you give this technique a try? Be sure to watch the video at Nichole's blog and play along for your chance to win a gift card to Papertrey Ink this week!

From Black and White to Color cards:
STAMPS: Peonies on Parade, Give Thanks
INK: True Black
PAPER:White cardstock
DIES: Noted: Scalloped A1 die
OTHER: sequins, seam binding, Copic markers.

Monday, August 1, 2016

Meadow Greens revisited...

Today the senior Papertrey Ink design team is doing a little blog hop to show you some fresh new ideas for using an older stamp set called Meadow Greens, which you can find HERE! I have two cards that I've used my Zing! Embossing Powders with to create a soft look to the flowers. I've used Powder and Blush.

On the first card, I used a background paper from the Beautiful Brushstrokes paper, an older paper set by PTI. I used the Meadow Greens dies to cut the flower and the stem and stamped and embossed with the Blush Zing! powder. The gray piece was cut from the Noted: Scalloped Square dies. The border is die cut with the Filigree Border die.
The next card also uses a background paper from the older Beautiful Brushstrokes paper pad. I used the Powder Zing! on this one with a little different color scheme from what I normally work with - yellow, blue and brown!
Another Filigree Border die was used here and a sentiment from Meadow Greens stamps again.
The seam binding is the pretty ribbon I often use and is from zipperstop.com. I get it wet with my fingers to scrunch it up, and it dries just how you leave it.
Hope you enjoyed these ideas! Visit Betsy, Dawn, Heather and Melissa for more Meadow Greens projects!

Thursday, July 14, 2016

Wanderlust inspirations...

Today we have quite a few new travel themed stamps, dies and papers to share with you! All of the new products will be available for purchase on July 15th at 10pm EST at papertreyink.com. First up, I have a travel journal to show you.

To create the journal, I used the new Traveler's Journal: Outer Cover dies for the cover and words, and the new Travelers' Journal Pages for the inside pages. Heather will have a full tutorial on how to assemble these books on Nichole Heady's blog. I love that the pages are already cut the correct size and holes are already punched for easy assembly. I used the dies, stamps and papers on the front cover, along with some shipping tags and burlap stars from my stash.

The stamping on the front cover is done with What the Doodle: Map (adventure) and Traveler's Journal: Adventure (stripes).

Here is a view from the top of the book with the pen holder I made and stitched into my book. (Made with fabric that I will show you more of later in this post!)
On one of my page spreads, I made a vellum envelope with the Sheer Basics Vellum and the new Traveler's Journal: Envelope die. It comes with the circle die also to create the fun clasps! You can hold tickets, memorabilia or even small photos inside. Added some stamping, chipboard star, washi tape and a fun die cut arrow from the envelope die.

On the right side, I added a "travel" die cut, some stamping and then a star pin...I thought it would be fun to attach a small photo with the pin on this page, or a little piece of memorabilia. The little sayings on this page spread were stamping with Traveler's Journal: Typed Notes.

Here you can see a pen holder that I made on the back of the inside cover. I folded a Moda fabric swatch in half and machine stitched it onto the page to hold a pen.

For another page spread, I wanted to create lines for journaling and a frame for either a photo or memorabilia. I used the inside of the cut out frame on the left page and Journal Accessories stamps to create the dotted lines. "Adventure awaits" and the stripes were stamped with Traveler's Journal: Adventure stamps.

The stars are stamped with Background Basics: Galaxy. I love the different sizes of stars and will be using those often!

"We were here" was stamped with Traveler's Journal: Adventure and the little "happy place" was stamped with Traveler's Journal: Typed Notes.


Of course you could leave many of the pages blank too to write in your travel plans or journal about your day! So many fun possibilities for decorating these adorable journals!


 Travel Journal supplies:
STAMPS: Traveler's Journal: Typed Notes, Traveler's Journal: Adventure, 
Background Basics: Galaxy, What the Doodle: Map
INK: Pure Poppy, Dark Chocolate, Enchanted Evening, Aqua Mist
PAPER: Traveler's Journal paper collection, Sheer Basics Vellum
DIES: Traveler's Journal: Outer Cover, Traveler's Journal: Envelope
OTHER: Traveler's Journal Pages, twine, burlap stars, star pin, fabric squares by Moda, shipping tags, gold thread, Pink Paislee chipboard star, washi tape, paper clip, enamel dot, Studio Calico shiny star.
-------

Last is a little card I made for a congrats...I thought it would work well for a graduation card. I used the Traveler's Journal: Adventure stamps, along with Postmarks and Some Like It Hot (flower).

The square is cut with Traveler's Journal: Outer Cover dies, and the scalloped base is cut with Noted: Scalloped Square die collection that was previously released.


Life Is An Adventure card supplies:
STAMPS: Traveler's Journal: Adventure, Postmarks, Some Like It Hot
INK: New Leaf, Tropical Teal, Pure Poppy, Aqua Mist, Enchanted Evening
PAPER: Aqua Mist, white
DIES: Traveler's Journal: Outer Cover dies, Some Like It Hot
OTHER: enamel dot.
-------

Don't forget to shop July 15th at 10pm EST at PapertreyInk.com to get all of the new products we have been previewing this week! Stop by each of these blogs to see more ideas!

Monday, July 11, 2016

Introducing "It's The Thought"...

I can't believe it's countdown time again! The Papertrey Ink team will be previewing several new products that will be released this month on the 15th, so today I get to share with you a new stamp set called It's The Thought! I've also used a paper pack that was released last month that I just received, the Floral Sketches patterned paper collection, available HERE! I love these papers! They make quick and easy cards by simply adding a quick sentiment to them!
I've got three cards for you today.

The first was made with the darker gray floral paper and a sentiment from It's the Thought. A piece of vellum was embossed with white embossing powder, then I trimmed the edges with my scissors and machine stitched it onto my card front before adding it to a card base. The gray patterned paper has white flecks in it...very pretty. I did trim down the sides and added it to another lighter gray paper in the paper pad.

On the next card, I added a light gray paper behind this floral, then heat embossed the sentiment from It's The Thought right onto the preprinted patterned paper.
Aren't the grays so pretty with these colors?

The twine adds a little "separation" between the two papers...and a little bit of contrast to the card.

On the last card, I used the "I think of you often" sentiment from It's the Thought and again heat embossed it onto vellum. It's machine stitched on the left, and adhered with a touch of glossy accents underneath the sequins to hold it down on the right side.


"It's the Thought" will be available on July 15th at 10pm EST at Papertreyink.com.

Visit Nichole Heady's blog to see more links to view new projects made with the July releases! I'll be back tomorrow. Have a great day!

Monday, June 6, 2016

Make It Monday video tutorial: shading with Copics...

Recently, I purchased a few more Copic Markers to add to my stash and have been having fun with using them in different ways! Today is my day for a Make It Monday video over at Papertrey Ink, so I've made this card with shadowing under the die cut. I'd love if you would stop over to watch the video at Nichole's blog, give it a try, and let me know what you think of this technique!
I've used a Pure Poppy die cut, trimmed from the Framed Friends die by Papertrey Ink, then a light pink R20 Copic marker for the shading under the word. In the video, I will show you other samples of cards I've made recently with the same technique. Word dies work excellent for this, but you can shadow under other die cuts as well!

I've used Tulip Time and Wonderful Words: Friends stamps also.

Swing by Nichole's blog to watch the full Make It Monday video on how to recreate this card! Have a fabulous day, and don't forget to play along in the shadowing challenge for your chance to win a Papertrey Ink gift card!


So Glad We're Friends:
(All Supplies by Papertrey Ink Unless Otherwise noted.)
STAMPS: Wonderful Words: Friends, Tulip Time
INK: Melon Berry, Sweet Blush, Pure Poppy, Bright Buttercup, Spring Moss, Simply Chartreuse, Ripe Avocado
DIES: Framed Friends, Tulip Time
PAPER: Stamper Select White, Pure Poppy cardstock
OTHER: sequins by Pretty Pink Posh.

Thursday, June 2, 2016

Quilted...

I love the quilted look and am a quilter myself, so I thought it would be fun to bring this look to a card again for today's Scrapbook Expo cardmaking post! I grabbed the Quilted: Summer stamps and dies to make my card. It came together so quickly, just love this set!
First, I die cut the frame and stamped all of the fun triangles! I left some of them white to make it look like a pinwheel. You could also take the frame off and just use the pinwheel, with a stamped stem using the stripe in the stamp set! I die cut a flower and stamped it also.
Then I attached these pieces to a white card base, added the flower over the top. The larger pinwheel pieces are popped up with dimensional adhesive.

The Scripted stamps were used for a sentiment at the bottom.


Hop over to the Scrapbook Expo post to read more about this card. Happy "almost" summer!

Tuesday, April 19, 2016

What inspires your cardmaking?

Today on Scrapbook Expo's Weekly Scrapper blog, I share what inspired these cards! It's probably something you'll never guess...:)

To create the background, I used an older stamp set from Papertrey Ink called Grid Lines Two for the grid and floral design. Then I added a layered butterfly cut with Color Pop Butterflies dies and used the With All My Heart stamps for the tag and sentiment (on a Tiny Tag die).

Stop over to the Weekly Scrapper blog to read more. What are you creating today?

Friday, April 15, 2016

Make It Market: Don't Forget to Write...

Betsy Veldman designed another GORGEOUS Make It Market kit coming May 1st at Papertrey Ink called Don't Forget to Write! I had the pleasure of working with this kit to show you a sneak peek of it, and let me tell you, I think this is the best one yet! It's sooo pretty! The dies and stamps are some of my all time favorites! Here is a tiny peek of the kit...there is so much more.

What do you think? This is just a small sample of what's to come! Love, love, love! Visit Nichole Heady's blog for more info on this kit - coming soon on May 1st!

Wednesday, April 13, 2016

Make It Market Mini Kit: Color Pop Butterflies...

I am so excited to share my post with you today, as I had a great time working with these new products and know you will too! Squeal! Today we are introducing the new Color Pop Butterflies mini kit that comes with stamps, dies, papers and stencils! First up is a card made with just the stamps and dies from the mini kit.
Originally, I stamped the butterfly and the flowers directly onto watercolor paper, but then I decided to die cut and stamp a butterfly to add over the top for dimension. I used a teal watercolor paint around the butterfly.
When dry, I added clear sequins from Pretty Pink Posh and a die cut sentiment from the mini kit! The font is gorgeous, isn't it!

So Happy watercolored card:
STAMPS: Color Pop Butterflies
INK: Summer Sunrise, Pure Poppy, Lavender Moon, New Leaf
PAPER: watercolor paper, white cardstock
DIES: Color Pop Butterflies
OTHER: watercolor paints.
------
Next is a card using the Color Pop Butterflies stencils in the mini kit!

The card background was stenciled with 3 different layers of stencils: the yellow, the aqua and the pink. Then I used the stamps over the top to add detail to the butterflies and flowers. I trimmed out the center with the Center Style: Feminine Frame and popped it up with dimensional adhesive!

Last, the dies were used to add a sentiment, a vellum butterfly and some extra dimensional flowers.

So Happy stenciled card:
STAMPS: Color Pop Butterflies
INK: Bright Buttercup, Raspberry Fizz, Aqua Mist, Enchanted Evening, Summer Sunrise
PAPER: white
DIES: Center Style: Feminine die
OTHER: stencils - Color Pop Butterflies mini kit, blending tool by Tim Holtz.
------

Don't forget to shop on 4/15 at 10pm EST at Papertrey Ink to get all of the new products we have been previewing this week! Stop by each of the design team blogs to see more: 

Sunday, April 10, 2016

Introducing What The Doodle: Apple...

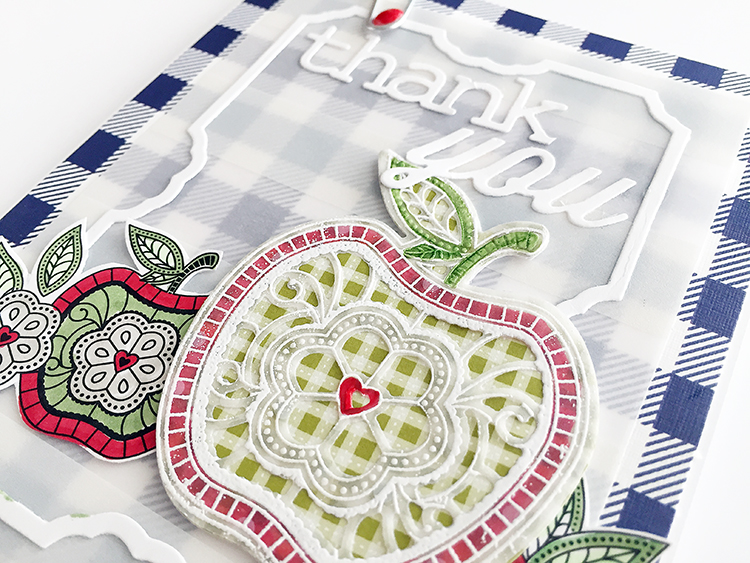
Welcome to the Papertrey Ink countdown for April! All of the new products you see here today will be available for purchase on 4/15 at 10pm EST at Papertreyink.com. Today I get to introduce to you a new stamp set and dies called What the Doodle: Apple. I loved working with these and can't wait to make more!
What the Doodle: Apple stamps, dies and Coloring Sheets were used to make 4 cards that I put in a clear card box with envelopes/and a tag for a teacher gift! 
On the first card, I added some Sheer Basics Vellum over a Chicken Scratch Gingham paper. I used a part of the Cover Plate: Pretty Frame Die to add a little frame. I colored one of the What the Doodle: Apple Coloring Sheets, and then I made a pretty apple to go over the top with vellum.

To make the large apple, I used the dies to cut a back layer from the tiny gingham and a top layer from vellum. I stamped the apple onto the vellum and embossed it with white embossing powder. Then colored it on the back of the vellum with Copics!

Next up are 3 cards with the What the Doodle: Apple Coloring Sheets, love these! I colored this one in with Copics and added 2 layers of the Thank you die cut with the Wonderful Words: Thank You die. I colored the die cut with a gray W3 Copic marker.
On the second one, I used some different colors and ink blended the background with New Leaf ink. The frames added are from the Cover Plate: Pretty Frame die again. (Just the outer portion)
The last one is another Coloring Sheet that I used slightly different colors on. 

Then I packaged them all up in a clear card box and created a tag with the Minute To Make: Holiday  Tags die.
The stamps were used on the tag and colored in with Copics again! 


Thanks Teacher gift card box:
STAMPS: What the Doodle: Apple
INK: True Black, New Leaf
PAPER: Sheer Basics Vellum, What the Doodle: Apple Coloring Sheets, 
Chicken Scratch Gingham, Ripe Avocado Pattern Pack
DIES: What the Doodle: Apple dies, Wonderful Words: Thank You die, 
Minute to Make: Holiday, Cover Plate: Pretty Frame die, 
OTHER: white embossing powder, paper clip, enamel dot, twine, 
Copic Markers = R29, W3, YG63, YG11.
------

Visit Nichole Heady to see more previews of what's coming this month!