Wednesday, August 31, 2016

Nestled die cuts...

While I'm awaiting my next Papertrey Ink box, full of new Christmas stamps and dies for the September release, I thought I would get you in the mood for the holidays a bit early! I have a new post up over at the Scrapbook Expo blog on "nestling your die cuts".
Pop over to the blog to see another beautiful sample I found online that demonstrates this technique as well!

Have a good day, and I will see you back here shortly!
Danielle

Friday, August 26, 2016

Adding a feminine touch to your autumn cards...

Happy Friday to you all! As I was looking for inspiration for today's design team tips post, I found a scrapbooking page that really inspired me, which isn't out of the ordinary! I can always find little design details on scrapbook layouts that translate well to cards. 


While studying this inspirational layout below, I realized that the reason I was drawn to it was because it had a feminine, light, layered feel to it. I usually tend to lean towards adding a feminine look to my cards and thought it would be fun to show you ways to add this look and feel to any card theme, including the autumnal cards that I've made for today's post! 
First, how do you define feminine?  To me, it's florals, light soft colors, layers, details, cheerful prints and patterns, swirly fonts, texture, gold/shiny accents, ruffles, soft curves, asymmetry.

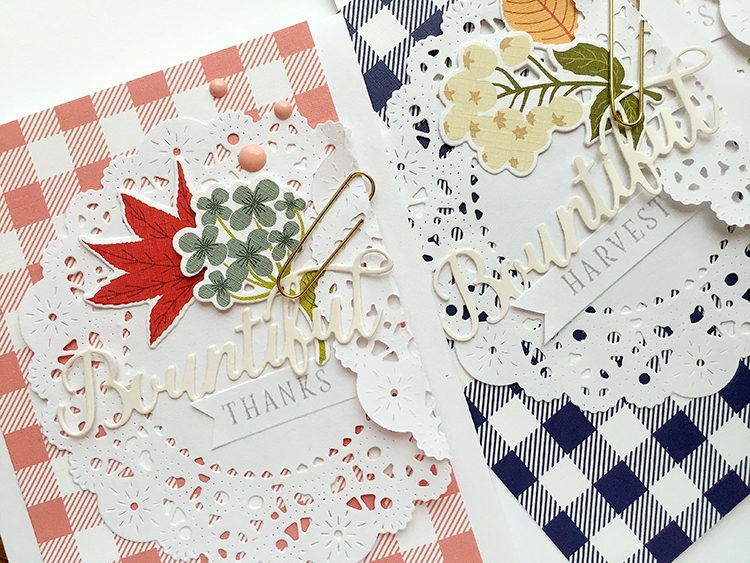
I was drawn to the circular piece on the layout and loved how it was white on white, loved how the doily was folded over and clipped. I also liked the layers of the flower and sentiment and how it was all tucked together. Instead of the scalloped circle, I immediately thought of a doily. Papertrey Ink has the Parisian Lace Doily die, which is what I used here. There's nothing quite as feminine as a doily, right! You can also find them pre-made in big quantities in the baking section at the craft store. I die cut some of these and gathered some gingham paper. I also gathered my Color Pop Autumn mini kit and used the dies in the kit to trim out some of the leaves and flowers.

What makes a doily feminine? Lots of fine detail and the soft, round shape. I love the color of the wooden clothespin with the pink on the layout, but I wanted something flatter to allow for mailing, so I found some gold paper clips that I thought would work well for a fall card.


The doilies were simply folded over and clipped with the paper clip, then I tucked in a couple of flowers, leaves, a bountiful die cut and sentiment.

Inspired by the white-on-white in the layout, I added a Vintage Cream "Bountiful" die cut over the white doily and stamped a sentiment to go with it in gray with the Color Pop Autumn kit, very soft and subtle. Then to add a bit more color, I wanted to try the gingham in the background.

You can add a doily and a few layered details to a card on any occasion to make it feminine! Change out the backgrounds if you'd like to make them even softer and more dreamy and romantic. I hope you enjoyed this post. Have a creative day!

Bountiful cards:
STAMPS: Color Pop Autumn
INK: Stormy Sea
PAPER: Color Pop Autumn, Chicken Scratch Gingham, white and Vintage Cream cardstock
DIES: Color Pop Autumn, Parisian Lace Doily die
OTHER: paper clips, enamel dots.

Thursday, August 25, 2016

Creative uses for stamps...

This week at the Scrapbook Expo blog, I have a little post on looking at your stamps in a different way. Can you guess what stamp I used to create these corners that I used to make a frame around the sentiment?

Stop over to the Weekly Scrapper to read more, and leave a link with stamps you've used in unconventional ways...I'd love to see what you're making also!
Thank You card:
STAMPS: Pedal Pusher, Paper Clippings: Thankful For You by PTI
INK: Lovely Lady, Simply Chartreuse, Pure Poppy, Bright Buttercup, True Black by PTI
PAPER: white, Green Parakeet + White Basics
DIES: Die-Namics Four Way Chevron Cover Up by My Favorite Things
OTHER: seam binding, paper clip, sequins.

Monday, August 15, 2016

Release day...

Today is release day, the day when Papertrey Ink releases all of their new products (stamps, dies, papers, mini kits) for the month! You can purchase them tonight at 10pm EST at Papertrey Ink. I have a few more sneak peeks to show you of some of the new products...

First up, I used the new What the Doodle: Tea Time stamp set and dies, and the new Inspired: Blessed stamps and dies.

I used the steam from the tea set as butterfly wings by cutting two of them! They would make a great frame too if you cut several of them and surrounded a sentiment with them. I stamped and embossed them, then ran a gray Copic marker over the top. (W3)

Two different patterned papers were used in the background, then a stamped butterfly in the background and a vellum butterfly over the top from Enclosed: Butterfly. The Blessed die cut was ink blended first on white cardstock, then cut out and placed onto my card.

So Very Blessed card:
STAMPS: What the Doodle: Tea Time, Inspired: Blessed, Background Basics: Super Stripes
INK: Pure Poppy, Lovely Lady
PAPER: Mod Mix, Vintage Linens
DIES: What the Doodle: Tea Time, Enclosed: Butterfly
OTHER: White embossing powder, Copic marker W3
--------

The next two cards made with New Every Morning, which has the most gorgeous sentiments, and Fancy Foliage, two new sets coming out this month. I love the encouraging sentiments!

On the first card, I used the sentiment from New Every Morning and the leaves from Fancy Foliage. 
The butterflies are stamped with Art With Heart and Background Basics: Super Stripes. It's backed with a Bright Buttercup + White Basics paper.

The second card is stamped with the same two sets and then a Filigree Border die cut was added to the sides.

The flowers are Pale Peony and Lovely Lady colors. The light blue background paper is from Mod Mix (an older paper pad).


Card Set:
STAMPS: Art With Heart, New Every Morning, Fancy Foliage, Background Basics: Super Stripes, Background Basics: Super Gingham
INK: Lovely Lady, Pure Poppy, New Leaf, Bright Buttercup, Summer Sunrise, Pale Peony, True Black by PTI; Soft Granite by Hero Arts
PAPER: Bright Buttercup + White Basics, white cardstock, Mod Mix
DIES: Enclosed: Butterfly, Filigree Border die
OTHER: seam binding, sequins.
--------

Last is Lucky Break. I love the fonts!
I used the sentiments from Lucky Break stamped in the background with some of the Color Pop: Autumn pre-printed pieces from the patterned paper in the Color Pop mini kit.

To create these gate fold cards, I used the Noted: Scalloped Square die and just folded the two ends in toward each other about 3-1/2 scallops deep to line up with the scallops on the back of the card. The two ends meet just perfectly in the center and overlaps just a teeny tiny bit!

Then I tied some rustic twine through the holes and wrapped it around the card twice, tying it in a bow in the center.

Here's the other one that you can see open. You could do so many fun things inside the card - a gift card, another sentiment, a photo, etc.! These would even be adorable on a place setting for Thanksgiving, don't you think? Oooh. I need to try that...

Gate Fold card set:
STAMPS: Lucky Break
INK: True Black
PAPER: Color Pop: Autumn, white
DIES: Color Pop: Autumn
OTHER: rustic twine.
--------

Well, that wraps up August! Such a fun time of year. I really had fun with the products this month, everything is so gorgeous! You can grab all of the new products we've been previewing this week tonight at 10pm EST at Papertrey Ink! Stop by the other team members' blogs to see more with these sets:

Sunday, August 14, 2016

Halloween stitching fun...

Welcome back to another countdown group blog post for Papertrey Ink! Today we are featuring some new Halloween stitching dies. I'm working with the cutest little candy corn and made some hair clips with them and a tag to attach them to...
The Papertrey Ink wool felt cuts so easily in the Cuttlebug machine, and there are tons of colors to match their cardstocks! The stitching dies have 3 sections to cut the different colors of felt for the candy corn, AND a whole piece for the back, so you can stitch the 3 pieces onto the back piece. I've attached some inexpensive bobby pins from Target to the backs by just slicing the back piece a tiny bit with my scissors in 2 places, then sliding the bobby pin though the 2 slits to hold it in. You could add a dab of hot glue if you wish. If you cut the back like I did, make sure you don't cut all the way through the front!

The tag was cut with Tag Sale #4 and stamped with the new Paper Clippings: Thankful For You. (Just in case you are wondering what these cute leaves are in the background, they are die cut with the Leaf Silhouette dies!)

Candy Corn hair clips:
STAMPS: Paper Clippings: Thankful For You
INK: Cocoa Bean, Classic Kraft
PAPER: white
DIES: Stitched Candy Corn
OTHER: wool felt by PTI, sequins, white embroidery floss.
--------

Be sure to check out the other blogs and new stitching dies coming August 15th at 10pm EST at Papertrey Ink:

Saturday, August 13, 2016

Halloween Inspiration...

Welcome back to another group post, this time it is Halloween related...are you ready? I am so excited to see what everyone came up with!

My first card is a bit unexpected as far as the colors go. I was playing around with the stamp sets and the new ink color called Americana, and liked how it looked with Sweet Blush, Classic Kraft, Spring Moss and Dark Chocolate inks. I'm using the new Autumn Expressions stamps and dies and Pumpkin Expressions to create the face. These two stamp sets work so well together!
The top portion is stamped with Stitched Sentiments. I love those leafy twigs. Then I added two rows of washi tape. The one with the pink, brown and green sort of inspired my card colors.


Happy Fall card (pink):
STAMPS: Autumn Pumpkins, Pumpkin Expressions
INK: Sweet Blush, Americana, Classic Kraft, Spring Moss, Dark Chocolate
PAPER: Soft Stone, white
DIES: Autumn Pumpkins, Enclosed: Leaf
OTHER: washi tape, seam binding.
--------


Next, I embossed a white background with the Cover Plate: In the Woods and stamped another (more traditional) pumpkin with the same two stamp sets.

They look kind of cute as a pair...:)


Happy Fall card (orange):
STAMPS: Autumn Pumpkins, Pumpkin Expressions
INK: Summer Sunrise, Cocoa Bean, Saffron Spice, Spring Moss
PAPER: white
DIES: Cover Plate: In the Woods
OTHER: seam binding.
--------


Next, a "Trick Or Treat" card made with the new Shaped Saying: Halloween die. I stamped the moon with Tiny Triangles to add color and pattern.

The "Boo to you" is from Spooky Smiles.


Trick or Treat card:
STAMPS: Spooky Smiles, Tiny Triangles
INK: Bright Buttercup, Summer Sunrise, True Black, Stormy Sea
PAPER: Stormy Sea cardstock, Bright Buttercup + White Basics Patterned Paper Collection, gray polkadot - other
DIES: Shaped Sayings: Halloween
OTHER: 
--------

One last project, a 3D Halloween house jar topper made with Tiny Town: Spookville dies and Tiny Town: Spooky Yard dies (tree and fence). I also added a larger ghost and Trick-or-Treat sentiment from the new Dress Up Dolls: Halloween stamps and dies.

The jar is a short, wide jar, about 4" wide by 3.5" tall. I tried to find candy corn to fill it, but couldn't find any! What's up with that? Candy corn is only a Halloween thing? I was sure I could find some, but no luck. Reese cups fill my jar...

The yellow chevron paper is from the Mod Mix paper pad and an Aqua Mist ribbon is tied around the jar. The Tiny Town: Spookville dies coordinate with the Tiny Town: Basics house that was previously released. With the Spookville additions, you can add a chimney, the spooky porch, pumpkins, bats, spiderwebs, etc.

The spooky house die is a pretty cute idea, huh? That Betsy. She's so clever. I wish I would have added the pumpkins to the front porch for more color, but oh well. Maybe next time.

Haunted House Jar Topper:
STAMPS: Dress Up Dolls: Halloween
INK: True Black
PAPER: Summer Sunrise pattern pack
DIES: Tiny Town: Spookville, Tiny Town: Spooky Yard, Dress Up Dolls: Halloween
OTHER: 
--------

That's it for me today. I'll see you again tomorrow with more! Have a great day and don't forget to visit these other talented ladies to see more Halloween inspiration:

Friday, August 12, 2016

Thanksgiving Inspiration...

Today we have more new and beautiful products to share with you by Papertrey Ink! Our post today is going to be full of Thanksgiving and fall inspiration...cards, hostess gifts, table settings, etc. First up, I have a card made with the new Make It Market mini kit called Color Pop: Autumn.
The dies in the kit were used to trim out the preprinted papers (leaves and flowers), and I used the Color Pop: Autumn stamps for the fall twigs on the ends in Classic Kraft ink. I love the colors in this kit SO MUCH! The gray mixed in with the fall colors is gorgeous, don't you agree?!

The "bountiful" die in the kit is a gorgeous font. It's trimmed out twice here and stacked for a nice embossed effect, and the stamp set was used to finish the sentiment in Dark Chocolate ink. I adore the raised affect when you stack 2 or more of the die cut sentiments together on top of each other!

Bountiful Blessings card:
STAMPS: Color Pop Autumn stamps
INK: Dark Chocolate, Classic Kraft
PAPER: Vintage Cream, White, Color Pop Autumn kit
DIES: Color Pop Autumn dies
OTHER: Sequins.
--------

My next project focuses on the new Give Thanks stamp set. It's full of BEAUTIFUL sayings and fonts...ahhh, I love it! I've made a tag for a hostess gift and wrapped up some cookies.

First, to create the tag for my hostess gift, I stamped the saying on a blank white sheet of cardstock, and heat embossed it with white embossing powder. Then I ink blended over the top with a Classic Kraft ink pad. Love how the white stands out! Next I used the Stitched Sentiments stamp set to create the twigs, berries and heart. I used Stormy Sea ink and the Give Thanks stamps and dies to create the little wheat pieces to add over the top. Last a piece of gray washi tape was stuck to the top of the tag.

The cookies are stacked two rows deep in a clear treat bag and tied at the top. (Not homemade, just Chips Ahoy, for the sake of time!) :)

Hostess Gift and Tag:
STAMPS: Give Thanks, Stitched Sentiments
INK: Clasic Kraft, Stormy Sea, Saffron Spice, Pure Poppy
PAPER: Linen cardstock
DIES: Give Thanks
OTHER: washi tape.
--------

Last is the new Splits: Giving Thanks stamp set. I embossed it onto linen cardstock, then used Stormy Sea ink to blend over the top and bring out the white. I really like the free-flowing look of this one! The linen cardstock works great with ink blending, because of the gorgeous texture in the paper.

"Thanks So Much" is a sentiment from Give Thanks (the stamp set that I used on my second project), along with the acorns and wheat stalk. I paired my card front with a plaid paper from Holiday Plaid.


Thanks So Much card:
STAMPS: Give Thanks, Splits: Giving Thanks
INK: Stormy Sea, Dark Chocolate
PAPER: Holiday Plaid, Linen cardstock
DIES: Giving Thanks
OTHER: white embossing powder, ink blending tool.
--------

All of the new products shown today will be available at Papertrey Ink on August 15th at 10 pm EST. Visit the team to see more ideas with these sets and more!

Thursday, August 11, 2016

Introducing Stylized: Autumn...

Welcome to day 2 of the Papertrey Ink countdown for August! We have some super cute fall stamp sets that will be released on August 15th at 10pm EST! Today I get to show you a few things made with Kay Miller's new stamp set, Stylized: Autumn.

Back in May 2014, I made these little baby booties. When I saw the fox in the stamp set, I thought of creating a baby card or tag and remembered I still had these little booties! The fox makes an adorable tag for a set of booties or other baby gift...for a girl or a boy!
The Mat Stack 5 and Layerz Mat Stack 5 dies were used along with the Stylized: Autumn stamps and dies. The sentiment was stamped with Boutique Borders: Baby.

Then I just punched a hole in the finished tag and attached it to the felt booties with a safety pin.


Little One tag:
STAMPS: Stylized: Autumn, Boutique Borders: Baby, Mat Stack 5 Collection
INK: Stormy Sea, Lavender Moon, Plum Pudding, Sweet Blush, Spring Moss
PAPER: White, Cream
DIES: Mat Stack 5, Stylized: Autumn
OTHER: R20 Copic marker.
--------

On this card, I created the lines with the Journal Accessories stamp set with Terracotta Tile and Aqua Mist ink to form a "notebook" looking paper for the background, then stamped the new Alphabet Soup stamp set over the top.

Keep It Simple: Teacher was used for the sentiment. I thought it would be a nice back-to-school card.


Just For You, Teacher card:
STAMPS: Journal Accessories, Keep It Simple: Teacher, Alphabet Soup, Stylized: Autumn
INK: Terracotta Tile, Aqua Mist and Saffron Spice by PTI; Soft Granite by Hero Arts
PAPER: white
DIES: Stylized: Autumn
OTHER: sequins - Pretty Pink Posh.
--------

The last card I think is my favorite! I stamped the fox repeatedly with Terracotta Tile, Soft Stone, Aqua Mist and a new ink called Saffron Spice! The leaf is stamped in Stormy Sea.

The cute saying is from a new set called Keep It Simple: From All of Us


From All of Us card:
STAMPS: Stylized: Autumn, Keep It Simple: From All of Us
INK: Soft Stone, Terracotta Tile, Saffron Spice, Aqua Mist, Stormy Sea
PAPER: white
DIES: Stylized: Autumn
OTHER: sequins.
--------

Visit Nichole Heady's blog for more sneak peeks all this week! I'll see you back here again tomorrow!

Tuesday, August 9, 2016

Cardmaking with washi tapes...

Is it too soon for a holiday card? :)
Today I'm up over at the Scrapbook Expo blog and am working with washi tapes in place of patterned papers. Stop over to read more about this card!

I've used the Tag Sale #4 die, Season's Greetings stamp set, Bigger Blooms stamps and dies and the Basic Bookmark 1 die by Papertrey Ink, along with the washi tapes and embossing powder, twine and sequins.

Swing over to the Weekly Scrapper blog to read more and to see how I store my washi tapes! Do you love washi? How do you use it?