Showing posts with label thanks. Show all posts

Friday, September 23, 2016

DT Tips: Golden Leaf Placecards...

Today I have a little place card idea for you that you can replicate for your Thanksgiving table decor! These are quick, easy and so pretty and elegant. I've used Papertrey Ink's Enclosed: Leaf dies.

All of the leaves and veins were cut out of White Tag Stock, which is a really thick cardstock by Papertrey Ink, perfect for tags, so they don't bend and are nice and sturdy. Then I glued the veins onto the leaves and painted the entire thing with Liquid Leaf in gold by Plaid. It dries VERY quickly, so make sure you rinse your brush often...or just use a cheap foam brush that you can toss when you are done. The foam brush works great for dabbing the paint into all of the crevices.
To finish off the leaves, I cut the Tremendous Tags from Smokey Shadow cardstock and stamped them with Autumn Pumpkins sentiments and heat embossed them in white embossing powder. You could write your guests' names instead on these if you'd like, then tie them onto the gold leaf stems!

The ribbon I used to tie the little tags onto the leaves is a piece of seam binding from Zipperstop.com in Chalk White. When wet, it crinkles nicely!

The floral pick with the white pumpkin and other white/gold pumpkins in my photos were found at Walmart. Here is another leaf you can make with the Enclosed: Leaf dies with the basic leaf in the background and the grateful outline piece over the top. I adhered the leaf layers, then painted it with the gold gilding like the previous samples.

Thanksgiving is all about food, friends, and family...and what better way to make your guests feel welcome than a wonderful and pretty note to welcome them to the table. You could also frame these and use them for fall decor! I hope you enjoyed this post today! Have a great weekend!


Friday, August 26, 2016

Adding a feminine touch to your autumn cards...

Happy Friday to you all! As I was looking for inspiration for today's design team tips post, I found a scrapbooking page that really inspired me, which isn't out of the ordinary! I can always find little design details on scrapbook layouts that translate well to cards. 


While studying this inspirational layout below, I realized that the reason I was drawn to it was because it had a feminine, light, layered feel to it. I usually tend to lean towards adding a feminine look to my cards and thought it would be fun to show you ways to add this look and feel to any card theme, including the autumnal cards that I've made for today's post! 
First, how do you define feminine?  To me, it's florals, light soft colors, layers, details, cheerful prints and patterns, swirly fonts, texture, gold/shiny accents, ruffles, soft curves, asymmetry.

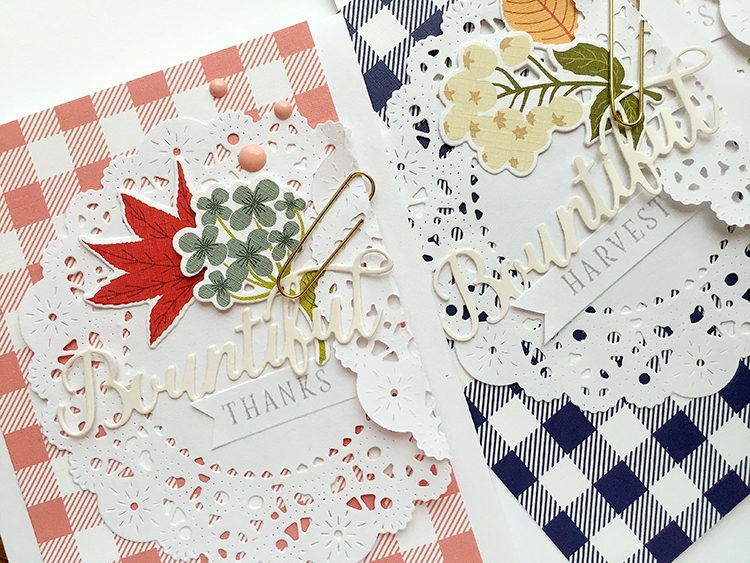
I was drawn to the circular piece on the layout and loved how it was white on white, loved how the doily was folded over and clipped. I also liked the layers of the flower and sentiment and how it was all tucked together. Instead of the scalloped circle, I immediately thought of a doily. Papertrey Ink has the Parisian Lace Doily die, which is what I used here. There's nothing quite as feminine as a doily, right! You can also find them pre-made in big quantities in the baking section at the craft store. I die cut some of these and gathered some gingham paper. I also gathered my Color Pop Autumn mini kit and used the dies in the kit to trim out some of the leaves and flowers.

What makes a doily feminine? Lots of fine detail and the soft, round shape. I love the color of the wooden clothespin with the pink on the layout, but I wanted something flatter to allow for mailing, so I found some gold paper clips that I thought would work well for a fall card.


The doilies were simply folded over and clipped with the paper clip, then I tucked in a couple of flowers, leaves, a bountiful die cut and sentiment.

Inspired by the white-on-white in the layout, I added a Vintage Cream "Bountiful" die cut over the white doily and stamped a sentiment to go with it in gray with the Color Pop Autumn kit, very soft and subtle. Then to add a bit more color, I wanted to try the gingham in the background.

You can add a doily and a few layered details to a card on any occasion to make it feminine! Change out the backgrounds if you'd like to make them even softer and more dreamy and romantic. I hope you enjoyed this post. Have a creative day!

Bountiful cards:
STAMPS: Color Pop Autumn
INK: Stormy Sea
PAPER: Color Pop Autumn, Chicken Scratch Gingham, white and Vintage Cream cardstock
DIES: Color Pop Autumn, Parisian Lace Doily die
OTHER: paper clips, enamel dots.

Friday, July 15, 2016

Release day...

Welcome to another release day at Papertrey Ink! All of the new stamps and dies for July are being released tonight at 10pm EST. I have several more cards to share with you using some of the new products. Let's get started!

First, I have a card made with the new Splits: Best Wishes stamps and dies. The leaves reminded me of Christmas holly for some reason, so I stamped them and colored them in with a green Copic marker. I used the new "happy" die from Just A Number dies and "holidays" is stamped with Home For the Holidays. The berries are just punched out with a hole punch, then I combined vellum with the Floral Sketches patterned paper and the Pure Poppy + White pattern paper. A happy little holiday card!

Happy Holidays card:
STAMPS: Splits: Best Wishes, Home for the Holidays
INK: True Black
PAPER: Sheer Basics Vellum, Floral Sketches paper pad, Pure Poppy + White
DIES: Center Style: Feminine, Splits: Best Wishes, Just A Number
OTHER: none.
------
Next is a card made with the new Paper Clippings: Done In Love stamps and dies! Love these! The big heart was so easy to cut out and place on my Classic Kraft Bitty Dot paper and then just die cut and stamped a few pieces and added them over the top.
And there is an adorable "-Vincent VanGogh" stamp to add, how cute is that!

Done In Love card:
STAMPS: Paper Clippings: Done In Love
INK: New Leaf, Pure Poppy, Bright Buttercup, True Black
PAPER: white, Classic Kraft pattern pack
DIES: Paper Clippings: Done In Love
OTHER: none.
------

Next is Number the Stars stamps and Number the Stars Banner die. I combined these with the previously released Shaker Shapes: Star die and the Sparkle & Shine Words die.


First, I added a layer of aqua ink in the background with my ink blending tool. Then I stamped the new Background Basics: Galaxy stamps (two-step) over the top, along with the Shaker Shapes: Star cut from Luxe Silver cardstock and the "shine" word die from aqua cardstock. A couple of vellum stars were added too.

You Shine card:
STAMPS: Number The Stars, Background Basics: Galaxy
INK: Aqua Mist, Tropical Teal, True Black
PAPER: white, Luxe Silver cardstock, What the Doodle: Map Coloring Sheets
DIES: Number The Stars Banner, Shaker Shapes: Star, Sparkle & Shine Words
OTHER: vellum, sequins, twine.
------

Next is Dress Up Dolls: Rainy Day stamps and dies. I added the little flowers from Tiny Town: Sweet Shoppe to the boots and popped them up for dimension.
The umbrella was colored in with Copics.

When Life Gives You Puddles card:
STAMPS: Dress Up Dolls: Rainy Day
INK: Tropical Teal
PAPER: Chicken Scratch Gingham
DIES: Dress Up Dolls: Rainy Day, Tag Sale: Quilted, Tiny Town: Sweet Shoppe (flowers)
OTHER: Copic Markers, enamel dot, seam binding.
------

Last is a gorgeous new set by Dawn McVey called Just a Number! I used the Cover Plate: Scallops underneath with Lovely Lady cardstock and the Shaker Shapes: Circle dies for layering.
The flowers are from Forget Me Not.


Happy Birthday Scallop card:
STAMPS: Just A Number, Forget Me Not
INK: Summer Sunrise, Raspberry Fizz, Pure Poppy, New Leaf
PAPER: Lovely Lady, Harvest Gold pattern pack
DIES: Just A Number, Forget Me Not, Shaker Shapes: Circle
OTHER: seam binding
------

Don't forget to shop tonight at 10pm EST at PapertreyInk.com to get all of the new products we have been previewing this week! Stop by each of these blogs to see more: 

Tuesday, March 1, 2016

Revisited: Fancy Folk Art...

Each month on the 1st, the Papertrey Ink team revisits an older stamp set to give you fresh ideas of what you can do with it! Today we are using the Fancy Folk Art stamps and dies. I have one card three ways for you today:

1. a one-layer card (simple),
2. a card using the dies and an extra technique for the sentiment (intermediate),
3. and one with extra dimension, ink blending in the background, and splitting the sentiment (advanced). 

You can use these same tips with any stamp and die set, however, to step up your cards!

1. First is the one-layer stamped card or "simple" version! 
Everything is stamped directly onto the card base with Fancy Folk Art.

The leaves are stamped in Stormy Seas ink and the flowers with Pure Poppy, Aqua Mist, Tropical Teal and Bright Buttercup inks, then the sentiment over the top.

Nothing wrong with this one, but let's see how we can "step it up"!

2. Next is the "intermediate" version! 
I added a couple more steps in my process to add extra dimension. The big floral piece is die cut and stamped first, so I could raise it up off the card with pop dots. Then I placed the die cut directly onto the card and actually stamped the sentiment right over the top (before raising it up!). It did stamp through the holes of the die cut onto the card base. The die cut was then adhered with pop dots to help it stand off the card, and I also stamped and cut out another banner to place over the top.

Can you see the dimension of the die cut that is standing up off the "intermediate" card? I love dimension!

Now should we "step it up" a bit more? :)

3. Last is the "advanced" version: 
I will call the last version of this card "advanced", just because it has a few more steps to creating it, but I really think the extra steps give it a bit more "WOW" factor and detail to look at! What do you think? Which version do you prefer?

The floral is die cut and stamped, but before adding it to the card with pop dots, I did some ink blending in the background with a sponge and Aqua Mist ink. I really love how the soft aqua brings out the teal and red! It also brings out the white banner and white edges around the die cut, which really makes it pop. When placing the die cut on the card, I adhered it on an angle. This way I didn't cover up the two tulip shapes. The slight tilt of the floral piece makes a huge difference!


The sentiment stamp was cut apart! (YES, I cut the stamp!) I wanted to stamp only the "many thanks" separately in Aqua Mist under the die cut. You could also mask off the banner if you'd like. I don't mind cutting my stamps apart, because they can be put back together very nicely on the acrylic block. I stamped the banner in black and cut it out and added it over the top of the floral piece. I've also added the clear sequins as another detail that adds sparkle and catches the eye, without taking the attention away from the pretty floral.

I hope you enjoyed these tips for adding more detail and color and "stepping up" your card designs!

Visit Betsy, Dawn, Heather, and Melissa for more Fancy Folk Art ideas!

Monday, September 21, 2015

Make It Monday: Two-Toned Sentiments...

Happy Monday! What do you have planned for today? I'm up with this week's Make It Monday video tutorial over at Papertrey Ink. Hope you'll swing by to watch the video and play along in this week's challenge!

The challenge this week is "two-toned sentiments". You can use Papertrey Ink's striped cover plates dies to get this look, or in the video I'll show you how to make these without the cover plates as well. Visit Nichole Heady's blog to see the Two-Toned Sentiments tutorial and play along for your chance to win a Papertrey Ink gift certificate! The Graceful Greetings and Bitty Bouquets stamp sets were used on these cards.

Two-toned sentiment cards:
(All supplies by PapertreyInk.com unless otherwise noted.)
STAMPS: Graceful Greetings, Bitty Blooms INK: True Black, Orange Zest, Raspberry Fizz, New Leaf inks; Versamark ink - craft supply
PAPER: True Black, white
DIES: Bitty Blooms, Cover Plate: Stripes Vertical
OTHER: twine - The Twinery, white embossing powder - craft supply.
______

Have an amazing day!
Danielle

Saturday, August 29, 2015

SAF 2015: Runway Inspired Challenge...

For the Runway Challenge, the designers each selected a runway outfit to use as inspiration. I chose this one:
Inspired by the aqua background with the peach, red, navy and kraft colors, I made this card...

The Brushed Blooms stamps and dies were used and the Branching Out die. I layered them together and popped up the blooms with some dimensional adhesive.


So Grateful For You card: 
STAMPS: Brushed Blooms, Lovely Layers
INK: Pure Poppy, Melon Berry, Classic Kraft, Enchanted Evening, Dark Chocolate
PAPER: Aqua Mist, white, Enchanted Evening Pattern Pack
DIES: Brushed Blooms, Lovely Layers
OTHER: sequins.
______

Visit Nichole's blog to play along in this Runway Inspired Challenge for your chance to win, and you MUST see all of the gorgeous cards made by the team! Truly inspirational! Now it's your turn, can't wait to see what you'll make!

Wednesday, July 15, 2015

Release day...

Have you been following the Papertrey Ink countdown this month? Today is the day all of the new products will be up for sale at 10pm EST! Here are a few more new stamps and dies we were lucky enough to work with this month! First up, I used a new stamp set called L' Shanah Tovah (sentiment and small leaves) paired with Vintage Linens stamps.
On this card, I wanted to try a more neutral color scheme and went for grays, blacks and golds. The wreath is cut with the Rustic Wreath die.


Fruitful Year card:
(All supplies by Papertrey Ink unless otherwise noted.)
STAMPS: L' Shanah Tovah, Vintage Linens
INK: True Black,  Soft Stone, Ripe Avocado, Enchanted Evening; Soft Granite by Hero Arts, Versamark - craft supply
PAPER: Soft Stone, white
DIES: Vintage Linens, Rustic Wreath
OTHER: gold embossing powder, sequins.
______


Next up I've used the new Petite Places: Main Street stamps and the new Graceful Greetings dies.
To create a little home for the cute little shops that were stamped, I cut some of the Limitless Layers 2.5" Square dies and layered them with a Vintage Linen paper and paper from the Sweet Blush Pattern Pack. 

 Hello Miss You card:
(All supplies by Papertrey Ink unless otherwise noted.)
STAMPS: Petite Places: Main Street, Mat Stack 3 Collection
INK: Aqua Mist, Tropical Teal, Pure Poppy, Hibiscus Burst, Summer Sunrise
PAPER: Vintage Linens, Sweet Blush Pattern Pack, white
DIES: Graceful Greetings, Limitless Layers 2.5" Square die collection
OTHER: twine, sequin.
______

Last are the Morning by Morning stamps and dies. 

In the background, I watercolored the paper with gray paint, then added the die cut over the top, along with another Graceful Greetings die cut.


Thanks card:
(All supplies by Papertrey Ink unless otherwise noted.)
STAMPS: Morning by Morning, Graceful Greetings
INK: New Leaf, Hibiscus Burst, Sweet Blush, Plum Pudding, Winter Wisteria
PAPER: Watercolor paper, Winter Wisteria Pattern Pack
DIES: Morning Glories, Graceful Greetings
OTHER: sequins, watercolor paints.
______

Is there a product you can't wait to get? Visit the PTI team to see more with these new items. Everything will be available on July 15th at 10pm EST at Papertrey Ink. Thanks for stopping by!

Wednesday, July 1, 2015

Stamping patchwork...

Well, hello there. My friend Claudia came over last weekend, and we were able to do some stamping and card making! So I decided to make a few things with the Quilted: Summer stamp set and dies by Papertrey Ink just for fun. I am a quilter at heart, so I just love this set and the fun patterns you can make with it. The design for these cards was originally by Betsy, which you can see in this post. I just used some different colors, added a little bit of Enchanted Evening, a pretty navy blue. Love how it looks with the Aqua Mist and Pure Poppy.

The red borders were stamped with a little dash line from Quilted: Summer. I think it was meant to be a stick for the pinwheel, but it sure looks cute as a border also!
Ended up making 3 of these with different sentiments and just love how they turned out! I've used different sentiments on each. "Just because" is from the Scripted stamp set. "Warmest thanks" is from Bloomers.

The "sunshine" sentiment is from Quilted: Summer.

These were quite easy to do after I had the first one done and could copy where all of the colors would go. The trick for me was to start with the aqua one in the top center. That way I could center the triangles on the card quite easily. Added some twine and a flower die cut from Quilted: Summer. Might have to make more of these for little card sets!

You might have noticed at the top of my blog, I've started a "SHOP" link. Be on the look out for some cards for sale soon! :) Bye for now!

Quilted: Summer cards:
(All supplies by Papertrey Ink unless otherwise noted.)STAMPS: Quilted: Summer, Scripted, Bloomers
INK: Aqua Mist, Enchanted Evening, Summer Sunrise, Pure Poppy, Simply Chartreuse by PTI; Soft Granite by Hero Arts
PAPER: white
DIES: Quilted: Summer
OTHER: twine.

Wednesday, April 15, 2015

Release day...

I have a few more cards to share with you using some new products coming out tonight, April 15th at 10pm EST at Papertrey Ink. First up, is the new Graceful Greetings stamp set!

On these, I stamped the sentiment in Versamark ink, then poured different colors of embossing powder on and heat embossed them to melt the powder. Then I stamped the flowers from Graceful Greetings. 
The papers are from last month's Chicken Scratch Gingham paper pad. These little cards make me so happy! I love all of the colors.

Graceful Greetings card:
(All supplies by Papertrey Ink unless otherwise noted.)
STAMPS: Graceful Greetings
INK: Aqua Mist, Pure Poppy, Summer Sunrise, Harvest Gold, New Leaf, Sweet Blush
PAPER: white cardstock, Chicken Scratch Gingham
DIES: none
OTHER: Zing! embossing powders, twine
______

Next is Petite Places: School stamps and dies and Keep It Simple: Teacher stamps.
The background is from the Black & White All Over paper pad (dot). The scallop is cut with the Scene It: Doily Tag Base.


Thank You, Teacher card:
(All supplies by Papertrey Ink unless otherwise noted.)
STAMPS: Petite Places: School, Keep It Simple: Teacher
INK: Pure Poppy, True Black, Tropical Teal
PAPER: Chicken Scratch Gingham
DIES: Petite Places: School, Scene It: Doily Tag Base, Shaker Shapes: Pencil (loop)
OTHER: Copic Markers, button from Wee Folk mini kit, ribbon-craft supply.
______

Next is Enclosed: Apple and Tucked In: Thank You.
Again I used the Black & White All Over paper pad and added some stamping to the background with Quilted: Spring stamp set. I had stamped this background previously and didn't end up using it, so I found it and pulled it out. I think it works nicely with the reds and greens of the apple! When you are feeling uninspired, try stamping a few backgrounds. Then maybe later on you'll be inspired to use them for something!
Thanks card:
(All supplies by Papertrey Ink unless otherwise noted.)
STAMPS: Enclosed: Apple, Tucked In: Thank You, Quilted: Spring
INK: New Leaf, Ripe Avocado, Pure Poppy, Pinefeather
PAPER: Pure Poppy Pattern Pack, Sweet Blush and Spring Moss cardstock, Black & White All Over Paper Pad
DIES: Enclosed: Apple
OTHER: sequins, twine.
______

Last is Flower Favorites stamps and dies and Lunchbox Love stamps.


Again a Black & White All Over paper is used in the background (frame), then I watercolored a piece to adhere in the center. 

Cheer Up Buttercup card:
(All supplies by Papertrey Ink unless otherwise noted.)
STAMPS: Flower Favorites, Lunchbox Love
INK: Hibiscus Burst, Pure Poppy, New Leaf, Aqua Mist, Harvest Gold, Summer Sunrise, Smokey Shadow Pattern Pack
PAPER: Black & White All Over
DIES: Flower Favorites
OTHER: sequins, watercolors.
______

All of the new things you see here will be available on April 15th at 10pm EST. Thanks for stopping by and please visit the other gals to see what they've made with the same products: