Showing posts with label thanksgiving. Show all posts

Friday, September 23, 2016

DT Tips: Golden Leaf Placecards...

Today I have a little place card idea for you that you can replicate for your Thanksgiving table decor! These are quick, easy and so pretty and elegant. I've used Papertrey Ink's Enclosed: Leaf dies.

All of the leaves and veins were cut out of White Tag Stock, which is a really thick cardstock by Papertrey Ink, perfect for tags, so they don't bend and are nice and sturdy. Then I glued the veins onto the leaves and painted the entire thing with Liquid Leaf in gold by Plaid. It dries VERY quickly, so make sure you rinse your brush often...or just use a cheap foam brush that you can toss when you are done. The foam brush works great for dabbing the paint into all of the crevices.
To finish off the leaves, I cut the Tremendous Tags from Smokey Shadow cardstock and stamped them with Autumn Pumpkins sentiments and heat embossed them in white embossing powder. You could write your guests' names instead on these if you'd like, then tie them onto the gold leaf stems!

The ribbon I used to tie the little tags onto the leaves is a piece of seam binding from Zipperstop.com in Chalk White. When wet, it crinkles nicely!

The floral pick with the white pumpkin and other white/gold pumpkins in my photos were found at Walmart. Here is another leaf you can make with the Enclosed: Leaf dies with the basic leaf in the background and the grateful outline piece over the top. I adhered the leaf layers, then painted it with the gold gilding like the previous samples.

Thanksgiving is all about food, friends, and family...and what better way to make your guests feel welcome than a wonderful and pretty note to welcome them to the table. You could also frame these and use them for fall decor! I hope you enjoyed this post today! Have a great weekend!


Friday, August 26, 2016

Adding a feminine touch to your autumn cards...

Happy Friday to you all! As I was looking for inspiration for today's design team tips post, I found a scrapbooking page that really inspired me, which isn't out of the ordinary! I can always find little design details on scrapbook layouts that translate well to cards. 


While studying this inspirational layout below, I realized that the reason I was drawn to it was because it had a feminine, light, layered feel to it. I usually tend to lean towards adding a feminine look to my cards and thought it would be fun to show you ways to add this look and feel to any card theme, including the autumnal cards that I've made for today's post! 
First, how do you define feminine?  To me, it's florals, light soft colors, layers, details, cheerful prints and patterns, swirly fonts, texture, gold/shiny accents, ruffles, soft curves, asymmetry.

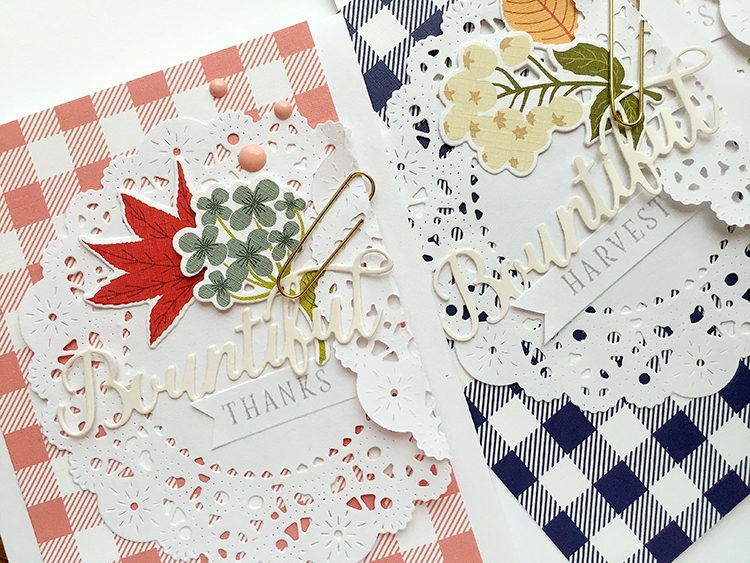
I was drawn to the circular piece on the layout and loved how it was white on white, loved how the doily was folded over and clipped. I also liked the layers of the flower and sentiment and how it was all tucked together. Instead of the scalloped circle, I immediately thought of a doily. Papertrey Ink has the Parisian Lace Doily die, which is what I used here. There's nothing quite as feminine as a doily, right! You can also find them pre-made in big quantities in the baking section at the craft store. I die cut some of these and gathered some gingham paper. I also gathered my Color Pop Autumn mini kit and used the dies in the kit to trim out some of the leaves and flowers.

What makes a doily feminine? Lots of fine detail and the soft, round shape. I love the color of the wooden clothespin with the pink on the layout, but I wanted something flatter to allow for mailing, so I found some gold paper clips that I thought would work well for a fall card.


The doilies were simply folded over and clipped with the paper clip, then I tucked in a couple of flowers, leaves, a bountiful die cut and sentiment.

Inspired by the white-on-white in the layout, I added a Vintage Cream "Bountiful" die cut over the white doily and stamped a sentiment to go with it in gray with the Color Pop Autumn kit, very soft and subtle. Then to add a bit more color, I wanted to try the gingham in the background.

You can add a doily and a few layered details to a card on any occasion to make it feminine! Change out the backgrounds if you'd like to make them even softer and more dreamy and romantic. I hope you enjoyed this post. Have a creative day!

Bountiful cards:
STAMPS: Color Pop Autumn
INK: Stormy Sea
PAPER: Color Pop Autumn, Chicken Scratch Gingham, white and Vintage Cream cardstock
DIES: Color Pop Autumn, Parisian Lace Doily die
OTHER: paper clips, enamel dots.

Wednesday, November 12, 2014

Monthly Moments: November...

Today I'd like to share with you the newest Monthly Moments collection for November, which will be available on Nov. 15th at 10pm EST at Papertrey Ink. Evidently, I jumped the gun making a "thankful" mini album last time, because this month's kit was perfect for scrapping family, food, and thankfulness! So here is another one, just an album filled with photos from last Thanksgiving.
As I looked through the journal cards, stamps and dies, I knew immediately what I wanted to do with them. Last Thanksgiving, my side of the family and my grandmother came to visit, and it was our first Thanksgiving together in 13 years. We all got together and took some family photos up by Daniel's Park here in Colorado, so I put together a little book of photos to give to my mom when she comes this year. I used the new tag die, Monthly Moments: Journal Card 6 to trim the journal cards and some of the photos. I used the stamp set on some of these also before I started putting it all together. Also incorporated a few other dies by Papertrey Ink, which I'll list in the supplies.
Here is the first inside page, just a kraft tag stamped with the Monthly Moments: November stamps.
Another super quick page, stamped with the stamps again. I cut a cork heart from the Tremendous Tags dies.  I didn't add journaling to my book yet...wasn't sure if I wanted to write in it from my perspective, since I wanted to give it away to my mom.
Pic of my mom and dad... cut with the same tag die as above, trimmed from 4x6" photos.
This "Give Thanks" paper from the Journal Card Collection was so cute, had to use it. It's larger than some of the others I used (others were cut in half), but I think adding different sizes into the book makes it more interesting. I added washi tape, a felt heart cut with Tremendous Tags dies, little paper clip and a pearl.
Even though the pictures didn't exactly match the papers (with the pink in our scarves), I decided to use them in color anyway. I don't think anyone will mind when they look at these 10 years from now! It's fun to see them in color rather than black and white, don't you agree? Too often I see black and white pics being used. This is my mom and dad in the middle, my brother and his family on the left, and me and my family on the right.
The leaves were cut with Leave It Be with some burlap, cut the "November" with the Monthly Moments: November die and added some stamping and washi tape. The washi tapes are fabric ones from Michaels..so in love with them!
Picture of my mother and her mother... it was vest and scarf season. :)
Here is a picture of me, my hubby and 2 girls. Funny to see this now, as my girls have slimmed down a lot since last Thanksgiving!  I cut a Wonderful Words: Together die and stapled it onto the pic, added more washi tape and another cork heart.
"Gobble, gobble" stamped tag for journaling...
Photo of my girls...
Little bit of layering of journaling cards and tags, and another felt piece cut with Tremendous Tags.
There are more pics, but I will spare you! :) Anyway, you get the gist of the cute journal cards and stamps, I hope. I'll be back tomorrow with more projects!

Thankful, Family Traditions Mini Album:
(All supplies by Papertrey Ink unless otherwise noted.)
STAMPS: Monthly Moments: November
INK: Dark Chocolate, Classic Kraft inks
PAPER: Monthly Moments: November Journal Card Collection, Dark Chocolate and Canyon Clay cardstock, Dark Chocolate Pattern Pack
DIES: Monthly Moments: November, Monthly Moments: Journal Card 6 die, Rustic Wreath, Tremendous Tags, Wonderful Words: Together, Phrase Play #7, 
Polkadot Parade #6 (mini leaves on front cover)
OTHER: twine, seam binding, pearls, paper clips, 
Canyon Clay felt, kraft tags, washi tapes, cork, burlap, machine stitching.
______

Visit the the PTI team to see more with these new products:

Friday, September 14, 2012

Quick Favors & Wraps...

Hello! Today the Papertrey Ink team is working with some new dies coming out this month on the 15th that are perfect for those handmade party favors! First up, a favor made for a Thanksgiving party. I used a new die called Tissue Paper Favors #1
To make this, I simply cut 2 large pieces of tissue paper and folded them together into four quadrants, large enough for the die to fit onto when it's done being folded. Next, I placed the die on the fold and ran it through my Cuttlebug to cut out the shape. Then, I unfolded the tissue and placed some little chocolates in the center, and wrapped it up, tied it with a gold ribbon. The tag is stamped with Classic Kraft ink from the new Do Me A Favor Tags stamp set and tied on with black twine. I used a leaf from the Autumn Acorns die to attach to the tag!


Nichole Heady will be showing how to make these on her blog if you'd like to see more on how to do this! They are really easy and inexpensive to make, and of course would work for any occasion just by changing up the colors of tissue paper. I can see these made from felt too if you had a large enough piece of felt - OOH, that would be pretty.

Thanksgiving Tissue Party Favor:
STAMPS: Do Me A Favor Tags
INK: Classic Kraft
PAPER: white cardstock
DIES: Tissue Paper Favors #1, Autumn Acorns (leaf)
OTHER: felt by PTI, tissue paper from craft supply, gold ribbon, twine by ScrapPantry.etsy.
------------

Next is the Essential Pillow Box die, which I used Classic Kraft paper with here. I decorated it with a Damask Snowflake, a 2" circle cut from the Candy Cane Prints paper and a new stamp from Dawn McVey's Happiest of Holidays set! This is one of my favorite sets from this month's release, love the sentiments and the fonts!

Can't get enough of baker's twine lately! It's perfect with holiday projects.

All the Joy Pillow Box:
STAMPS: Happiest of Holidays
INK: True Black
PAPER: Classic Kraft and white cardstock, Pure Poppy Pattern Pack, Candy Cane Prints
DIES: 2" circle die, Damask Snowflakes, star punch by Fiskars
OTHER: Scrap Pantry.etsy twine
------------

And I couldn't resist one more quick card with the Happiest of Holidays stamp set, the same set that I used on my pillow box. :)
The snowflakes are die cut out of felt with the new Snowflake Medley dies coming out on the 15th. LOVE these! I added Aqua Mist cardstock die cut with one of the Edgers dies, a strip of Pure Poppy Patterned Paper, a sentiment stamped with Hawaiian Shores ink and some embossed snowflakes from Snowflake Medley stamps.

Peace, Love, Joy card:
STAMPS: Happiest of Holidays, Snowflake Medley
INK: Hawaiian Shores, Fresh Snow ink
PAPER: Pure Poppy Pattern Pack, Aqua Mist and white cardstock
DIES: Snowflake Medley dies, Edgers #3 die
OTHER: Scrap Pantry.etsy twine, floral pin, Spring Mix Buttons by PTI.
------------

Yearning to see more party favor ideas? Visit the rest of the Papertrey Ink team, you won't be disappointed! All of these products will be available at Papertrey Ink on the 15th. (Tomorrow!)

Ashley Cannon Newell

Monday, April 2, 2012

Scrapkit Studio...

I have been working on this little mini album the past week or so, coming back to it here and there and adding more when I have time! That seems to be the trick for me, as I usually like things more on the simpler side, but when I leave a project and come back to it, I can see better where something might need to be added in or where it feels empty!
This mini album was made with a kit by ScrapKit Studio. When I received this kit in the mail, I was pleasantly surprised...it's like no other kit I've ever tried! EACH piece is already pre-cut for you! I didn't cut a thing in this little album.
You can either follow the directions provided to you to complete the album, or go more on your own and complete it how you'd like. I decided to just wing it, and do what feels natural to me. The only thing I really added to this kit was the black houndstooth tape by Pink Paislee, some white paint and machine stitching.

On this first page spread, I decided to leave one of the chipboard pages blank with no patterned paper and instead added some paint around the edges, then journaled over the top.

I've included some pictures of our family that we took of us at Thanksgiving. We were trying to get a family photo for our Christmas picture (which I never sent out because I ran out of time!)

There are chipboard shapes included with paper shapes to match, so I covered the chipboard frame here with the blue paper and stitched around it. I also added some messy stitching to the red heart. The white and black alphas are in the kit - as well as every punched shape you see! Yes, everything! The owner of this kit club works so hard to pre-cut everything you will need to create the album.
Here I used the white letters on white cardstock. I love the tone-on-tone effect! Another thing I like to do is tie twine or ribbons around the rings in between pages. You can also add more photos on the rings! Simply punch holes and add the photos in between pages.
This little pocket came in the kit also. All you do is fold the pocket and adhere the sides. I decided to do a little zig zig stitching on the sides of my pocket. I added the banner and felt word over the top from the kit. I used the red ribbon to twirl around into a little rose and attached a pin through it.
Here is another chipboard piece that I painted instead of adding paper to it...love how that looks.
A couple of little embellishments add to the page and photos, but don't completely take it over like this page below.
Some of our pictures were blurry from that day, but I scrapped them anyway...we were having fun together in the pics being silly!
And another peek at the cover!
Don't be afraid to mix and match colors when making a mini album - as long as you have a reoccurring color scheme throughout the book, it will keep it looking cohesive. All of the Basic Grey Picadilly papers are double sided, so you could end up with a book looking totally different than mine if you chose the other sides! Many options with this kit, yet what I loved was not so many decisions on what shapes to cut, etc. It was fast and super easy.


Here is the link to the Live Love Laugh kit. Hope you enjoyed my take on this little album! :)