Wednesday, August 31, 2011

beach inspired...

Today I have more to share with you made with the new Nantucket line by Pink Paislee. Catherine from Scrapbook and Cards Today asked me to put a little something together for their blog this week. Stay tuned over there for a Nantucket giveaway!

My first card was inspired by a blue and white beachy pillow I found on-line. The Nantucket die cuts were perfect! I layered a few of these along with Nantucket ribbon, punched butterflies from the 6x6 paper pad and a Vintage Vogue wooden spool, also by Pink Paislee.

To create the card, I cut a long piece of white cardstock about and folded the 2 long ends in towards each other, overlapped them in the front and adhered, then stitched along the edges. I punched a hole at the top with a 2" circle punch for inserting money or a gift card for the sweet birthday girl. I added a stamped sentiment by Papertrey Ink from the Mega Mixed Messages stamp set. (I seem to use that one a lot lately.)
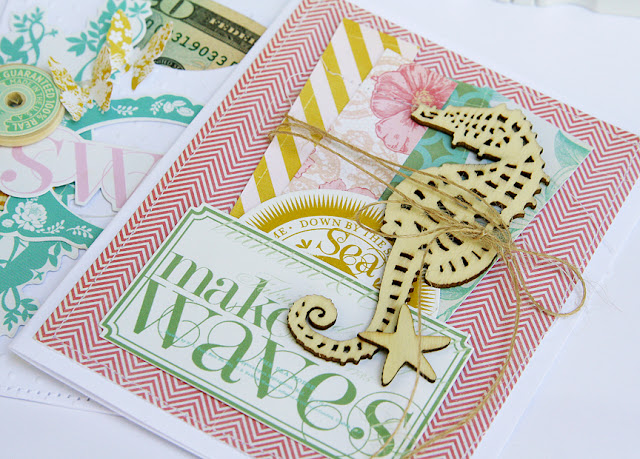
The next card was inspired by these frames I saw online. Loved the little weathered strips, so I decided to cut my 6x6 Nantucket papers into strips and randomly sew them together. I didn't want them to be straight. I think it adds to the casual "beachy" feel. Two Nantucket die cuts were added over the top and two wooden pieces from the Nantucket Wood Shapes!
Just because a paper line has a "theme" to it, doesn't mean you can't use it to create cards! I think the Make Waves card would be a fun card for a high school graduate just leaving for college, with the world (or the big sea) ahead of him/her. :)
Thank you for viewing today. I hope you are inspired to try something new on a card?

Monday, August 29, 2011

a little me time...

Do you love to read or know someone who loves to read? These little bookmarks are so much fun to make - and would make a great gift. I saw the idea on Pinterest awhile back here and they were made with pretty little jewelry pieces. They are so beautiful. I am not good with making jewelry, but I can hot glue like it's nobody business. lol

I was playing around with my scrapbooking products tonight, since it's been so long since I've spent time creating, just for fun. Then I saw these Melissa Frances resin frames lying on my table and thought....a necklace? A photo inside? Hang them on a scrapbook page? Aha. A bookmark.


For each bookmark, I wanted a long piece that you slide into the book to hold the page. For this, I used white pom pom trim by Melissa Frances on the middle bookmark, tinsel for the swirl bookmark, and a crepe paper strip for bookmark on the right. (All by Melissa Frances.) I just added some little resin frames, pins, and a satin flower (on the center one) with a hot glue gun. For these photos, I covered some old books with Melissa Frances papers from the 5th Avenue line.


This one holds a little photo of my girls.
I think I know what my mom is getting for her birthday in September! She loves to read. A new book with a new bookmark inside will do the trick. (I might cover the new book in pretty papers too!)

Ooh, I just had another thought. One of Melissa Frances' chandelier drops would be neat dangling on a bookmark as well!

Melissa Frances supplies used:
Papers: 5th Avenue line
Resin: Elegance Frame Applique, Provincial Applique - set of 4, Scroll Applique
Flower: Green Satin Twist Rose
Rub on sentiment: Girlfriends rub ons
White Pearls
Silver Tinsel
Tissue Paper Garland, pink and white
Pom pom trim, white
Other: floral pins, gray lace ribbon

Wednesday, August 24, 2011

creating with the Cuttlebug...

Hi everyone! I am off to take my daughter to the cardiologist for her annual checkup, but wanted to post this layout quickly that I did for Pink Paislee! When I received the new Nantucket line by Pink Paislee, I couldn’t wait to “dive” right in (no pun intented!) and scrap some photos of my daughter collecting shells from our trip to the ocean in Maine. The Nantucket line is so gorgeous and timeless. I love that it’s not too “themey” and is versatile enough to be used for anything, not just beach photos. But…I couldn’t resist using these beautiful light and airy papers with the summery pictures from Maine – they were perfect!
To create some movement to the page, I decided to add some swirls with the Cuttlebug embossing machine. First, I punched four white cardstock circles with a 2″ circle punch by Fiskars.
Next, I added them inside the swirls embossing folder and ran them through the machine.
This is such a simple technique to do and the swirls add to the theme of the layout without taking attention away from the photos!

I added a die cut sun shape from the Nantucket – Ephemera over the top of one of the circles, along with some Nantucket Wood Shapes. I wanted to keep the wood color of the shapes, because it reminded me of driftwood found on the beach. But of course, these can be painted or misted as well!


Here you can see I added some twine around the ribbon for added texture. I cut the blue paper around the wave shape to add even more movement to the page.
For a complete supply list, visit the Pink Paislee blog HERE. If you have any questions, let me know! Thanks for stopping by today,

Monday, August 22, 2011

Winner of the Echo Park kits giveaway...

Hi everyone! I'm so sorry for the delay in choosing the winner for the two Echo Park kits. My husband has taken a week off, and we've been doing some much needed purging things and fixing/finishing some projects around the house! Sending SINCERE thanks for everyone for your nice comments!! I appreciated each and every one of them. Truly. I wish I could send you all a free kit. :)
Here are your random numbers:
256
Timestamp: 2011-08-22 15:05:23 UTC

Congratulations goes to ROSE! Please email me with your mailing address, Rose, to dflanders71@hotmail.com.

BloggerRose said...
Love your twine blooms! Gorgeous!
August 19, 2011 10:48 AM

Thursday, August 18, 2011

Echo Park and The Twinery blog hop!

Welcome! If you arrived here from IVONA's blog, you are in the right place! If not, make sure you start at The Twinery blog.

Most of my blog readers know how much I love, love using twine on my projects, and The Twinery is the BEST place to purchase colored twine in my opinion. :) The colors are so awesome! Today Echo Park and the Twinery have asked me to participate in a fun little blog hop to showcase some of their new goodies!

First off, a little layout that I made for a special friend of mine, Shonna. She lives in my hometown in South Dakota and we don't get to see each other often, but we keep in touch with email, phone calls and Facebook time! I want her to know how much her friendship means to me! We met... oh, I would say somewhere around 1994...? Gosh, that means we've been friends for about 17 years. Wow, wow, wow. Time sure flies. That's me (right) and Shonna (left) this summer when I went home for a visit.
Here I used Echo Park's new Country Drive line of papers, journaling cards and stickers. The teal twine is called Caribbean from the Twinery. The stamped flowers and remember sentiment are new by Papertrey Ink and are called Harvest Berries, and I cut them out with a Harvest Berries die as well. The "thinking of you" is from a new stamp set by PTI called Think Big Favorites #7.
I love creating my own backgrounds with stamps. Using a similar color of ink makes the background interesting and supportive to the theme of the page, but doesn't take attention away from the photo.

After stamping, I wrapped the cardstock twice with twine and tied it in a knot at the end. I used one more piece and tied it into a bow over the top of one of the knots. Kind of reminds me of a nice warm HUG, the way the twine wraps around the page.

--------------

My second project is a fun little baby card. Twine is perfect for hanging things like banners and tags!
Here I've used a paper from the Country Drive line again (floral), along with a paper from the Dots & Stripes: Candy Shoppe (pink background). The twine is black and is called Charcoal.
I've used some new tag stamps by Papertrey Ink called Fillable Frames Additions 2 and stamped them right over the patterned paper with Pure Poppy ink (red), then cut them out and punched holes for hanging. The background is white cardstock that I added some Vintage Cream paint to, just swiped the ink pad right across it, then embossed it with a polkadot embossing folder and my Cuttlebug.
------------

On the next card, I made my own little faux crocheted flowers. I know I've shown this technique before on my blog, but instead of yarn this time, I used twine!
Here is a close up of the twine flowers....

I've put together a how-to for these Faux Crocheted Flowers:

Step 1.  Cut 3 lengths of twine 15" or so. (This will create a flower that is about 1 1/4" wide.) Tie them together in a knot at the end.

Step 2.  Braid all the way to the end and tie another knot. Punch a 2" circle of cardstock.

Step 3.  Add adhesive to the cardstock circle. Start in center and adhere twine braid.

Step 4.  Begin rolling the braid around the center.

Step 5.  Continue until you get to the end. Trim excess cardstock off with scissors.

Step 6.  Tuck end underneath the circle and tape the end on the back.

On this card, I used Echo Park's Dots & Stripes again (blue polkadot) and the Dots & Stripes stickers that come with the collection! Stamp set is the Love Lives Here set by Papertrey Ink. Twine is Maraschino and Blossom.
-----------------

I will be giving away the Country Drive and the Dots & Stripes-Metropolitan collections! Deadline for commenting will be 11:59 EST Friday, August 19th. Prizes will be announced August 20th on each blog. Echo Park is giving away 3 collections and The Twinery is giving away the Ultimate Color Sampler Pack!

Next on the hop, please visit HERA's blog!

Tuesday, August 16, 2011

two birds of a feather...

We are definitely two of a kind, my little Kati and I! We are so alike, it's crazy. I never thought I'd have a little mini me! I call her my "baby bird".

She has my personality, almost exactly to a T. Scary! ha We are both very quiet, caring and sensitive...little things bother us that people say, and we both take things very personally. Both love artsy/crafty things, of course! She can draw like no kid her age I've ever seen! She's patient and a perfectionist like me, so her Kindergarten teacher tells me, and takes a long time finishing her work, but quick to catch on. (My junior high art teacher said the same thing about me...that it took me much too long to finish my art projects, but when they were done, they wowed him. hee) We both love to stay up late and sleep late into the morning. We both are more "stay indoors and paint your nails" type of girls, not very outdoor-ish. :) (She hates bugs and is so afraid of them!)
I wanted to get it all down on paper now to show that even at a young age, she is so much like me. My other daughter's personality is very much like my husband's. Hmmm...page idea for the future!

The paper line used here is Echo Park's Country Drive line. Love the little bird paper and the honeycomb paper! I created my own stems for the birds to sit on with this new stamp set by Papertrey Ink called Flower Fusion #7:
The stems were just stamped one on top of another with Aqua Mist and Pure Poppy ink. I made the little birds myself. I just punched a 1" circle for the small bird and cut it in half. I punched a 2" circle for the large bird and trimmed it as well. The beaks were made with the Simple Circles stamp set, and I just trimmed a small triangle out of the circle.

She's 6 now and getting so big. Took these pictures a couple of days ago, she's really looking grown-up to me lately! I really can't comprehend how fast the time has gone!
Love my little sweetheart!

Monday, August 15, 2011

Nut'n better than a friend like you...

Good morning, everyone!  :)

If you just saw my Twinery blog hop post, I apologize. I had to delete it, because I just found out my day for the hop is going to be Thursday instead, so check back for that on the 18th! Meanwhile, you can visit The Twinery's blog for more info on this week's events.

How about a few Papertrey Ink cards today instead? Today is the 15th, and that means there are lots of new stamp sets, dies and fall papers available!

This set is sure to make you smile...

Cute sentiment, right! To cut the card base, I used the new Mega Mat Stack 1 die. First I folded a piece of green cardstock in half for the card base. Then I placed the shaped die on top, hanging it off the left side a bit, so it wouldn't cut on the left fold. Then, I ran it through my Cuttlebug to cut out the shape. Voila! You get a shaped card!


For the wood grain background, I used PTI's new Modern Wood Mats stamp set and Spring Moss ink. The sentiment and swirls are from the new Autumn Acorns stamp set!

I used the Autumn Acorns dies to cut 2 of each nut, stamped the tops, cut them apart, and layered the stamped nut over the patterned paper nut.
 Nut'n Better card:
Stamps: Modern Wood Mats, Autumn Acorns
Ink: Pure Poppy, Spring Moss, Dark Chocolate
Paper: Fall Prints and Patterns paper pad, cardstock by PTI
Dies: Autumn Acorns, Mega Mat Stack 1
Other: Maraschino twine from the Twinery

--------------

This one was very quick and utilizes the new Background Basics: Houndstooth stamp set and Tag-its #7. I used Spring Moss ink over the Fine Linen cardstock. The little photo corner is an Artisan Element by Pink Paislee, which I just ran some ink over the top, Vintage Cream and a brown ink, to add depth.
I absolutely love Papertrey Ink's new fall papers...
Autumn Wishes card:
Stamps: Tag-its #7, Background Basics: Houndstooth
Ink: Spring Moss
Paper: Fall papers by PTI
Dies: none
Other: Maple Leaf 2" punch by McGill, artisan element by Pink Paislee (photo corner), twine by PTI, burlap, floral pin
--------------

Another houndstooth card here - you can be sure you'll be seeing lots of houndstooth from me! :) I'm a little obsessed with this pattern! "Be Thankful" is from the Tag-its #7 again.


Be Thankful card:
Stamps: Background Basics: Houndstooth, Tag-its #7
Ink: Dark Chocolate, True Black
Paper: Fine Linen cardstock, (chevron) Nantucket by Pink Paislee, and
Fall papers by PTI (heart)
Dies: none
Other: sticker by Basic Grey, twine by PTI, Melissa Frances crepe paper and pearl, 1" heart punch by McGill
--------------

This last card utilizes Autumn Acorns again and the journaling lines from the Gratitude Journal set!
I cut a Pink Paislee Mistables tag in half and rubbed it with Aqua Mist ink. It has a cool resist on it that shows up white when you ink the tag. The leaves are die cut and stamped, and you can see I've added some Vintage Cream over the top to tone them down a bit and make them look just a tiny bit more rustic.
On this little acorn, I stamped the bottom, but left the top plain and machine stitched on it a few times...

Falling For You card:
Stamps: Autumn Acorns, Gratitude Journal (lines)
Ink: brown- Ranger, Aqua Mist on tag (teal), Summer Sunrise (orange), (yellow) Lemon Drops - Jenni Bowlin, Vintage Cream around edges
Paper: Fall paper pad by PTI
Dies: Autumn Acorns
Other: Twine by PTI, Button by PTI, lace, vellum, machine stitching. 
---------------

I truly had fun with these products and know you will too! 
Thank you very much for letting me share my projects with you. Hugs,

Saturday, August 13, 2011

attitude of gratitude...

Hello! The Papertrey Ink team is back again to share with you a new stamp set called Gratitude Journal designed by Dawn McVey. Perfect for this time of year, to reflect on all that we're grateful for! I wanted to make a little mini book that I can add pages on to, and I really wanted to try an unusual color scheme - something other than the traditional "fall" look. I chose to use Pink Paislee's Nantucket line of papers!


Here you can see I've used some new Pink Paislee wooden alphas and stamped "life is beautiful" across them with the Gratitude stamps. One of my favorite things Pink Paislee came out with this month is these beautiful Vintage Vogue Spool Buttons, so I couldn't wait to try them on a project (the black wooden circle). I added a tab to the front that is cut from one of the patterned papers and stamped with, "gratitude, a journal".
The tabs were cut with a new set of dies called Journal Tabs, then I stamped on them and stitched the bottoms of the tabs for an extra detail.
Page 1: I used a sheet of vellum for journaling and layered it over a large photo of my daughter Taylor. I had a lot to say, so I decided this would be a good way to fit a lot of journaling without blocking the photo all together.


Page 2: My girls are getting so close now that they are getting older. They are 11 (almost 12) and 6 years old. I love how well they play together sometimes, and this photo really captures that! I'm grateful for all of the little happy moments we have together.
On this page, I stamped the "Give Thanks" twice - once in a lighter brown and once in a darker brown, then layered them on top of each other. The doilies are just purchased from the craft store in the baking supply section.
Page 3: Here I stamped onto the envelope and sprinkled white paint over the top. There is a little note (journaling) tucked into the envelope. Watching my girls dancing in the rain makes me so happy!
More of the Vintage Vogue wooden spools and a Papertrey Ink button and twine! I stamped "treasure" 3 times, stitched and then shabbied it up with paint. LOVE the chevron paper that Pink Paislee came out with! I could use it on everything!


The last page is one of my favorites, because I really love the mix of patterns and colors here, sort of an eclectic feel. I used a vintage book paper for my journaling and folded it up 3 ways, then punched a hole and tucked it into my book. The brown polkadot paper is a paper by October Afternoon, floral button is Crate Paper and sticker/twine/other papers are Pink Paislee. Ribbon is Papertrey Ink.

One of my favorite things when creating mini albums is making little "fun finds" inside, little surprises like this folded page of vintage book paper that I journaled inside.
Love repeating a stamp on a background. I left the bottom open for journaling. I think I'm going to add more open pages that are ready for journaling, so I can add MANY more pages to my book this month! There is so much to be grateful for!
When finished, I tied the book together with embroidery floss, an inexpensive way to bind your own books.
 Gratitude Journal:
STAMPS: Gratitude Journal, Simple Circles
(star on front cover) by Papertrey Ink
INK: True Black/ Dark Chocolate by PTI, light brown by Ranger,
pink is Chewing Gum by Jenni Bowlin
PAPER: Nantucket line by Pink Paislee, (brown polkadot) October Afternoon
DIES: Journal Tabs by Papertrey Ink
OTHER: ribbon/twine/buttons by Papertrey Ink,white floss, doilies, Vintage Vogue wooden spools by Pink Paislee, white flower by Pebbles, envelope by Maya Road, seam binding.

Thank you for visiting! Please visit the other ladies to see what they have made with the Gratitude Journal stamps and dies!