Showing posts with label Snow Village. Show all posts

Monday, December 9, 2013

when one door closes...

Beware. Long post! :)

The first thing I want to tell you about is that today marks Day 1 of Pink Paislee's big 12 Days of Christmas countdown event! Swing over each day to see projects, inspiration, PDF's to download, free stuff and giveaways! We are sharing projects made with the new Snow Village line by Pink Paislee all this month, and here is one I made recently with this line...
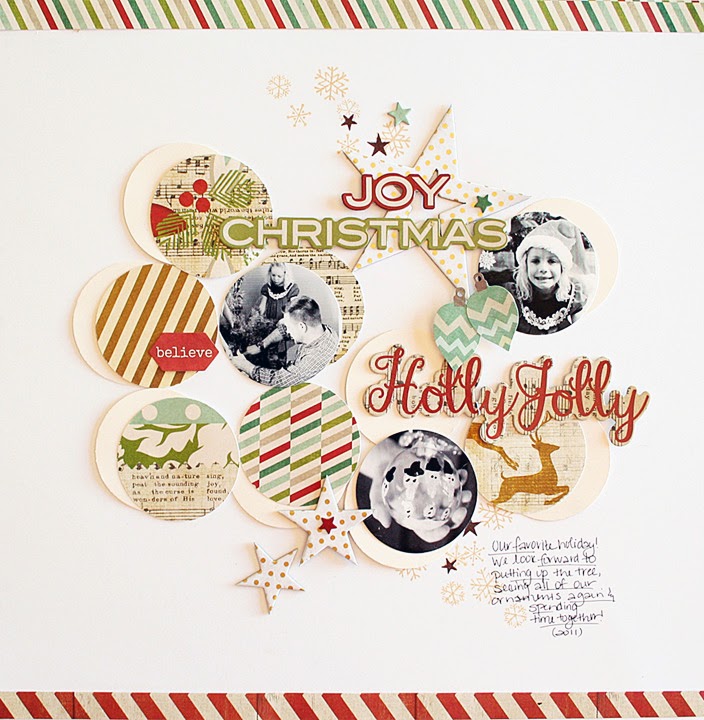
Pics are from last Christmas, putting up the tree, special ornaments, etc. With a circular design like this, you could add even more photos if you'd like. I love the way you can add a bunch of the patterns as well with this type of repetitive design, yet it's still clean and has a bit of white space to let your eye rest! I used cream cardstock under the patterned papers with a 2" circle punch to help them stand off from the white a bit more and slightly offset them.

I used the Snow Village 12 x 12" papers, the Snow Village clear stamps (stars and snowflakes in the background), the Kre8tive Kit (chipboard title and stickers), and some Luxe chipboard stars.


-----------

Another layout made with the Snow Village line. I used the collage paper in the background and just added a few things over the top... the photos, a title, a couple of ribbons and chipboard stars, and the arrow clear stickers.

I love these canvas stickers from Snow Village (berries.) As you can see, I colored one of the stars and some of the Artisan ribbon with Heidi Swapp's Color Shine in Chartreuse.

-----------

In other news, I have a Snow Village layout on the front cover of Scrapbook Trends' December 2013 Issue!


And last, but not least...

Some of you have been asking what my news is regarding my design teams, and I'm sorry I haven't posted sooner, but I've been up in the air about a few things the past couple of weeks. You may have heard that American Crafts has acquired Pink Paislee. This is happy and sad news for me all at the same time! I've known Rebecca since 2005 and have been designing for her since she owned an online store called Create My Keepsake. When she opened Pink Paislee 6 years ago, she asked me to follow her to her new company. She was the first one who gave me a chance to join a paper manufacturer team, and I've always felt very dedicated to Pink Paislee. It has made me so happy to see its success over the years and to have been such a huge part of that success! Unfortunately, my role as Design Team and Blog Coordinator will be gone as of January, as part of the acquisition. I won't lie...I'm truly sad about this. Sad that my role with Pink Paislee has come to an end after all these years. But I know that all things happen for a reason, and I want to thank Rebecca and Barry for all they've done for me. They are very genuine people, have been so good to work for the past 8 years, and I'm so happy for them as they move to Utah and continue their journey with American Crafts. I can happily say I put my ALL into my time with Pink Paislee and feel proud that they've been so successful. Can't help but feel PP's success was in part because of me. :)

I have also decided not to renew my contract with Studio Calico. Their contract has changed for next year, and after giving it some thought, it just doesn't fit with what I need right now. I do love Studio Calico and the trends they set! They are always one step ahead of the game and always fun things happening there. I will still pop in and chat and ooh and aaah over the fabulous gallery there!

So where does this leave me? To be quite honest, I'm not sure, which is why I've been putting off publishing this post. My plans right now are continue crafting, hopefully stay on with Papertrey Ink and stamp my heart out (if they will keep me), and maybe begin some plans for stamp design concepts. When one door closes, another opens, so I'm looking forward to seeing what doors will open next. I am a little excited to craft JUST FOR FUN again as well!

I'll be back shortly with another Snow Village project. If you're still with me, thanks for reading my long post today...

Friday, August 30, 2013

a start on a December Daily mini album...

It's mini album week on the Pink Paislee blog, and I had fun with the Snow Village line. Wanted to get a little start on my December Daily, so I'll share a few pages I've started in it. I'll keep working on it... and add, add, add!

I LOVE making mini albums. Mostly because I enjoy mixing and matching colors and patterns, and love adding texture...and mini albums are a great way to add tons of texture to a project (and lots of photos)!

I've used the Artisan 4x8" covers for the front and back and just made my own inside pages, some of them are the Artisan tab pages that go in the album, and some of the pages are just ones I made myself with patterned paper, cardstock, stamps, journaling cards, etc. On the front, I painted with white acrylic paint, added some Artisan ribbon sprayed with Heidi Swapp's Color Shine in Chartreuse. Then added some of the Snow Village canvas stickers, clear stickers and chipboard. I used Heidi's Black Velvet Color Shine to sprinkle on a few drops of black on the front.

On the first inside page spread, I decided to paint the inside back of the cover and leave it open for photos. I added a paperclay button I made myself (video for that is on my blog) and a piece of scrunched seam binding. On the other side, I used an Artisan paper and rubbed it with stamping ink, a color called Aqua Mist by Papertrey Ink. It's such a pretty teal and goes perfectly with this line!

One thing I love to do in my minis is add lots of things to turn and flip! I added little glassine bags to house little photos (wallet size) and also added journaling cards to write on - they are not attached to the pages, they are loose and just hooked onto the rings. This way you can enjoy the front and the back of them.

You could certain journal on the back of some of these cards... or add photos!


On the second page spread, I used another Artisan paper on the right and rubbed it with a gray stamping ink called Soft Stone by Papertrey Ink. It really brings out the pretty circles. I added a collage paper from Snow Village on the left side.

A half-doily dresses up the glassine bag with a felt snowflake, Snow Village chipboard and some Artisan stars. I have inked a few of them up with red ink. The blue snowflake is from the Snow Village clear stickers.

The third page spread is stamped on the left with the Snow Village stamps. Added some Artisan ribbon sprayed with Heidi Swapp's Color Shine like I did on the front cover and a big striped ribbon from my stash.


On the fourth page, I have cut some of the patterned paper for the left, added a clear snowflake sticker to the top, a flower chipboard and an Artisan Element circle over the top! Oh, see the little label underneath? Those are new from the Sentiments Series line!

On the right are lots of journaling cards again, a glassine bag and a scalloped vellum banner.

I've got more to add for sure, but I'll stop there for today! Hope you gained some ideas for your next mini album.

Pink Paislee products used: Snow Village collection, Artisan collection, Luxe collection, Sentiment Series. Other: Heidi Swapp's Color Shine - Chartreuse and Black Velvet, glassine bags, ribbon, stamping inks by Papertrey Ink in Aqua Mist and Soft Stone, paperclay button, and seam binding.

Saturday, July 20, 2013

holiday cards in July...

The Craft and Hobby Show is coming up in just a few days! What are your favorite new lines that you've seen so far? I have a few more cards to share with you made with Pink Paislee's new Snow Village line. HERE is a sneak peek of the whole line.

The first one uses the Snow Village stamps. I fell in love with the elegant look of the "Christmas" stamp and used it with Fresh Snow ink and white embossing powder on white cardstock.  The Snow Village Ephemera package has a ton of die cuts in the package and even some gorgeous vellum pieces as well, which is what I used here with a chipboard poinsettia over the top.
On the Believe card, I stamped the sides of the card with the Snow Village stamp set. I cut a doily out of white cardstock with the Parisian Lace Doily die by Papertrey Ink, then added a vellum Ephemera piece and a chipboard piece. Really simple card to make, even though it looks more involved.

I love these layered chipboard pieces from Snow Village!

On the third card, I chose an Ephemera piece - a golden reindeer -to be the highlight of this card. He's shiny in real life. I used a vellum frame from the line over a journaling card (from one of the 12x12" papers) and stamped "Christmas" on it.

The last card was a little more involved. I began by stamping Christmas on white cardstock at an angle for the background in black. I wanted to add more items over the top, but didn't want it to be too busy looking, so I added a sheet of vellum over the stamping. It tones the look down, but you can still see the saying peeking through.
I framed out the stamping with 2 pieces of patterned paper, one on top and one on bottom. Last, I added some Ephemera pieces and a chipboard flower on top. I love to layer to create more interest!

Always feels weird making holiday cards in July, doesn't it? I suppose it's better to get a head start than to wait until December. Enjoy your weekend. We are getting new windows put into our home this coming week, so our job this weekend is to move all furniture away from windows and take down all blinds and curtains. Sounds like fun, huh. But I'll be glad when it's done. :) Thanks for swinging by. Hugs,


Friday, July 19, 2013

Scrap your holiday photo...

Good morning! If you are looking for the SC Toolbox blog hop, see below. I thought I'd pop in and share a layout made for CHA with Pink Paislee's Snow Village line. I loved working with this line, the colors are earthy and beautiful together, and the patterns could be used for any occasion, not just holiday. That makes these papers so versatile.

I scrapped our holiday photo from last year, which was kind of an impromptu photo! My parents were visiting and we decided to go for a walk around the neighborhood one morning. My mom snapped some pics of us. (If I would have known, I would have dressed the girls better. Hee) But I ended up using it as my holiday photo anyway. Rarely do we get pics of the 4 of us!
When I first opened the packages of everything, I was inspired by the stamps. They are adorable! I couldn't wait to use the "christmas" stamp. I cut up the 12x12" paper with the journaling cards on it and laid them on my layout, then made a card with the "chalkboard" look with the stamps to go with these! Check out the vellum borders too, they are so cute. Here you can also see a peek of the Ephemera and chipboard.

I pulled out my Cameo and cut the big "joy" out to add some pizazz and drama to the page. Last, some punched circles and snowflakes tie it all together. Oh, see the red under the photo? That is a journaling card also from one of the 12x12" papers. I used it to add color and tucked it under the photo, which will draw your eye down to the photo and frame it out a bit. The black stripe is simply cut from one of my Heidi Swapp alpha packages. I needed a tiny bit more black in the corners of the page.

I think I will come back tomorrow and share a few cards. Thanks for reading! If you'd like to see the Pink Paislee summer catalog and all of the new products, CLICK HERE.