Showing posts with label book. Show all posts

Monday, July 13, 2015

Calling all bibliophiles...

We are back with group post #2 at Papertrey Ink for the month of July to show you some new book-related products that will be available July 15th at 10pm EST at www.papertreyink.com.

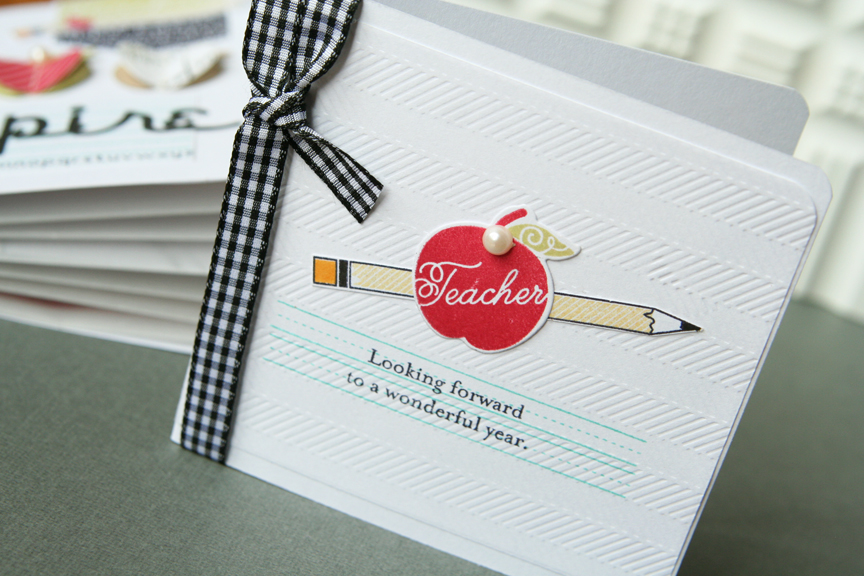
I was inspired by this bookshelf quilt I found on Pinterest and thought the books would be cute on a teacher card! So I added the Apple Prints stamps and dies in with the new book themed stamps and dies. On one of the cards, I used the books horizontally and the other vertically.
On this card, I used the different sentiments on several books to create one big message. Such a cute set of stamps! I really like this idea. Fun way to add lots of color on the differing books.


A Favorite Book card:
(All products by Papertrey Ink unless otherwise noted.)
STAMPS: Bibliophile, Background Basics: Twinkle, Apple Prints
INK: Tropical Teal, Pure Poppy, Simply Chartreuse, True Black, Summer Sunrise
PAPER: white, Aqua Mist; dark gray cardstock - craft supply
DIES: Bibliophile
OTHER: twine - The Twinery, sequin - Pretty Pink Posh.
______


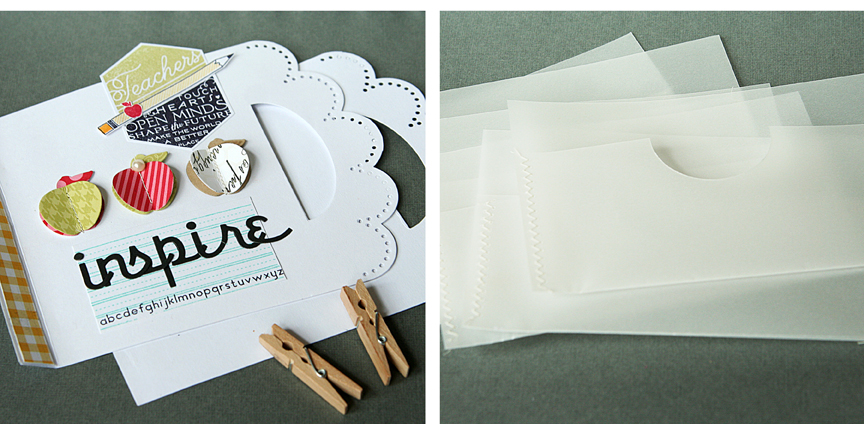
Couple of pics of the card set. 
I read the directions wrong and was supposed to make a card with the Book Cover Card dies... ooops! Sorry!!

Think I like the vertical books the best. They look more like books. What do you think?


Books Fall Open card:
(All products by Papertrey Ink unless otherwise noted.)
STAMPS: Bibliophile, Background Basics: Twinkle, Apple Prints
INK: Tropical Teal, Pure Poppy, Simply Chartreuse, True Black, Summer Sunrise
PAPER: white, Aqua Mist; dark gray cardstock - craft supply
DIES: Fancy Bookends Dies, Bibliophile
OTHER: sequin - Pretty Pink Posh, seam binding - Zipperstop.
______

To see more book-related projects, visit the rest of the team:

Tuesday, August 14, 2012

Teach & Inspire.


I have a fun project that I couldn't wait to share with you today! The Papertrey Ink team members each created with the new Teach & Inspire stamp set and the Teacher's Apple dies, and I can't wait to see what amazing things they've come up with. I LOVED this set!! (I apologize in advance for a photo-heavy post!)


For a back-to-school gift for a teacher, I wanted to make a set of cards. Then I wondered how to package them all together. Hmm....a BOOK! Yes, perfect for a teacher.
Here is what my book of cards looks like from the front. Don't you just love that Script alphabet die?
I created a front and back for my book of cards with the Front and Center #2 die. Then for the inside pages, I made pockets with vellum to hold each card. To make the pockets, cut vellum 6 1/2" wide x 7" high. Fold up the bottom 3". Punch a notch in the center of the front with a 2" circle punch. Machine stitch the sides with a zig zag stitch. Finished pockets are 4" x 6 1/2".
Here you can see a little peek at the pockets. I clipped it all together with clothespins, but you could certainly bind it in a more permanent manner if you wish.

Now for the inside! I wanted to have a little cover page on the inside telling the recipient what it is for!
I have six cards - one tucked into each pocket.
I used the Background Basics: Herringbone background here to emboss the cardstock after stamping the lines and sentiment.
I stamped the little rulers onto the background for this one.
Made my own little button apple.
On this card, I placed the Block Alpha die onto Soft Stone cardstock and ran it through my Cuttlebug to cut out the alphas. I used the negative piece on this card, along with the circle from Think Big Favorites #19. I kept the alphas to use on the next card!


The alphas that were punched out were used on the next card! I used a ruler to line them up. (Started in the center with d and e and worked my way out to the sides. This way if you have more room on one side or the other, you can trim the card down to make it look more even and centered.)
Last is a card using the adorable pencil stamp!

So colorful!

One more thing. I know this post is a little long!

...it's a little pencil made with a pack of Rolos candy. I used Summer Sunrise Patterned paper and Melon Berry cardstock to wrap around the Rolos and just taped it on the back.

Hope you are INSPIRED to try making your own teacher gifts this year! Visit the rest of the team to see more with Teach & Inspire:


"Inspire" Book of Cards gift set for teacher:
STAMPS: Teach & Inspire, Background Basics: Houndstooth, Think Big Favorites #19
INK: True Black, Spring Moss, Harvest Gold, Summer Sunrise, Pure Poppy, Hawaiian Shores, Classic Kraft
PAPER: White/Melon Berry/Spring Moss/Classic Kraft/Soft Stone cardstock, Pure Poppy and Summer Sunrise Pattern Pack, vellum. Other: Mistables by Pink Paislee, orange check by Lily Bee Designs
DIES: Front & Center #2 die, Script Alpha die, Teacher's Apple die, Background Basics: Herringbone Impression Plate, Block Alpha die
OTHER: True Black ribbon, felt, rustic twine, Pure Poppy button by Papertrey Ink. Pearls by Melissa Frances, font is Typewriter, clothespins from craft supply store, Rolo candy.

Monday, March 12, 2012

If you are a technique person like I am, and love to try new things, you will definitely want to check out a new book by Vicki Boutin called Creative Foundations. There are 40 step-by-step demonstrations for easy, fun, messy, funky, innovative and customizable techniques. I was honored when Vicki asked me to participate in her book!

When you flip through the pages, you'll be amazed at Vicki's work. And truly, I'm not just saying that. Her layouts in the book are simply stunning. I talked to Vicki on the phone the other day, and she said the book was a blast to do because she is very much a technique girl, something I didn't realize about her! :)

Today a few of the gals who had work in the book are doing a blog hop to show you a few of the fun techniques! I decided to make a new card with 2 of the techniques that I was NOT assigned to in the book: working with gesso and making pleated beaded ribbons. It's inspiring to try new things, right!

You can use gesso or dimensional paste for this technique, just take a credit card and scrape it over your project. Let dry and add embellishments over the top! Would be a fun technique for a layout also to add dimension and interest without a lot of bulk. The second thing I tried from the book was the adding beads to ribbon. I'm a big ribbon fan, so I used a needle and thread with a running stitch. Every so often, I added a bead and pulled the string tight to gather the ribbon!
I used lots of Heidi Swapp's new items here, new papers, file tabs, fun sticker words, rub ons and fabric stars! Ribbon and beads were older items from my stash.

Would you like to win a copy of this book? All you have to do is visit the participating designers' blogs in order and find a word next to each name to spell out a sentence. Then go to Vicki's blog and leave her a note with what the sentence says!
(me) My word is "OF".
Back to Vicki

Thank you for stopping by and good luck!