Showing posts with label stencil. Show all posts

Wednesday, February 17, 2016

More stenciled cards...

Today I chose to just sit and play. I haven't done this in ages...just creating for fun, not for work, while listening to audios on things I've been wanting to learn about myself. Feels so good to take time for me and just let out my creativity. Does that make sense?

The Modern Stencils Collection by Papertrey Ink was used for the backgrounds with the same technique I shared in my post over at Scrapbook Expo. The stamps I've used are Bitty Bouquets and Big Birthday Wishes.

On this one, I used Aqua Mist ink in the background with Tropical Teal ink on the "Enjoy". The stencil looks great in a lighter color than your focal point, but in the same color family.

What are you doing today? I hope you have an opportunity to take time for you and get into your happy place! xo We all need that so much, and that's what cardmaking does for me.
Danielle

Tuesday, February 16, 2016

Stenciled backgrounds...

Recently I've started dabbling in ink blending on my cards! It's such a fun way to add color. You can ink blend directly onto the card or over a stencil like I did here today.  *Note: this card is inspired by Betsy's Sending Love card from her post on the 14th.
Over at the Scrapbook Expo blog, I show a few step-by-step photos with the supplies I used and talk about why I love this technique!
 I've used the Modern Stencil collection, the Bitty Bouquets stamps and dies and the Big Birthday Wishes stamps.

Swing by the Weekly Scrapper blog over at Scrapbook Expo to read more!

Tuesday, September 20, 2011

Crafter's Workshop blog hop with Julie Balzer...

I am very excited today to be part of a blog hop using new Crafter's Workshop stencils by Julie Balzer! If you don't know of Julie, you are definitely missing out on some awesome artistic creativity - to say the least! Julie is the queen of misting, painting and creating FAN-tastic works of art. Here is a link to her blog. There is always something new and inspiring to see by Julie! She is truly one of a kind, and I feel so fortunate to be asked to participate in a hop showcasing her new stencils!

I received some of the 6x6 stencils and as a card maker, I wanted to show that these are great for cards! What I love is that you can use them over and over, so an endless supply of cards could be made with each stencil. Each style is available in 12x12" AND 6x6".

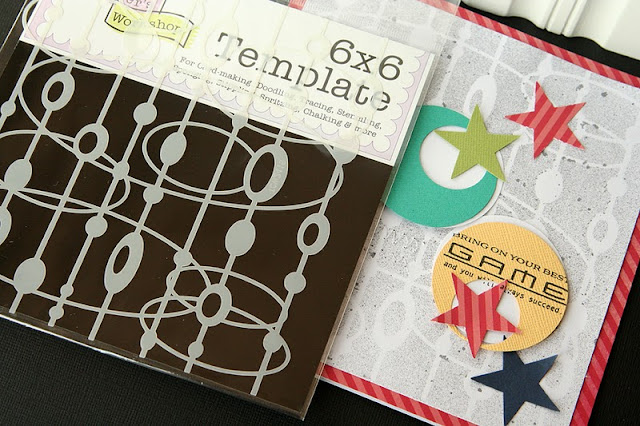
The first one I worked with is a mod looking one called Love Beads.

I sprayed over it with Graphite Glimmer Mist by Tattered Angels and added a few stars and circles with cardstock! The sentiment is from Boy Basics: Game On by Papertrey Ink. I wanted my circles to look mod too, so I punched 2" circles, then punched out a 1" circle from it and layered them over a white cardstock circle. You could definitely make the background darker by adding more mist. I just did a light dusting here! (Red paper is Echo Park's new line called Season's Greetings.)
On the second card, I tried something different with the Summer stencil. Let me show you the card I'm referring to...

I was spraying over the stencil just playing around with it, adding yellow and pink mist over the top (below right), when a lot of the mist pooled up on the stencil and instead of washing it off, I flipped it over onto the cardstock (left side). This created a stamped look!

I decided I wanted the look on the left, but I wanted her hair to flip the other way. So I turned the stencil over (starting on the back) and used the same technique - first spraying the stencil with mist, letting the mist pool up, then flipping it over and laying it on the cardstock. Then pressed it down like I was stamping. (The sentiment here is from Sweet As Can Be.)

So...long story short...I discovered you can use the front OR the back to stencil with!

Here is one more card using the Screen stencil.


I actually made a Christmas card with it! I sprayed over the stencil with a green mist onto kraft cardstock. It started as a fall card, but since I had Christmas goodies on my desk, I went with that! I cut a snowflake out of white felt with a Papertrey Ink die called Damask Snowflakes, then added a few Echo Park chipboard pieces over the top. The sentiment here is from Christmas Blessings.
This background could be used for so many things!

And last, but not least, Henna Hands...

I chose two of the hands I liked the best and chalked over them with chalk! I added a sentiment from  Love Lives Here, a resin swirl by Melissa Frances and a purple twine from the Twinery. The effect with the chalk is very subtle and soft. (I would recommend sealing it after you are done if you use chalk, so it doesn't wipe off. The first hand starting wiping off while I was working on the second hand!)

Well, I hope you enjoyed these examples. Please visit a few more crafty girls for a variety of fun stencil ideas, and don't forget Julie's blog for a chance to win!

Monday, September 12, 2011

creating with mists, paint and dimensional paste...

Today at the Pink Paislee blog, my assignment was "mixed media" - when I think of mixed media, I think of paint, mists, dimensional paint and creating fun backgrounds! :)
I worked with Pink Paislee's Mistable Mask and the Vintage Vogue line of Ephemera, Chipboard Pops, Paper Rosettes and Spool Buttons.
Love their new wood chip alphabet!
I call this layout, "Any Given Day". Any given day, Kati is always dressing up and ready for pose for me!
I also tried Dimensional Paint/paste with the same stencil by Pink Paislee and will show you how to create these neat backgrounds!

Check out the HOW-TO at Pink Paislee's blog!

(With Appreciation is a stamp by Papertrey Ink called Mixed Messages.)

Monday, August 16, 2010

monochromatic Monday with sunny yellow...

Yellow has been one of my favorite colors for a long time now! For the Pink Paislee blog today, my assignment was to do a monochromatic page. I dug through my Pink Paislee stash and found lots of yellow - in the Sweetness, Old School and Starlight lines.

When I think of yellow, I think of happiness! I found some pictures of my girls jumping on our trampoline that we bought in April. Love their expressions in these pics! I used Candlelight Glimmer Mist by Tattered Angels to spray over the background paper and a Crafter's Workshop stencil. It creates more interest to the background and allows a fun place for journaling! The Sweetness background paper has lines on it, which was awesome for journaling and easy to get my lines straight. I stamped some stars from the 365 Degrees set and layered them down the page. The large stars were from my stash and I liked the gray color, but wanted it a bit deeper of a gray to pop off the page, so I sprayed them with Graphite Glimmer Mist.

Pink Paislee supplies: Sweetness - Pretty lace paper (background), Old School- Prep School paper (lined), Artisan Alphabet ("lucky"), Artisan Swirls, Old School cardstock sticker alphas ("happy go"), 365 Degrees stamp set (stars), 365 Degrees Cork Buttons, Starlight Cardstock Stickers (star strip). Other: Graphite Glimmer Mist and Candlelight Glimmer Mist by Tattered Angels, Crafter's Workshop (stencil), Prima flower, Cosmo Cricket chipboard stars, cardstock, StazOn ink (black), Close To My Heart ink (honey).
                         ______________________________________________________

Last is a quick card made with the new Sweetness line by Pink Paislee. I dry embossed the background with a swirl embossing plate (Cuttlebug), then added the Sweetness rub ons, ticket, 1/2 of the sticker, twine and a brad. Super easy!
I LOVE this twine from Studio Calico!

Supplies: Cream cardstock, Cuttlebug embossing machine and swirls plate, rub ons and stickers - new Sweetness line by Pink Paislee, Baker's twine from Studio Calico, brad is Sassafras Lass.

I appreciate you stopping by today!
Danielle