Tuesday, August 14, 2012

Teach & Inspire.


I have a fun project that I couldn't wait to share with you today! The Papertrey Ink team members each created with the new Teach & Inspire stamp set and the Teacher's Apple dies, and I can't wait to see what amazing things they've come up with. I LOVED this set!! (I apologize in advance for a photo-heavy post!)


For a back-to-school gift for a teacher, I wanted to make a set of cards. Then I wondered how to package them all together. Hmm....a BOOK! Yes, perfect for a teacher.
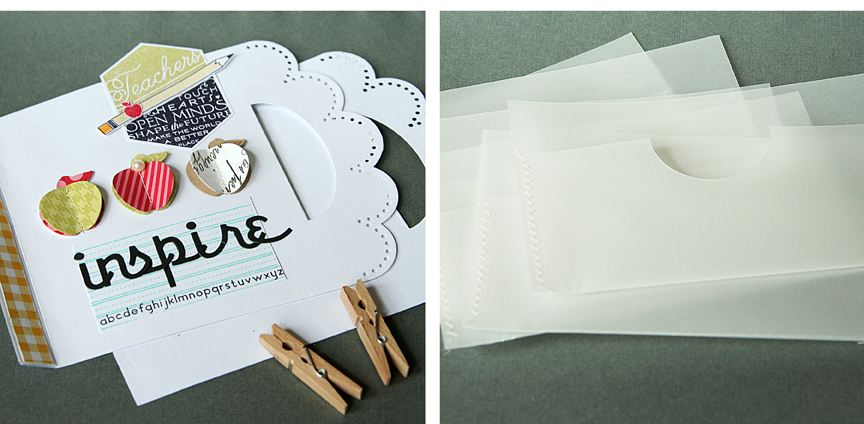
Here is what my book of cards looks like from the front. Don't you just love that Script alphabet die?
I created a front and back for my book of cards with the Front and Center #2 die. Then for the inside pages, I made pockets with vellum to hold each card. To make the pockets, cut vellum 6 1/2" wide x 7" high. Fold up the bottom 3". Punch a notch in the center of the front with a 2" circle punch. Machine stitch the sides with a zig zag stitch. Finished pockets are 4" x 6 1/2".
Here you can see a little peek at the pockets. I clipped it all together with clothespins, but you could certainly bind it in a more permanent manner if you wish.

Now for the inside! I wanted to have a little cover page on the inside telling the recipient what it is for!
I have six cards - one tucked into each pocket.
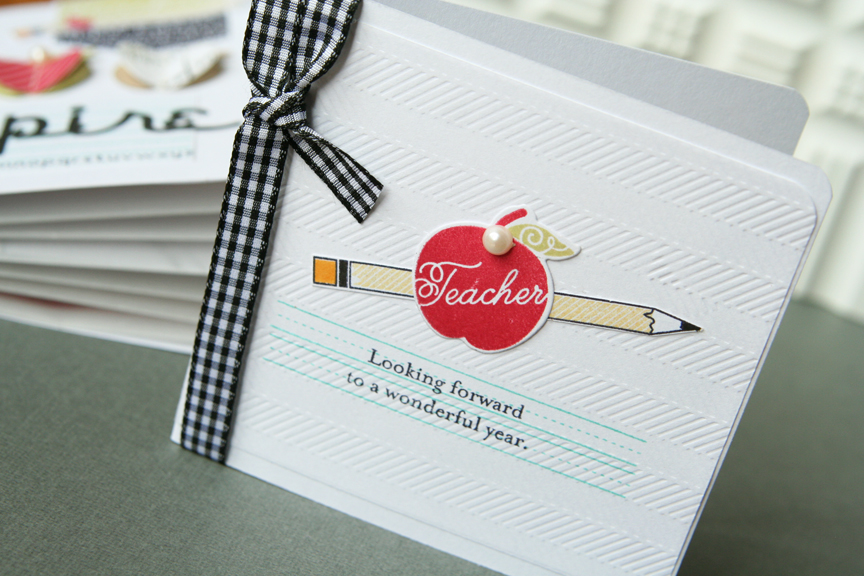
I used the Background Basics: Herringbone background here to emboss the cardstock after stamping the lines and sentiment.
I stamped the little rulers onto the background for this one.
Made my own little button apple.
On this card, I placed the Block Alpha die onto Soft Stone cardstock and ran it through my Cuttlebug to cut out the alphas. I used the negative piece on this card, along with the circle from Think Big Favorites #19. I kept the alphas to use on the next card!


The alphas that were punched out were used on the next card! I used a ruler to line them up. (Started in the center with d and e and worked my way out to the sides. This way if you have more room on one side or the other, you can trim the card down to make it look more even and centered.)
Last is a card using the adorable pencil stamp!

So colorful!

One more thing. I know this post is a little long!

...it's a little pencil made with a pack of Rolos candy. I used Summer Sunrise Patterned paper and Melon Berry cardstock to wrap around the Rolos and just taped it on the back.

Hope you are INSPIRED to try making your own teacher gifts this year! Visit the rest of the team to see more with Teach & Inspire:


"Inspire" Book of Cards gift set for teacher:
STAMPS: Teach & Inspire, Background Basics: Houndstooth, Think Big Favorites #19
INK: True Black, Spring Moss, Harvest Gold, Summer Sunrise, Pure Poppy, Hawaiian Shores, Classic Kraft
PAPER: White/Melon Berry/Spring Moss/Classic Kraft/Soft Stone cardstock, Pure Poppy and Summer Sunrise Pattern Pack, vellum. Other: Mistables by Pink Paislee, orange check by Lily Bee Designs
DIES: Front & Center #2 die, Script Alpha die, Teacher's Apple die, Background Basics: Herringbone Impression Plate, Block Alpha die
OTHER: True Black ribbon, felt, rustic twine, Pure Poppy button by Papertrey Ink. Pearls by Melissa Frances, font is Typewriter, clothespins from craft supply store, Rolo candy.

Monday, August 13, 2012

Halloween inspiration.

Need Halloween ideas? You are in the right place today! The Papertrey Ink team is working with three different Halloween sets coming out this month - Happy Haunting, Mr. Bones and Tremendous Treats: Halloween. My first card is made with Happy Haunting.
I made three little faces from some of the eyes and mouths in the set on my stamping block, then stamped randomly onto Smokey Shadow patterned paper with Fresh Snow ink.
Next, I folded it in half and added a strip of new Royal Velvet dotted paper, and a tape I bought at Target. I wanted to cut out a ghost with the Happy Haunting die out of felt, but I didn't have any white felt on hand, so I used a baby wipe that was completely dry. Love the texture. I keep a pack of baby wipes by my desk to clean up with, but they have dried out over time.
A frame is cut out with the Framed Out #7 die and stamped with "Boo to you!" from the Happy Haunting set.


Boo to You card:
STAMPS: Happy Haunting
INK: Fresh Snow, True Black
PAPER: Smokey Shadow and Aqua Mist cardstock, Royal Velvet Pattern Pack
DIES: Framed Out #7, Happy Haunting
OTHER: pearls by  Melissa Frances, baby wipe, Smash tape from Target.
-----------

Next up: a simple treat holder. Spider and sentiment are from Tremendous Treats: Halloween. I cut the shape from the Seed Packet die, a 2" circle from Summer Sunrise paper and then a web from the Spider Web Trio dies. The spider was stamped and cut out by me. I tried to keep it on the simple side for recreating multiples of these for a child's classroom!
The little spider ring is made from Smokey Shadow felt and Spooky Sweets II dies.
Trick or Treat candy holder:
STAMPS: Tremendous Treats: Halloween
INK: True Black, Fresh Snow
PAPER: Royal Velvet Pattern Pack, Summer Sunrise Pattern Pack, black and white cardstock
DIES: Spider Web Trio, Seed Packet die
OTHER: mini clothespin, tape from Target, candies.
-----------

The EEK! card is made with Mr. Bones stamps and dies. I used the spider, the web and the eek.
I stamped the webbed background in Soft Stone ink and the eek in Lavender Moon. I really wanted the spider to dangle, so I punched a hole for him to dangle in and backed the circle with another punched Orange Zest circle inside the card behind him.

EEK! card:
STAMPS: Mr. Bones
INK: Soft Stone, Lavender Moon, Fresh Snow
PAPER: white and black cardstock, Orange Zest Pattern Pack, Summer Sunrise Pattern Pack
DIES: Mr. Bones
OTHER: scallop circle punch by Martha Stewart, rustic twine.
-----------

Be sure to stop by these amazing girls' blogs too to see more Halloween inspiration!

Sunday, August 12, 2012

Shape up series: pumpkin.

Welcome to day 3 of the Papertrey Ink countdown for the August release. Today Nichole Heady is showcasing a few of the new arrivals this month, and she asked me to try out the Shape Up Series: Pumpkin dies that will be out on the 15th. I have a little fall mini album to share.

The pumpkin dies are nice and big - perfect for a mini album cover!  I used the A base die to cut the 4" x 6" photos to make all of the pages the same shape. (Size of the pumpkin base is 5 1/2" x 3 3/4".) The B die cuts the pretty rounded shapes you see on the front cover!
On the cover, I used new Orange Zest patterned paper underneath, along with some Lily Bee patterned paper (check) on top. I raised up a few of the pumpkin rounded shapes with pop dots and left the outer ones flat. The herringbone pattern is a new stamp coming out this month called Background Basics: Herringbone. Heart tag is cut from the Tiny Tags.
On the first page, this new stamp is from a new set called Sunflower Bouquet. I used it as a background. I wanted to have a little cover page before I added all of the pictures from our visit to the pumpkin patch last year. Kati brought her friend Maddie along, and I captured some nice pictures of them last fall!
Love how easy it was to cut 4" x 6" photos. They fit perfectly with a little room to spare when cutting them with the A pumpkin die to create pages for the mini book. Here are a few of the pages...

This is Kati with the pumpkin she chose!

They had a big tube slide there at the patch, and Maddie had talked Kati into going down it with her. I caught their expressions at the end! HA Love this pic!
...A hay bale spider that we saw in the field while on the wagon ride. Clever! We really have some amazing corn mazes/pumpkin patches in our area.


Orange and burgundy...a lovely fall combination.
I think I'm going to make one of these to give to Maddie to keep also! It was so quick to make with these dies.

This would make a cute little fall brag book for grandma too!

Pumpkin Patch Mini Album:
STAMPS: Sunflower Bouquet, Background Basics: Herringbone
INK: Classic Kraft, Summer Sunrise
PAPER: Summer Sunrise Stripe Pattern Paper, Kraft cardstock, Dark Chocolate Pattern Paper, Orange Zest Pattern Paper - all by Papertrey Ink, check is by Lily Bee Designs.
DIES: Shape Up Series: Pumpkin die, Shape Up Series: Pumpkin Sections die
OTHER: Classic Kraft felt, Scarlet Jewel felt/ribbon/button, Maya Road pins, My Mind's Eye brad, pearl by Melissa Frances, resin flower by Pebbles, pinking shears.
-----------

If you are still reading, I have one more project to share with you that I made with the pumpkin die. Here I used it as a tag for a treat bag...would be cute fall "thankful for you" for a teacher. The "A" pumpkin die could really pass for an apple shape too if you wanted to use it that way!

The thankful die and "you" stamp are from the new Counting My Blessings set coming out this month, as well as the little apple die from Teacher's Apple. One of my favorites from Papertrey Ink has been these little script alpha dies!

The felt leaves were cut from older Autumn Acorns die collection.
Thankful For You treat bag:
STAMPS: Counting My Blessings
INK: Classic Kraft
PAPER: Fine Linen Pattern Pack, Simply Chartreuse Pattern Pack, Pure Poppy Pattern Pack
DIES: Shape Up Series: Pumpkin die, Teacher's Apple die, Counting My Blessings die, Script Alpha dies
OTHER: Glassine bag, candy, heart punch by McGill, wooden button by Pink Paislee, Classic Kraft and Pure Poppy felt, rustic twine, Dark Chocolate ribbon.
-----------

Melissa P. and Nichole have some new sneaks to show you today, as well as Maile, Dawn and Melissa B. Have a wonderful day!