Friday, December 13, 2013

Happy Hearts...

Papertrey Ink has a new stamp set coming out on Dec. 15th called Happy Hearts, and the design team is hosting a little blog hop to show you lots of fun projects with it!

First, I used the new Cover Plate: Hearts to die cut this piece from white cardstock.

Next, I stamped a few of the hearts and placed them back in the cut outs. The card front is backed with white cardstock. A sentiment from the set is stamped in the blank area. 

To make the arrow, I used a new die set called Cupid's Arrow and cut one from chipboard, then inked it with gray ink. Twine is wrapped around it and another heart placed on top! I chose a darker heart to be my focal point.


One Heart is Simply Not Enough card:
(All supplies by Papertrey Ink unless otherwise noted.)
STAMPS: Happy Hearts
INK: Raspberry Fizz, Hawaiian Shores, Harvest Gold, True Black, Sweet Blush. Other: Hero Arts Soft Granite
PAPER: white
DIES: Cover Plate: Hearts, Cupid's Arrow
OTHER: twine, chipboard.
______

My next card uses some of the extra hearts that were cut out. I also die cut the LOVE from a new die called Framed Love. 

I folded a piece of vellum and made a pocket.

Then I adhered the Love die cut frame over the top and added heart confetti inside the pocket.

Here's the finished result. 

For the color palette, I was inspired by the Crate Paper decorative pin to use navy and teal with hints of pink and red and gold.


Room in Your Heart card:
(All supplies by Papertrey Ink unless otherwise noted.)
STAMPS: Happy Hearts
INK: Enchanted Evening, Hawaiian Shores
PAPER: white cardstock, patterned paper by Crate Paper
DIES: Framed Love, Cover Plate: Hearts
OTHER: Heart Punch by Martha Stewart (little confetti hearts), decorative pin by Crate Paper.
______


Visit the rest of the PTI team to see more with these products, and I'll be back tomorrow with more sneak peeks!

Thursday, December 12, 2013

Pink Paislee's 12 Days of Christmas Countdown...day #4.

Are you ready for the holidays yet? I'm almost there, but have a bazillion gifts to wrap!
Pink Paislee is hosting a 12 Days of Christmas event on their blog right now with some fun crafty ideas, and I'm up for Day #4. I made a vellum pocket full of gift tags that you could gift to a friend, neighbor or coworker.

Here are the four tags that fit in the pocket. I kept them on the simpler side to keep room on them for writing "to/from". (You could fit many more tags in the pocket if you wanted to create more than 4!)

These two have twine at the top.
Or you can use any type of gift wrap ribbon from the craft store like I did on these two tags. The thin ribbon curls better.


This is a little detail pic of the reindeer tag. I just LOVE these Snow Village canvas stickers! You can see the whole Snow Village line HERE.
INSTRUCTIONS TO CREATE THE POCKET:

Step 1: Cut two pieces of vellum with Papertrey Ink's Front & Center die. (Place die over vellum and run it through your Cuttlebug or other manual die cutting machine.) Trim one down to cut off the handle. This is going to be the front of the pocket.

Step 2: Machine stitch around the sides and bottom of the pocket with a zig zag stitch. (OR you can simply adhere the sides and bottom.) Stamp "Christmas Joy" with the Snow Village stamps using Versamark Ink. Sprinkle gold embossing powder over the image and heat emboss to melt the embossing powder.

Step 3: Add a sticky-back canvas snowflake border sticker to the top edge of the pocket. Wrap twine around the pocket twice and tie in a bow. Trim ends if needed. Add a chipboard star, canvas snowflake sticker and a resin flourish. Adhere a few pieces of star confetti.

Here is the pocket without the tags. Simple, yet colorful and fun!

And with the tags. I really love using vellum right now, so the tags can be seen peeking out from inside. Makes you want to dig right in and see what's in there!

You can download a PDF to create this project and the tags at the Pink Paislee blog, grab a freebie, and comment for your chance to win. And don't forget to check out the other projects Dec. 9th - 20th by the Pink Paislee design team.


Monday, December 9, 2013

when one door closes...

Beware. Long post! :)

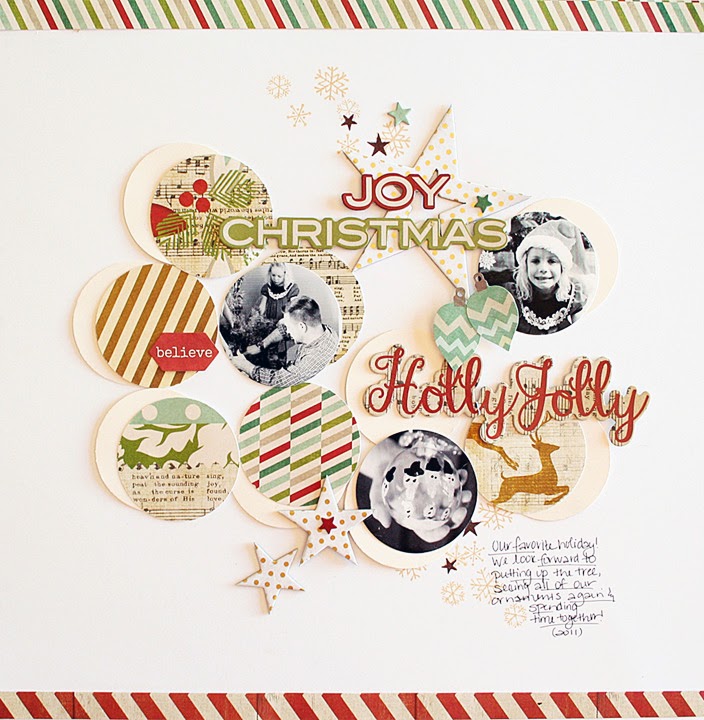
The first thing I want to tell you about is that today marks Day 1 of Pink Paislee's big 12 Days of Christmas countdown event! Swing over each day to see projects, inspiration, PDF's to download, free stuff and giveaways! We are sharing projects made with the new Snow Village line by Pink Paislee all this month, and here is one I made recently with this line...

Pics are from last Christmas, putting up the tree, special ornaments, etc. With a circular design like this, you could add even more photos if you'd like. I love the way you can add a bunch of the patterns as well with this type of repetitive design, yet it's still clean and has a bit of white space to let your eye rest! I used cream cardstock under the patterned papers with a 2" circle punch to help them stand off from the white a bit more and slightly offset them.

I used the Snow Village 12 x 12" papers, the Snow Village clear stamps (stars and snowflakes in the background), the Kre8tive Kit (chipboard title and stickers), and some Luxe chipboard stars.


-----------

Another layout made with the Snow Village line. I used the collage paper in the background and just added a few things over the top... the photos, a title, a couple of ribbons and chipboard stars, and the arrow clear stickers.

I love these canvas stickers from Snow Village (berries.) As you can see, I colored one of the stars and some of the Artisan ribbon with Heidi Swapp's Color Shine in Chartreuse.

-----------

In other news, I have a Snow Village layout on the front cover of Scrapbook Trends' December 2013 Issue!


And last, but not least...

Some of you have been asking what my news is regarding my design teams, and I'm sorry I haven't posted sooner, but I've been up in the air about a few things the past couple of weeks. You may have heard that American Crafts has acquired Pink Paislee. This is happy and sad news for me all at the same time! I've known Rebecca since 2005 and have been designing for her since she owned an online store called Create My Keepsake. When she opened Pink Paislee 6 years ago, she asked me to follow her to her new company. She was the first one who gave me a chance to join a paper manufacturer team, and I've always felt very dedicated to Pink Paislee. It has made me so happy to see its success over the years and to have been such a huge part of that success! Unfortunately, my role as Design Team and Blog Coordinator will be gone as of January, as part of the acquisition. I won't lie...I'm truly sad about this. Sad that my role with Pink Paislee has come to an end after all these years. But I know that all things happen for a reason, and I want to thank Rebecca and Barry for all they've done for me. They are very genuine people, have been so good to work for the past 8 years, and I'm so happy for them as they move to Utah and continue their journey with American Crafts. I can happily say I put my ALL into my time with Pink Paislee and feel proud that they've been so successful. Can't help but feel PP's success was in part because of me. :)

I have also decided not to renew my contract with Studio Calico. Their contract has changed for next year, and after giving it some thought, it just doesn't fit with what I need right now. I do love Studio Calico and the trends they set! They are always one step ahead of the game and always fun things happening there. I will still pop in and chat and ooh and aaah over the fabulous gallery there!

So where does this leave me? To be quite honest, I'm not sure, which is why I've been putting off publishing this post. My plans right now are continue crafting, hopefully stay on with Papertrey Ink and stamp my heart out (if they will keep me), and maybe begin some plans for stamp design concepts. When one door closes, another opens, so I'm looking forward to seeing what doors will open next. I am a little excited to craft JUST FOR FUN again as well!

I'll be back shortly with another Snow Village project. If you're still with me, thanks for reading my long post today...