Saturday, March 1, 2014

More Monthly Moments: February...

Today is my second installment working with Papertrey Ink's new line of stamps, dies and papers for February called Monthly Moments. This line was designed for scrapbookers and pocket page scrappers, but of course can be used on cards as well! I made another pocket page, reviewing our highlights from February. Pics are of us on my hubby's birthday and my daughter Kati on the morning of her school Valentine's party. (Just to warn you, my teen doesn't like her pic taken these days, so you may see a lot of Kati. Ha. I will figure out a way to get Taylor into a few pictures as well.)

I had a really hard time photographing this. It's so colorful in real life!

I started with the journaling cards. I know. I know what you're thinking. "You don't start with the photos?" Well, I had an idea of what photos I was going to use, but I tend to work backwards, working with the colorful journaling cards first. I figure out where to place them, then add my photos after. I like to spread out the color!

Often times in my mini albums, I make little fun things to go between the pages. I just like to create fun surprises for the reader. I made a pocket with vellum (fold vellum and stitch sides) and stamped "this" several times, then embossed it with white embossing powder. I added a Monthly Moments journaling card inside, the February calendar from the free download and a letter that I typed up about all of our February highlights! The pocket floats in between the pages.

Next to it, I used the Valentine Stitches dies to poke little arrows in the cardstock. Added some washi tape to the bottom before I die cut the arrows. "Here's The Story" was stamped with Monthly Moments: Library Card stamps.

On the left side, I kept it super simple, 2 photographs, a journaling card, and then a fun pocket made with the Framed Love die. The hearts were cut from one of the Monthly Moments papers. Washi tape adorns the outside of the pocket to match the one on the vellum pocket.
Next, a little pic of my cupcake...hee hee...next to some cupcakes that we made for daddy's birthday. Took this one of her before she left for school on the day of her Valentine party. She was all dressed up, she HAD to get a red dress for that day, so we found one at Target. "Today is a perfect day" was stamped with Monthly Moments: Days of the Week stamps.

Behind the pocket is one more pic of Kati the morning of her Val. party. I used the Wonderful Words: Love die to cut out the word and added it over the pocket.

On the bottom right, I stamped "happiness is us" with the Monthly Moments: Slide Frame stamps. Love adding these little sayings!

Visit Nichole Heady, Heather Nichols, Ashley Newell, and Melissa Phillips to see more!

Love pocket page layout:
(All supplies are by Papertrey Ink unless otherwise noted.)
STAMPS: Monthly Moments: February (this heart), Monthly Moments: Library card (Here's The Story), Monthly Moments: Days of the Week (today is a perfect day), Monthly Moments: Slide Frame (happiness is us)
INK: True Black and Versamark
PAPER: Monthly Moments journaling cards and papers and free download with kit, vellum
DIES: Valentine Stitches dies, Framed Love dies, Wonderful Words: Love die
OTHER: washi tape - unknown, pearls- Melissa Frances, white embossing powder machine stitching.
______

Friday, February 28, 2014

NEW from Papertrey Ink! Introducing Make It Market Kit Co...

The NEW! Luxe Letterpress Kit designed by Betsy Veldman exclusively for Papertrey Ink is full of specialty items that will instantly give you a boutique feel as soon as you open your box! This kit not only features a new innovative impression plate and die system, but also contains high quality letterpress papers and golden embellishments to give all of your projects a luxurious, timeless beauty.  The best part about this kit is that over half the value is invested in exclusive TOOLS which can be used again and again, even after you have used all of the expendable items!  


Here is a quick look at the contents of this amazing kit:
  • Luxe Letterpress Stamp Set 
  • Luxe Letterpress Impression Plate
  • Luxe Letterpress Impression Accessory Plates (3)
  • Luxe Letterpress Frame Die
  • Luxe Letterpress Envelope Seal Die
  • 1 Printable Envelope Seal Labels Download
  • 12  (8.5"x11") sheets of Lettra 110# letterpress stock
  • 8 (4.25"x5.5") pieces of Lettra 220# letterpress stock
  • 3 (8.5"x11") sheets Gold Foil Label sheets
  • 1 Gold Doily
  • 3 White Feathers
  • 1 roll Super Fine Gold Metallic Tape 
  • 1 roll Gold Metallic Tape 
  • 1 mini bag Gold Sequin Mix 
  • Gold Baker's Twine 
  • Colorbox Cat Eye Metallic Ink Pad 

The total retail cost of this kit is $85. There will be a limited number of these exclusive kits available and once they sell out, they will never be available again. The Luxe Letterpress Kit will be available for sale beginning on March 1st at 10pm EST, only at Papertrey Ink. Read all the details on Nichole's blog or contact Customer Service with any questions.

Here are a few things I've made with the kit!

When I opened my box, I had to try the impression plates right away. I used the center ones to create the center for the gold doily card and impressed the design onto the letterpress paper, then trimmed it to fit inside my folded doily. (Folded the edges of the doily, inserted the center letterpress paper that I embossed, and tied around the whole thing with the twine from the kit. I added it to a card base.) I also used the larger impression plate on an envelope! Really love how it looks and can't wait to do this to all my envelopes. Not sure why I never thought of this before.

Here is what the center of the doily card looks like. I used the gold ink pad in the kit to stamp the sentiment.

This is the impression plate and insert I used from the kit on the card above! There are actually 3 different impression plate inserts and also a plain one that cuts, so you can die cut the center out of a card, even if you aren't using the large impression plate with it. So awesome and soooo many possibilities! By the way, the letterpress paper in the kit is AMAZING. So thick, it impresses so beautifully. Really makes a professional looking card.


Here's another look at the envelope. (Envelopes are not in the kit, but I couldn't resist trying this plate on envelopes too!)

______

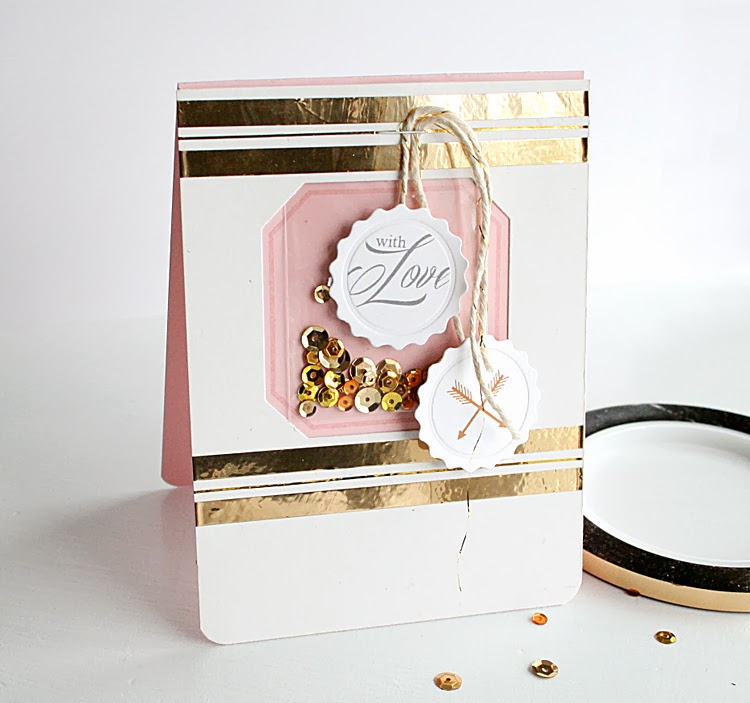
On the next card, I used the gold foil tapes, large and small to create these stripes on my card. I used the center die to die cut a hole in the front of the card and backed it with Sweet Blush cardstock. I stamped the center frame with the kit stamps, then I added a little bag of sequins in the middle from the kit. The bag is the one that the skinny gold foil tape came in!

Last, I used the seal die with the free download in the kit to cut these adorable seals!! They are simply attached to twine from the kit and stapled onto the card front. It's hard to capture in photos, but the twine has a beautiful gold running through it.

Speaking of seals, look at all of these seals you get to make, and it's a free download, so you can keep on making them whenever you need one with this amazing seal die! On the gold star one, I cut the seal shape from the gold paper in the kit, then popped the star out with a circle punch and placed it in the center for a layered seal. Or you could emboss on the gold seal! The foil paper would work well for that.

______

My last card is embossed and stamped with a feather added to the front. Simple, but so elegant for a wedding.

Had a hard time photographing today, but the impression is really, really nice and deep on my card. Here is the plate I used in the center, and stamped it with the kit stamps. Placed it over the top of the card.

Here is a little better view of the nice impression in this really great quality letterpress paper!

Don't forget to grab a Luxe kit on March 1st before they are gone! 
Visit the Make It Market team to see more with this kit: Betsy VeldmanDawn McVeyHeather NicholsMelissa PhillipsNichole Heady.

Monday, February 24, 2014

Inspired by watercolors...

Hey, everyone! After my last post (Design Team Tips) and working with watercolors, I was very inspired to play around with them some more. Of course, Pinterest helps too with inspiration. I started a new "watercolor" board on Pinterest and just can't get enough of the watercolor look! And ended up making this....

To dress up the envelope, I used the Envelope Liner die by Papertrey Ink and die cut it out of watercolor paper. Then just painted lines on it with my watercolors. The watercolor paper I bought is called Artists Loft from Michael's, and I think it was only about $3 for 24 sheets on sale. It's much thicker than cardstock, making it great to work with when working with water. It doesn't warp like cardstock would. When dry, I tucked the painted envelope liner inside the envelope and adhered it. Love how this quick technique customizes the envelope to match the card!


Now onto the card. I was inspired by this image I saw on Pinterest. I started by penciling out my image onto watercolor paper. Excuse the photos, as I was taking them with my phone as I went.

Step 1: I drew my image in with pencil onto watercolor paper. (If you aren't a sketcher, you can always use stamps...stamp an image and paint them in with this same technique!) When happy with my penciled image, I start painting. I always start painting with a lot of water and a little bit of color. You can add deeper color as you go, but start off light at first for the base. Here I've used red for the flowers (when mixed with water, has a pink tint). I mixed blue and green to get this shade of teal for the banner.

Step 2: I've painted in the flowers and leaves very lightly. I've also taken a really light yellow and shaded around the entire image.

Step 3: I've added some darker shades of watercolor (using less water) over the top to add more dimension.

Last, a "Thank you" was stamped with Papertrey Ink's Think Big Favorites #2 after the card was dry.

I'd love to see what you are making with watercolors, please leave me a note if you do make something "watercolor" inspired!

Thank You Watercolor card and envelope:
(All supplies by Papertrey Ink unless otherwise noted.)
STAMPS: Think Big Favorites #2
INK: True Black, watercolors
PAPER: Artist's Loft by Michael's Stores (watercolor paper pad), envelope by Papertrey Ink, white cardstock
DIES: Envelope Liner die
OTHER: none.